Showing posts with label The Old Quarry Line - 009. Show all posts

Sunday, 1 January 2023

Highlights of 2022

On the face of it, 2022 seems to have been a quiet year modelling wise for me, at the end of the year it doesn't feel as if there is anything to really reflect on, but as I browse back through the photos I realise it hasn't all been that bad!

The Bungalow

Started in 2021, completed in January, an Airfix/Dapol conversion in 4mm scale built with no real purpose but to 'do'. Interestingly this inspired one of my modelling 'hero's to do a similar conversion, and I'm flatered! I still have it, one day it may feature in a layout or diorama...


The 'Big Tree'

Encouraged by my friend James Wells' work for the NRM's O gauge layout, I reworked my prototype wire-framed tree into a half-relief model with the hope that it would move forward a layout project. Completed in April, it hasn't achieved that but I still have it, awaiting it's moment...


Little Red Number

Restarted earlier in the year from a stalled project, again completed in April, this model of nothing in particular (sorry, The Smiths are playing on the radio...) is one that I am particularly proud of, capturing the spirit of a mid 20th century 15" gauge loco.


'Old Quarry Line' Scenic Re-work

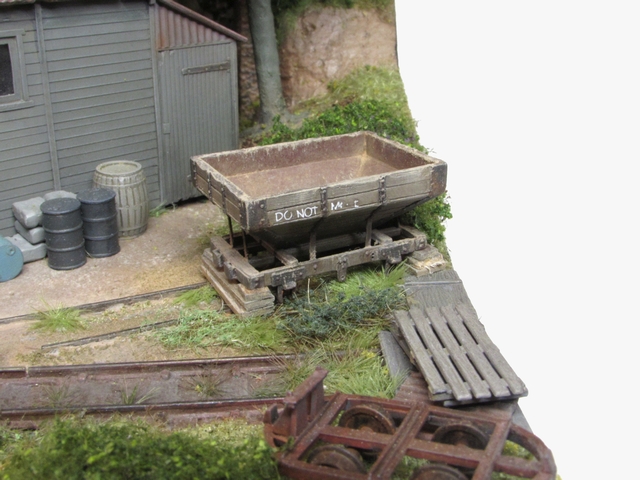
Totally unexpected, as I was meant to be re-working something else instead! I wanted to reuse the scenic materials removed during reworking the big tree and another project, creating new layers of undergrowth and adding another reworked Hornby tree. 


In addition a new dummy siding was added that became host to a much modified Dundas Snailbeach hopper. I completed a running example too, plus a Peco one was received at Christmas...
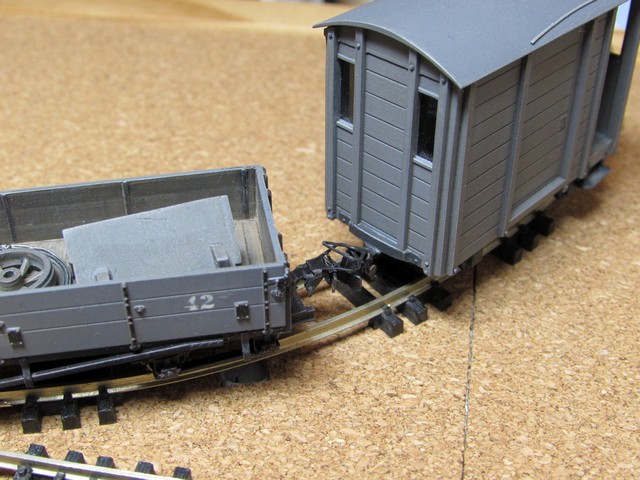

The White Rose

Having been received from A1 Models back in February, this 3D print finishing project was not completed until October, I have to admit I fell out with on more than one occasion, but perseverance paid off in the end to a satisfactory result, although a few further changes have not been ruled out...


The Tramcar

Another February generated project, but one that had a lot of thoughts and doodles behind it by the time it started. Very much a nonsense project it is currently in the latter stages of assembly post-paintshop, the full reveal will hopefully not be too far into 2023...


Almost 'Albert'

Another A1 Models build but with a lot of changes to better reflect it's inspiration (largely because I know the chaps that built it!). Livery and real name to be determined very soon, watch this space!


There were a few other projects in the course of the year that I haven't mentioned here, including numerous wagons and another tree. But all in all it doesn't really add up to a massive amount of creation. I look on at other modellers rates of production not with envy but awe at what they can output, but have to remember that we all have different circumstances, resources and amounts of time available. I cannot even pinpoint 3D printing as a reason people can produce more, despite those who claim it isn't 'real modelling' (whatever that is), designing the print takes skill and time, and even after printing cleaning up, preparing for paint, painting and finishing still takes time and real skill. I have to admit I prefer other mediums, one of the reasons 'The White Rose' took so long was the 3D print's limitations, but that is a personal choice rather than a prejudice.

In O9 ready-to-run isn't an option, one of the reasons I keep an hand in 009 is that it does allow the odd dabble in "instant satisfaction" and the ability to receive the odd gift of a wagon etc. I'm torn on the Bachmann Quarry Hunslet, I'd really like one, I can afford one but only as a one-off treat. But would it eclipse my Minitrains-based locos that I've put work into to make unique? Decisions, decisions...

Happy New Year to all readers of O9 Modeller.

Colin


Saturday, 10 September 2022

Do not move - an abandoned wagon in 009

Abandoned wagons are a theme that I seem to return to from time to time, there seems to be something quite intriguing about a vehicle that should have a purpose, sitting idly doing nothing, perhaps forgotten by all but the keenest observers.

This 009 project was inspired a rebuild of the new RTR Peco Snailbeach wagon that featured on the NGRM Forum where the top of the hopper was altered from three planks to a two-planked version. My interpretation uses my second Dundas kit, with appropriate modifications to the top sections of the body. On the underframe I carried out the same frame end modifications as my operational example and wishing to create a wheel-less wagon up on blocks, I removed the axle boxes by making a horizontal cut with a fine razor saw across the top of the axlebox, then a vertical cut up behind the axlebox leaving a flat piece behind. The pin-point was then drilled out from the back and opened below to create a slot, which I neatened with a file.


Having removed the original mouldings before reworking the underframe ends, I added new bumpers either end from Evergreen channel section, and all the strapping between hopper body and underframe, a fun job if ever there was one! Rivet/bolt details carefully cut from the discarded top plank sections were added to detail underframe end strapping and holes drilled to represent mountings for the vanished brake lever. After final cleaning up it was given a scrub up ready for painting. 

A coat of primer brought all the elements together and revealed little need ready for further treatment before moving on.


I'd give a step by step account of the paint job, except that I laregely just made it up as I went along and didn't have time to take photos...

To summarise, I started with washes of Citadel 'Nuln Oil' and Penhaven weathering paints, followed by dry brushes of wood colours, light greys etc and further washes to tone different areas. I then masked-up and painted the metalwork in Vallejo black-grey. That was followed by another wash using a brown shade and more dry brushing. The interior was treated to various shades of rust, some stippled using a stiff brush, representing the metal lining of these wagons. In a sense this was all pre-weathering for what would follow.


In order to set the wagon onto 'The Old Quarry Line' I created supports from a couple of different coffee stirrers and squares of Basswood strip. These had a wash of 'Nuln Oil', a brown wash and were then dry-brushed with a beige/grey shade. After drying they were glued together to create the support stacks. They were them glued and weighted in place on the layout.


Before installation the wagon acquired a significant amount of 'grot', in the form of paint and weathering powders. Again, no step-by-step but a lot of the load remnants are a mix of acrylic paint and filler, stippled in place in the base of the hopper and around the top edges, and on horizontal surfaces of the underframe. To this was added sand and earth weathering powders to add to the colour and texture. On the black ironwork I had previously added a few areas of Citadel 'Typhus Corrosion' paint and I added some rust colour weathering powders in these areas - all very subtle! The somewhat ironic 'Do not move' inscription is from an old Replica Railways sheet of chalk markings - it didn't rub down correctly but that adds to the effect. Once the stacks of wood were firmly fixed in place on the layout the wagon was fixed in place on it's perch.


At the far end the wagon is slowly starting to vanish into the undergrowth, I had to re-arrange the bushes a little to push the wagon closer to the baseboard edge to create enough clearance at the end of the operational siding. I think this scene is closer to what I had in mind here when I added the disconnected siding, the Penrhyn Fullersite wagon looked far too useable to be in there and will be recycled into the operational fleet.

I am pleased with how this project has turned out from a kit that was likely to have become a source of 'bits' and is now the generous donor of a spare set of Greenwich wheels!

Colin

Saturday, 6 August 2022

More Makeovers (Red is the new Grey)

Not so long ago I realised that my 009 stock was a little bit, well, grey in colour. The main reason for this on the kit built stock is pure laziness on my part, working the colours up from primer grey. In the case of my modified Dundas WHR brake van, it is also a symptom of hurried completion to meet an exhibition deadline. With it's seasonal use on 'Christmas Tree Halt' in mind I decided to give it a bit of a makeover... 

As the dedicated Christmas wagon is green, the obvious other Christmas-compatible colour is red, but not too bright a red. The ideal colour came in the form of the Citadel 'mephiston red' as used on my recent O9 loco. The intention was to just repaint the grey areas but in the end the only original paint remaining is the roof and veranda floor. These areas were masked off, the grey areas sprayed with red primer and then a couple of coats of the citadel colour applied.

I had also masked off the axleboxes and underframe but the black-grey that looked fine against the light grey body colour now looked too light, so I repainted these areas in a darker shade, using the same shade on the bumpers at either end and the steps. A wash of Citadel 'nuln oil' over the red sat nicely in the plank lines and door recesses, although some dry brushing of the body colour over the planks was needed to get the desired effect. Feeling the red needed breaking up I added numbers either side from an old dry-print sheet of GWR locomotive lettering.


The Meridian Models TR brake handle had been removed prior to repainting and was reinstated prior to varnishing with Humbrol matt acrylic. For the first time in ages I experienced 'blooming' of the varnish coat and had to again dry brush the body colour over in places. The lamp and guard figure were glued in place and the roof (and integral partition) glued back in place, and finally the wheels added and couplings refitted. 

In other makeover news, I have been able to complete the area under the new tree on 'The Old Quarry Line'. 


Filler was used to create an impression of the roots and once dry the new roots, trunk and lower branches were painted, attempting to match the Hornby colour. You cannot actually see the roots now as I have cleared the grass away and added a small area of treated coir hanging basket liner before adding more recycled foliage material.


On the other side of the layout I have added a felled tree trunk, actually the remains of an early home-made tree I started during the construction of the layout. This wire framed tree was chopped at the roots and branches using a cutting disc in a hobby tool. Some touching up of the cuts with filler and paint was required to complete the cut timber "look".

There may be a few more additions or changes to make in due course, watch this space...

Colin


Sunday, 17 July 2022

Summer Scenic Makeover

I had been planning to give my O9 diorama 'The Headshunt' a scenic refresh and to create a storage box for it, but rather unexpectedly I have ended up giving 009 layout 'The Old Quarry Line' similar scenic  treatment. Whilst this had been on the cards it has well and truly queue jumped! 

This started one idle weekend moment I was looking at ways that I could add an abandoned siding to hold a couple of wagons, potentially around the curve at the left-hand end of the layout. Common sense eventually prevailed and I opted for the more reasonable location in the yard alongside the workshop building. Two channels were cut into the existing scenery and blackened/painted rails placed within, held in with PVA and bedded back in using DAS stone modelling clay. Once dry this was blended in with various paints, fine turf scatter and Silfor grass tufts. The Meridian Penrhyn Fullersite wagon has taken up residence, in the past it lived at the end of the main siding . This will be fixed on place using a wire wound around the axle, through a hole in the board and secured below. It would have been glued by now if the subsequent days weather hadn't been so warm.


Suitably in the swing of things I decided to look at refreshing and enhancing the scenic treatment of the layout using materials that I didn't have available at the time of the build, including coir matt hanging basket liner, Peco 10mm tufts/strips and Martin Welberg tufts. One area that received new additions was the area around the drain outlet. The new areas of vegetation were created using the coir hanging basket liner, prepared off-layout by being teased out, sprayed with hairspray to fix and when dry sprayed with two shades of matt brown paint. This was glued in place on the layout and once the glue was drying, sprayed with hairspray again and foliage material added. This was actually the original material recovered from the two trees that I re-worked earlier in the year. Further hairspray and other layers of scatter were added to add variation and a small patch of Woodland Scenics purple foliage - another recent purchase!


Looking around the curve I have added the Peco long tufts around the bottom of the fence and on the opposite side of the line. In places I cut the strips lengthways, sometimes a tough job as the glue layer can be quite thick. The skip body that used to be by the workshop has now moved here, with the vegetation encroaching over it. Additional vegetation is provided by the dark green Martin Welberg tufts.


On the far side of the layout there is a new tree located on the embankment. In line with three of the other trees on the layout this is a metal-framed Hornby Skale Scenics tree - R8907 Oak. This was purchased last year with the intention of maybe using it on a 7mm scale project, where it would represent a small tree! This has been glued in place but not yet blended in, I think there may be more vegetation to go in around the base. I did add some additional foliage using hairspray and Woodland Scenics loose material in a close-enough shade. Some areas around the middle of the layout have been enhanced with more areas of the coir hanging basket liner and recovered foliage. The Snailbeach hopper seems quite at home, the other kit may yet see the light of day in one form or another!


It is always good to revisit scenic projects from time to time to update the materials and techniques used and to refresh tired areas. There are still a few jobs to do here once the weather cools a little - the workshop is rather hot at times lately making sitting in the shade daydreaming/planning a nicer option!

Colin

Sunday, 10 July 2022

Slidin' down to the Workbench

Picking up from where the last post left off, the shelf riser is now varnished and in place above the workbench. A slide-in box has also been created that sits within. It lifts out to sit on the desk whenever modelling is envisaged. This is constructed with a 5mm ply base and 3mm sides, which use the same recycled material as the top and bottom of the riser.


The slide-n box performs two useful functions, firstly holding the 'Really Useful Box' that holds my smaller "essential" tools, and on the other side of the divide provides a space for "work in progress" projects to be stored between sessions. In the past I had simply left both the tool box and anything in build on the work board whilst it was put away, so the new box is essentially part one of its replacement. Part two is a 3mm MDF board to act as a desk protector, this was coated both sides with  a couple of coats of emulsion and has a trim strip along the front edge to prevent it being pushed backwards.
 

All far to clean so I have now actually done some modelling on it before giving in to the heat. However, before I go into any detail there is the matter of investigating this recently unearthed archive photo which appears to show the presence of hitherto unknown abandoned rails buried in the yard by the 'Old Quarry Line' workshop...


Colin


Tuesday, 1 February 2022

Snailbeach - at a Snail's pace!

I received a couple of Dundas Snailbeach wagon kits as a Christmas gift from my Dad after I mentioned that I might get a couple of the Peco ones when they came out. What I had forgotten to say is that the reason I was interested in them was based on them being RTR and that the kit had something of a "reputation"... 

Between Christmas and New Year I started to build one of the kits, which has been an interesting build process to say the least. Any hopper wagon in kit form will be tricky, more so from what must be among the oldest moulds in the range. I probably took away too much material on the insides of the joints, you can see some of the styrene strip infill on the inside. A few mistakes have been made, such as scribing plank lines into the inside of the upper sides, thinking the old tooling just didn't feature them... before discovering that the real wagons had metal linings, and having to fill the lines back in! 


I paid particular attention to the ends of the chassis, refining the shape, adding a 5 thou overlay wrapped around and adding new bumpers from Evergreen channel section. I have added some deliberate distressing on some of the planks and some very dubious looking brake gear, with the proviso that it isn't a Snailbeach wagon but one supplied to the Old Quarry Line. 

One area where I did make a change was at the left hand end of each upper side, trimming the corner plate back by approx 1mm to line up with the plate on the angled section and also making each end section equal in length. I have had to add new bolt heads harvested from another Dundas part that was redundant. All painted up in primer it looks OK, and you can see some of the distressing I added to the planking. 


Wanting a finish that would differ from any future RTR companions I applied a weathered wood effect, including some planks in "wood" colour and some in grey, black-grey and brown washes. The ironwork has been painted black-grey with brown/rust washes. The interior metal plating is finished in a base rust colour with various stippled effects. The hopper is seen here after varnishing but before weathering.


Once varnished the additional weathering and finishing work was completed. This is largely dry-brushing on the exterior using a grey/cream colour in an attempt to represent a wagon that has been in a quarry environment, along with some gunmetal dry-brushed on the axleboxes.

Unfortunately the lighting has picked up the plank lines I scribed and thought I had subsequently filled, you cannot really see them at normal viewing distance.


Inside the wagon I have added a representation of load remains, starting with the leftover mix of the acrylic paints used for the dry brushing and a dab of household filler. Once dry weathering powders were added to vary the colour a little and spread the effect further up the wagon sides.


Greenwich couplers have been added at ether end, I could perhaps have moved them in by another 1/2mm but wanted to ensure that the loop did not have any interference from the bumpers when lifting.

No doubt the forthcoming Peco model will be quicker to get into service, but a lot less individual!

Colin


Friday, 19 February 2021

Pizza Ponderings 2 - Square Pizza

There used to be a pizzeria locally who's trademark was square pizza. I suppose it is better box space utilisation if nothing else... 

Curious I took the estate scene pizza and translated it to the same 13 x 19" board size as my 009 scene 'Old Quarry Line', retaining the 5" radius curves of the pizza but adding in a straight on each side allowing a short siding to be incorporated.


Having checked with a full size plan the siding would probably have to be curved in reality, but it just about fits. Overall the scheme reminds me of some of the micro layouts that James Hilton has built over the years, more recently in OO6.5.


At 13 x 19" is isn't much smaller than the 15 x 24" of my stalled corkboard scheme but it seems a very different style of scene. All this thinking is leading towards how this project could be restarted and as part of that process I have revisited some older sketches made during the development of the 'Misterton Fen Tramway' scheme (another square pizza) to see how I tackled issues such as the line vanishing behind the buildings and through the hole(s) in the sky.


In the scheme above a tank on brick piers, and a simple block structure hide the exits. The tank was the focus of my attention, I think it was envisaged as Knightwing on scratch built piers but could easily be fully scratch built. In the scene below the all too familiar hut appears!

Eventually a full size mock-up was made, by this stage I had actually extended the board a little at either end. A combination of structures and trees would hide the exits reasonably well.


Ideas are now starting to fall into place and thoughts are turning to how the corkboard inspired scheme can be taken forward...

Colin


Sunday, 8 March 2020

Gmeddling About in 009

Prior to exhibiting my 009 pizza layout 'Old Quarry Line' last July I quickly reworked a Minitrains Gmeinder as a spare loco. I had limited myself to replacing the bonnet side vents with a MG Models etch and altering the cab doorways a little to lose the door one side and add a canvas side sheet and wooden planking on the other. This was the result.


It was only meant to be a temporary work-around but I've grown a bit attached to it. However, the cab sides were still jarring a little, they just didn't look like they belonged on a Feldbahn locomotive...

This is where a recent O9 project came into play. I realised the etched cab sides from the 009 cab on the A1 Models test-build did have a slightly Feldbahn-esque look to them. This is the etch as seen on A1's eBay listing.


Offering them up they were a little too wide and a bit too tall, but setting to I managed to cut them down to size, re-drilling the bottom handrail hole as the original was lost in the cutting. Having added the handrails I then realised the real thing would most likely have shorter rails to allow for a removable cab top, so I removed them, re-drilled and re-soldered them in place. Then came the moment of truth, the cab was carefully removed from the Minitrains loco and bathed in 'Super Strip' to return it to bare plastic to make the required changes. With detail removed and sanded flat I was able to Araldite the new sides in place.


Milliput was used to fill the gaps between the etched sides and plastic parts, being careful to try and retain the rivet details on the ends. I opted not to add a split line horizontally on the cab sides/ends to represent the removable cab top. Even so, it now looked a lot more like a Feldbahn locomotive despite still being a very much a freelance interpretation

Painting then followed, I have managed to match the weathering (what little there was) to the original paintwork on the bonnet and I'm really happy with how the cab corners look, the time spent carefully filling and sanding the join has paid off with the rivet detail intact.


The original driver, already much modified from a Dapol example (largely flattened on the other side) has had further surgery to cope with the new door layout. Having infilled the old door opening to the right with styrene before adding the etched sides, he has had a chunk taken out of the back of his right arm and leg to accommodate this (and a chunk from his left arm too). He now sits in such away that it highlights the thinness of the cab sides at the door opening. He is also now an integral driver, securely polystyrene cemented into the cab side rather than relying on glue under his feet!

On the other side of the cab the original canvas cover have been resized to fit the new opening, with planking retained below


Before reassembling the cab onto the loco I was able to resolve the issue of less-than-perfect running I had encountered with the loco, eventually resorting to having the wheels out and tweaking the pick-ups a little. I was also careful to replace the glazing in the rear window with thinner material as there was evidence of the flywheel making contact with the old window.

Colin

Saturday, 7 September 2019

Greenwich Couplings for 009

When I started my 009 project 'The Old Quarry Line' the idea was that it would be largely RTR based to take advantage of the new products coming from Peco, Minitraine and Bachmann. This had been diluted by the chance winning of some Meridian Models kits courtesy of Narrow Planet and then the need for a brake van, which I converted from a Dundas kit. Both of these had received the Peco style coupling but I was becoming a little unhappy with these on such small items of stock. Also, I wasn't too happy with the Bachmann couplers poking out of my WD open wagon.

As I was ordering a few pieces from Narrow Planet, including a cast brass brake handle for the brake van, I added a pack of Greenwich couplers with NEM pocket fittings to the order, and a pack of magnets. An hour or two of bending brass later both the WD and van were fitted with couplings and ready for testing.


I reconfigured my test board from the 6" curve experiments to include a point and two sidings to test the couplers and magnets. Satisfied I then curved the diverging line to 4.5" radius to mimic the 009 layout. I had feared the couplers wouldn't uncouple but the bogie mounted coupler on the WD open tracks very well and the brakevan isn't too bad (and they work equally well the other way around).


Pushed back over the magnet into the curve they re-couple as well as expected (especially with my slightly ham-fisted assembly!)


What I haven't really been able to do yet is test them fully around the circuit, I have a feeling there might be an issue with the loops but that could be resolved by going to a single loop per vehicle, we shall see...

Although I have stuck rigidly to MicroTrains couplers in O9 they do have issues with coupling on gentle curves let alone anything this tight, so I'm keeping an eye on this experiment from that perspective too as part of any future layout planning. Although the Greenwich couples are more time-consuming to assemble they are just about as fiddly as MicroTrains!

Colin

Thursday, 29 August 2019

Downsized Diorama

Before restarting work on my 'Beck Bridge' diorama I had completed one of my 'microramas' as an O9 scene incorporating a wooden barrier and some experimental treatment of the grass at the edges of the ballast to look as if it had been weed-killed, a technique I then reused on the larger scene.


Something never quite felt right about this scene, it never gelled in the same way previous efforts had and I wondered what could be done with it to bring some life to it. Eventually I opted to rework the scene in a smaller scale with new details as a base to display items of my 009 stock.

I removed the wooden railing and larger plants and carried out a little reconstruction of the surfacing, filling in the post holes and also scraping back some of the grass to be replaced with basic ground cover. New grass was planted along the edges of the track over the yellowy grass used before, I think there is less chance of weedkiller on this line! The ballast was also coloured using weathering powders to tone it down a little.


Various items were prepared and painted to add 4mm scale detail to the scene. These are mostly slightly modified proprietary items, the fence being Ratio, oil drum Modelscene, the box Knightwing and the sleepers Peco. The WD bogie is a much modified Parkside example that came my way as a 'freebie'. It has had a fair bit of reconstruction using Evergreen 1.5mm channel section and 5 thou styrene using photos on Dave Enefer's website as a reference.

Detail positions were carefully considered, I didn't want to impede the view of the chosen locomotives and stock, in this case 'Isla' and the Penrhyn quarryman's coach.

I am much happier with the revised micro diorama, but that is not a reflection on the change in scale, more a realisation that the original was pitched wrongly....

Colin

PS, whilst I think about it, I know that technically the diorama hasn't changed down in size, but the scale has.... 

PPS, it now represents a bigger area so it is in fact actually bigger. I think...


Sunday, 14 July 2019

Dioramas on Display

Yesterday I displayed my two larger O9 dioramas at the 009 Society members day in Mansfield alongside 'The Old Quarry Line'. Here everything is set up and ready for action, the layout sat on it's box and one of the dioramas on the cardboard box I had created to carry 'Beck Bridge' in.


Days before the show I assessed the lighting options for the layout, having purchased two Ikea Jansjö lights that I had planned to clip to the box itself. Realising more height was required I fashioned an upright from a spare piece of timber and I opted to paint this in a black finish. Time was running short and I actually hung the timber from the washing line with a piece of wire and sprayed it with a Halfords matt aerosol...

A bonus was being able to mount the second light to illuminate the dioramas on the upright. 'Beck Bridge' was home to my pacific  and a Chivers coach...


Whilst 'The Headshunt' hosted the Exmoor tank and the recent works coach.


Interest in the layout and the dioramas exceeded my expectations and I was on the receiving end of many compliments and dodging out of the way of cameras (no-one wants a checked shirt backdrop to their picture!).

With everything packed away at home, the next day I ventured coastwards to see a pair of real Exmoor locomotives, but I'll leave that for another time...

Colin

Tuesday, 2 July 2019

Cornered

I've been carrying out some tests as part of planning for (potential) future projects in O9. Looking at what I have achieved in 13" x 19" in 009 I am keen to see if something similar is possible in the larger scale in a just little more space. My 009 layout 'The Old Quarry Line' uses a 4.5"radius curve and I know that most of the O9 locos struggle with this, especially longer 4-wheel ones as it throws the couplings too far out on the curves.

So I laid a 6" radius test piece, added power connections and had a play. With diesel testing out of the way I decided to see if 'St Edwin' the Exmoor 0-6-2 could cope with it...


This is probably the limit this loco should go down to, and probably not something I'd want to see in a visible part of a layout, as the swing out is noticeable. The couplings are almost at their limit here on both loco and wagon but it does show the flexibility of the MicroTrains design.


I then relaid the curve to 5.5" just to see what happened... 

Colin