Pages

Sunday, 24 April 2022

Finished Business - a 15" Workhorse

Last seen a month ago, things have moved on with my O9 4w internal combustion loco build with it emerging from the paintshop. I'd say resplendent but it is clearly a little way from it, being finished in a work-a-day style befitting of a little workhorse, even on 15" gauge.

The first step was a coat of grey primer, allowing identification and rectification of any issues. 


Once tidied the grey primer was overcoated with Halfords red primer as a basis for a red livery, the chosen colour being Citadel 'Mephiston Red' (lighter I believe than the old 'Scab Red'). It is unusual for me to brush paint a loco but on this occasion I gave it a try. Three even coats were required, with a day between coats to dry and very light use of dry 1500 wet and dry to remove any blips in the finish.


The buffer beams were originally going to be yellow with black chevrons, to the point of being white primed and sprayed yellow! But I realised as this may need to represent a machine being used in the 1960s such things had not really reached the minimum gauge at that time so after rubbing down red primer was applied and three coats of Vallejo red applied instead.

The underframe areas are finished in an off black, black mixed down with brown to make it less "black". I had originally used Vallejo black-grey in this area but it looked wrong, although this colour did form the basis of the cab roof.


The headlights were painted off the model and given a fill of Araldite after vanishing. The whole model was sprayed with Humbrol matt acrylic aerosol varnish, taking care to pick a good day weather wise over Easter and not to over-coat whilst wet, which inevitably leads to blooming in the finish. As well as adding headlights after varnishing, the air horn was also added, being pre-painted from a previous life on SMR no.3. The cab front windows were glazed with 20 thou material, held in place with Johnson's Kleer. This is a single piece of glazing so I resorted to using a window weathering colour on the inside of the cab to hide any reflections from it, carefully removing paint from he inside of the portal windows with a damp cotton bud.

Weathering relies on washes and dry-brushing. I'm still experimenting with Citadel 'Nuln Oil' as a wash, using it on the bonnet sides around the doors and louvres. Dry brushing included a lightened body colour on edges of the cab and bonnet and some muck etc around the running gear. The final job was to fit Microtrains couplers, and on finding no built 1015 examples in the box I assembled the last three sets in a pack to build up stock and fitted one set to the loco, blackening the screw head and exposed thread. The visible parts of the shiny coupler boxes benefit from a matt brown wash to tone them down.


With the driver installed, set in place with Tacky Wax, the loco is now complete and ready for running trials. I have not added any weight as yet as the new style Kato chassis is an unknown quantity for me.

Colin


Thursday, 21 April 2022

Tree One - Completed

The half relief tree, also known as 'Tree one' is now complete.

It was a surprise to find that I have used a whole packet of foliage on 1/2 a tree! Towards the end I was getting worried I'd run out as the edge of the foliage mat was quite thick, rubbery and unusable. However, I was able to get all the foliage in place, including additional layers where desired for both appearance and to cover any gaps

The whole tree was then given a waft of hairspray and the loose contents of the bottom of the packet of foliage were sparingly sieved over to add a final layer to the foliage. I was very careful here not to overdo it. A light coat of matt varnish was then used as extra security and to remove any hairspray shine from the trunk, branches and foliage.


I do rather like that gap through the leaves where the big branch is exposed. I may have to consider adding wildlife of some sort here, maybe a couple of birds or even a squirrel. By some unplanned act this same area is actually visible from above too.


One final addition was a run of ivy up the trunk, this uses MiniNature oak leaf foliage carefully PVA glued in place and then sprayed with matt varnish to kill any shine. I've tried to be economic with material as it isn't cheap, but also to not overdo it.


I'm rather pleased with it, I was asked by family how long it all took, and I have no idea, but somewhere between 10-20 hours would be right including the original frame creation last year. Unlike the original build that lived on a shelf in the workshop, the Mk2 version has been swiftly placed in an adapted box ready for future use.

As for 'Tree two', that may have to wait until the layout progresses and the foliage is restocked!

Colin

Saturday, 16 April 2022

Tree Painting and Foliage

I have now worked up the colouring of the tree from the base colour of the DAS and bark mix. Sorry there is no step-by-step pictures but the process was fairly simple:

  • Overall wash of Citadel 'Nuln Oil', with a spot of water added in places to help it spread out. This darkened the tree to a dark grey, and was left to dry overnight.
  • A misting of Humbrol dark brown (29) from an aerosol, this isn't that dark, but a misting adds a nice beige effect to the mix.
  • Dry brushing with a mix of Vallejo colours, notably grey-green, London grey and WW1 beige. This varied in different areas of the trunk and branches.
  • Stippling with a stiff brush and the colours above, especially on the smoother branches to give an effect of texture.
  • More stippling concentrating grey-green and additionally yellow and off-white into those areas that might have a high traffic of birdlife, creating the effect of moss and guano!


The next step was to start to think about adding foliage, where I felt that I would need to improve on the original to add more depth to it. The original had used Hornby Skale Scenics mid-green foliage and despite having removed this for reuse the stiffness it now has from hairspray meant that it would not be reusable on this tree. New material from the same pack  was used but having got around several of the lower branches I was not too happy with the result, feeling it looked too flat and matted. I ended up taking it back off again and having a rethink.

Posing some Woodland Scenics mid-green material on some of the branches this looked a lot better in terms of texture but was a lighter colour than I desired. I quickly ordered in some dark green material from Broughton Rail via eBay and applied this as a test over a few branches. I suppose in theory each branch should have it's own bit of foliage, some do, but others share with a neighbour depending on how the mood takes me. Material is teased out and trimmed of excess fibres before being glued into place with a run of PVA down the branch.


Working in short sessions the foliage has started to spread around the tree, by the close of play on Good Friday the lower branches of the tree all had cover. Taking a tip for a friend who has been making trees for the Railway Museum layout at York I have added extra layers of foliage in places which does accentuate the texture of the foliage.


A couple of further sessions saw the next layer of branches covered, working methodically around the tree to try and avoid any issues with not being able to access some areas once the foliage is in place in others, though being a half relief tree you can sometimes sneak in around the back!

With any luck the next time the tree appears here it should be all but completed.

Colin

Saturday, 9 April 2022

Tree Construction Continues

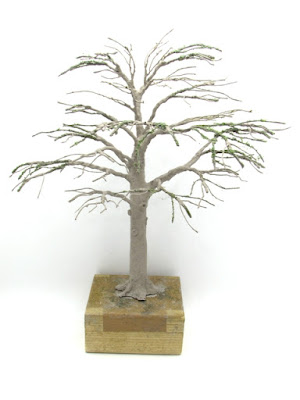
I'm making progress with the half-relief tree. I've bulked up the trunk using DAS Stone modelling clay, I still need to adjust the branches and then apply bark mix all over the exposed bits of wire frame to match the existing, and also to cover the DAS.


After a couple of days to dry out I was able to mix up a brew of my bark mix and apply it to the tree where required. The mix is formed of grey tile cement, PVA glue and light brown emulsion paint, with a spot of water added during application to keep the mixture liquid enough to apply.

The mix was applied over all new main branches that had not been included in the DAS stage, these were largely wire with some Araldite on them, the mixture blending everything together. The mix was also applied to all the new minor branches, both those added to existing branches and the newer ones, including the Hornby branches incorporated in the upper part of the tree.

The mixture was then thinned again slightly to work over the DAS areas, mostly on the major branches and the trunk. Here I was able to use a stiff brush to add some texture to the bark by both dragging and stippling. It is very subtle but can just be made out here.


The next stage will be to enhance the colouring, using the existing colour as a base and subtly working up from there. I keep having to tell myself that this is going to be a background item and not to look too closely at it, but it is difficult to do that when it is right in front of you!

With this tree now progressing thoughts have been turning to how a second tree could interact with it to disguise a fiddle yard exit, but I have to remind myself to take one step at a time...

Colin