Pages

Tuesday, 27 September 2022

A Tramcar Doodle

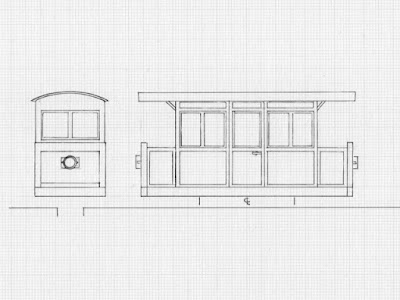
It seems like only yesterday, but turns out to be a number of months ago (four to be precise), I was looking at ideas to build an O9 railcar on a Kato bogie chassis. I had hinted at another design to come, which would essentially have been a pastiche version of my Dapol railbus conversions. That has not been drawn up, however with time on my hands I had another look over the various ideas and parts to hand and drew up something that ticks many boxes.


This is very much an evolution of the tramcar-like "Chivers Jubilee" design but actually incorporates the Avalon Line coach sides as well. The large windows would be split in two by the (scratch built) divider between balcony end and saloon. The ends are envisaged as the Chivers coach ends with the planking plated over, and the roof the Dundas VoR moulding. The chassis will be better hidden in this configuration and there is the potential to maybe have mesh panels in the end doors rather than solid, or even to leave them open if it looks OK and is strong enough.

A number of people had echoed my thoughts that the previous design was rather Volks-esqe, this continues that theme but is none the worse for it. I can envisage it jollying around sand dunes or in a private garden!

Colin


Saturday, 10 September 2022

Do not move - an abandoned wagon in 009

Abandoned wagons are a theme that I seem to return to from time to time, there seems to be something quite intriguing about a vehicle that should have a purpose, sitting idly doing nothing, perhaps forgotten by all but the keenest observers.

This 009 project was inspired a rebuild of the new RTR Peco Snailbeach wagon that featured on the NGRM Forum where the top of the hopper was altered from three planks to a two-planked version. My interpretation uses my second Dundas kit, with appropriate modifications to the top sections of the body. On the underframe I carried out the same frame end modifications as my operational example and wishing to create a wheel-less wagon up on blocks, I removed the axle boxes by making a horizontal cut with a fine razor saw across the top of the axlebox, then a vertical cut up behind the axlebox leaving a flat piece behind. The pin-point was then drilled out from the back and opened below to create a slot, which I neatened with a file.


Having removed the original mouldings before reworking the underframe ends, I added new bumpers either end from Evergreen channel section, and all the strapping between hopper body and underframe, a fun job if ever there was one! Rivet/bolt details carefully cut from the discarded top plank sections were added to detail underframe end strapping and holes drilled to represent mountings for the vanished brake lever. After final cleaning up it was given a scrub up ready for painting. 

A coat of primer brought all the elements together and revealed little need ready for further treatment before moving on.

I'd give a step by step account of the paint job, except that I laregely just made it up as I went along and didn't have time to take photos...

To summarise, I started with washes of Citadel 'Nuln Oil' and Penhaven weathering paints, followed by dry brushes of wood colours, light greys etc and further washes to tone different areas. I then masked-up and painted the metalwork in Vallejo black-grey. That was followed by another wash using a brown shade and more dry brushing. The interior was treated to various shades of rust, some stippled using a stiff brush, representing the metal lining of these wagons. In a sense this was all pre-weathering for what would follow.


In order to set the wagon onto 'The Old Quarry Line' I created supports from a couple of different coffee stirrers and squares of Basswood strip. These had a wash of 'Nuln Oil', a brown wash and were then dry-brushed with a beige/grey shade. After drying they were glued together to create the support stacks. They were them glued and weighted in place on the layout.


Before installation the wagon acquired a significant amount of 'grot', in the form of paint and weathering powders. Again, no step-by-step but a lot of the load remnants are a mix of acrylic paint and filler, stippled in place in the base of the hopper and around the top edges, and on horizontal surfaces of the underframe. To this was added sand and earth weathering powders to add to the colour and texture. On the black ironwork I had previously added a few areas of Citadel 'Typhus Corrosion' paint and I added some rust colour weathering powders in these areas - all very subtle! The somewhat ironic 'Do not move' inscription is from an old Replica Railways sheet of chalk markings - it didn't rub down correctly but that adds to the effect. Once the stacks of wood were firmly fixed in place on the layout the wagon was fixed in place on it's perch.


At the far end the wagon is slowly starting to vanish into the undergrowth, I had to re-arrange the bushes a little to push the wagon closer to the baseboard edge to create enough clearance at the end of the operational siding. I think this scene is closer to what I had in mind here when I added the disconnected siding, the Penrhyn Fullersite wagon looked far too useable to be in there and will be recycled into the operational fleet.

I am pleased with how this project has turned out from a kit that was likely to have become a source of 'bits' and is now the generous donor of a spare set of Greenwich wheels!

Colin