Thursday, 23 December 2021

Merry Christmas from O9 Modeller

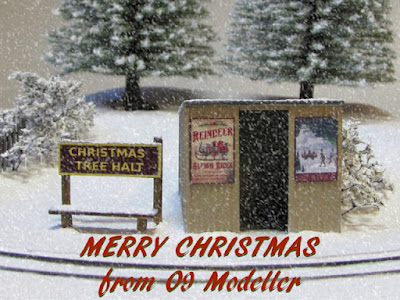
It's that time of year again, 'Christmas Tree Halt' sits on display in the living room as a little bit of entertainment and has also made an appearance in the third issue of the 'Micro Model Railway Dispatch' edited by Ian Holmes. You can download a copy here: MMMR Dispatch 3 

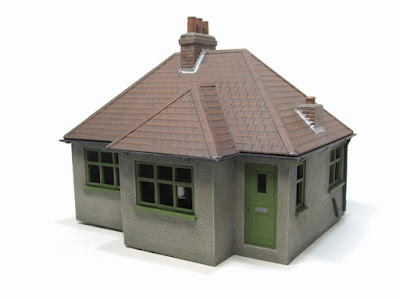
On the workbench the Dapol bungalow conversion has been receiving various paint effects, which have been transformational in how it appears. I will explain these in more detail at a later date, but at the moment it is awaiting a coat of matt varnish to seal everything in place. The Christmas period generally sees the workbench slow to a halt, so it will likely be the new year before this is applied.


Once back into the swing of things there will hopefully be some progress on a layout in one form or another. Until that time, I'll wish all O9 Modeller readers a Merry Christmas and a Happy New Year.

Colin


Thursday, 9 December 2021

Bungalow Bodgery

Years ago, back in primary school, our class topic was buildings. A friend of mine told a story of how he thought the Bungalow had got it's name, when housebuilders ran out of bricks and the foreman just told them to "bung a low roof on!" Whatever the truth, it came to mind when working on this project...

This is a project that doesn't really fit in anywhere in my longer-term plans but has acted as an effective time-occupier, having off and on for many months. It nearly got thrown in the bin earlier in the year and has only really come together properly in the last fortnight. The starting point is the Dapol C027 Detached House kit, this particular example having been acquired at a toy fair for a couple of quid.

Somewhere I had read that this kit could be converted to a bungalow and I was intrigued to have a go...


Aside from the obvious conversion to single storey, I have added a 3mm strip of material to the base of the sides, largely to give a footing that could be buried in the ground rather than to add any extra height. Elsewhere I have adopted a principle of refinement of the kit parts wherever possible. For example the chunky window frames were thinned by sanding them against a flat surface, then adding opening frames from strips of 5 thou styrene. The doors were given frames from Evergreen strip, and panel lines scribed in, door handles and letterbox etc added. Doors and windows are presently loose to aid painting (blu tac is holding them in place for the pictures).

One window on the right-hand end was made smaller as it conflicted with the chimney stack. This was nothing to do with cutting the kit down, even the original upper storey had this issue! The join can just be seen but I think paint will hide it.


The main chimney stack has a new top with Wills pots and a strip of Slaters bricks towards the top to add relief, the shorter stack is half size as I only had one half in the pack and had to double-up. This has a MicroTrains truck pin as a capped stack.

Working on the roof nearly ended the project, the moulding was poor with little lumps all over it, as does the one on the Dapol website so this may be a damaged tool. Sanding this smooth destroyed a lot of the detail and I ended up scribing it back in (not my greatest work). I also removed the half-row of tiles from the bottom edge as they looked ridiculous! This destroyed what there was of a gutter so guttering and downpipes were later added from the Wills building accessories pack. These are a massive improvement visually. The kit roof lacked any capping strips so these were added to all joints, scribed from 10 thou styrene.


Of course, in best DIY fashion, there are a few bits left over...


Some of these will go into the bits box, even those chunky window frames might come in useful somewhere as they are accurately moulded shapes. The more damaged bits of wall and failed modified windows are likely to go however, you cannot keep everything!

Colin

Friday, 3 December 2021

The best laid plans... can be changed

The appearance of 'Brooking Vale Brewery' in the latest 'Modeller has prompted some further thought about my stalled O9 micro layout project. Although the builder of that layout did not reference it, I was reminded of my source material, Julian Andrew's United Brick (Avalon Brickworks). I revisited this to see what it was that didn't quite gel for me, aside from issues about a credible scenario... I realised part of the issue might be that I had watered down one of the elements of the original (and many of it's imitators) by moving the inner siding towards the running line rather than it going towards, or even through a building in front of the backscene. Indeed I had physically moved it forward twice since the track was first laid.

I pondered what could be done if I swung the siding into a 6" radius curve and to move the Petite Properties structure to this location. So I drew out a 6" curve on good old cereal packet and also created a new mock-up of the structure as I realised it would look better reversed. By moving the bigger tree forward from the backscene it potentially hides the line running through the backscene a little better.


I have used part of the older mock-up to disguise the right-hand-side curve. I think I would actually go for a slightly taller, maybe wider, but definitely more bland structure here, possibly in corrugated material. The key to this structure appears to be that is should be seen but not to draw the eye to it, and the more I think about it the more the Petite Properties kit would not meet that criteria!


I still think I am some way off (re)starting this build. Whilst it remains an aspiration to complete it, having worked on the Christmas pizza and taking great delight in the simplicity of it, part of me yearns to do something quite simple and accessible for my next project, but I am not sure what...

Colin

Saturday, 20 November 2021

Santa's Gotta Brand New Sack

The presents in the open wagon on 'Christmas Tree Halt' were troubling my mind a few weeks ago. The reduction in size of the originals was the obvious solution at the time but part of me wondered if the eventual solution was to have a sack of presents represented in the wagon. I thought nothing more of it until I took a trip to a local model shop that is sadly closing at the end of the year (http://www.thegoodsyard.co.uk/). I was hoping to get some 009 flexi track but they were out of stock, however I did pick up a few bargains...


All were in the £1 box and being 7mm scale I was going to pop them in the "some day" box. I've no idea who NMB Models are/were, address on the back in is Immingham, but the more I looked at those sacks once I'd returned home the more it occurred to me they could be the answer to a present wagon load in 4mm scale. Even the smaller parcels might pass as presents if painted up in a suitable way...

In order to create the new load I started with a piece of 20 thou styrene scribed as a false floor, to hide the fact that inside the wagon it still has 7mm scale planking. I arranged the sacks to overlap, filling the area underneath the left-hand sack with Milliput, carefully shaped to match the casting. The parcel castings were cleaned up and used as larger presents (must be train sets and TVs!) to fill the gaps. I adjusted two of them in size to give a little more variety. All were placed carefully with the label hanging downwards.


After a coat of grey primer I gave everything a wash of watered-down Vallejo grey-black and once dry carefully picked out the floor planks in timber colour, and the sacks in a slightly darker red shade than the final shade. The presents were picked out in different base colours and then the actual red shade almost dry-brushed over the sacks giving a pleasing depth effect. the ribbon on the presents was picked out in Vallejo brass, as I had no gold to hand!


Once varnished the load was slipped into the wagon, it isn't glued in place but is a tight enough fit. I'm really happy with how this has come out, whilst the old present load worked to a degree I think this actually looks better and is more in keeping with tone and texture of the scene as it exists.


Colin

Wednesday, 10 November 2021

Christmas in a Box

Having spent the time to restore/rebuild 'Christmas Tree Halt' I decided that I would have to find a way of safely storing it for the eleven months that it might not be required. I was mindful of the fact that the damage to the original version may have occurred due to it being badly stored - I'll never know. 

Given that the trees are removable the easiest option would have been to locate a suitable 'Really Useful Box' but having looked at the options I would have needed an 11 litre box, and they were not available locally. It would also have involved a cost, and when you have a selection of materials to hand building your own box makes some sense...

There is a distinct recycling theme here, construction of the bottom half of the box used some 8mm ply from an old box that a friend passed on to me in January 2020, having held vintage car parts, in the days when things were packaged properly! The hardboard for the base came from the back of an old wardrobe disposed of when my daughter moved in January this year and the thinner ply diagonally in the corner and dividing the main box is some of the last bits of lovely veneered ply that came from a wardrobe disposed of many moons ago.

The lid is a further piece of ex-wardrobe hardboard with 25x12mm timber surrounding the edge, this was new material purchased specifically for layout-boxing, with the Avalon Brickworks layout in mind at the time. If I could have found some suitable material to recycle...

The pizza layout fits in neatly in the large compartment, and the two trees fit in the smaller compartment, retained by a system of trunk peg holes and special supports in the centre. The smaller compartment top-left is intended to hold the battery pack and any other bits and pieces that need to stay with the layout. I need to devise how the pizza can be padded into the space, it is deliberately not too tight a fit!

Along the back edge of the box can just be seen the two pieces of thin aero-ply that cover the encapsulated nuts that allow the lid to be secured in place. Holes were carefully drilled through with the lid clamped in place, then opened out from the inside to hold the nuts. The nuts were Araldited in place and the thin ply plates, with holes punched using a hole punch rather than drilled, were fixed in place as a belt-and-braces approach to stop the nuts falling through in the unlikely event the Araldite failed.

With the lid in place and secured the box ought to provide adequate protection for the layout, I just have to remember that unlike the covers for my other layouts that bolt to the baseboard, this one cannot be stood on end! All timber surfaces and hardboard edges have received a coat or two of yacht varnish to protect them from moisture and it has really lifted the appearance of the plywood sides.

Overkill, maybe... but I've actually quite enjoyed the build process.

Colin


Sunday, 31 October 2021

A White Christmas

I had unofficially set myself a target of getting the 'Christmas Tree Halt' rebuild completed by the end of October, lots of reasons but mostly to ensure it was completed for December! I think I might have made it...


Since last week's update the major change is that I have painted the snow. As daft as it sounds this is key to the effect that I am after, as I wanted a snow finish that was durable (i.e. not too much loose material glued down) and repairable (in case of sticky fingers). This is why I paid so much attention to texture at the filler stages... My method has been to use Vallejo 70919 'Cold white', thinned very slightly with water and with a drop of Vallejo retarder medium added, painted using a soft brush (to avoid brush marks) and as each area is painted a very sparing sprinkle of Deluxe Materials 'Icy sparkles' added. You cannot see the sparkles in the photos but they do glimmer if the light is right!


The Noch trees have been fixed to their barbeque skewer pegs and slot neatly into the tubes set into the scenery. In the foreground I have added the bare bushes around the fence and shelter, with a smaller patch to the right. These are largely recycled from last year's efforts, but broken into smaller sections and a effort made to make them look more like bushes than trees. These were painted with the Vallejo 'Cold white' for the snow effect and again some icy sparkles sparingly added.

Last year I had hoped to add some ribbon around the base of the scene to help emphasise the "decoration" element of the concept, but had nothing to hand and no time to go out looking. With more time on my hands this year I was able to obtain something suitable, I always knew I would probably end up in the craft section of Boyes for this but had not perhaps foreseen making the purchase in their Barnard Castle branch!*


The ribbon was attached using double-sided tape, it really adds to the effect of the whole scene "floating" as you cannot really see the black-painted supports underneath.

There is one more item to add in due course but all the work I wanted to do to bring the pizza back to life for 2021 is pretty much done. A few adjustments have been made to the wagon for this year, notably adding Peco couplers in place of the bent bits of wire it ran with last year, and adjusting the load to not look quite so over-powering (although they are still HUGE presents!).


Attention is now turning to safe storage, it isn't easy to create a box that slips over a pizza and bolts in place, so a box that accommodates the pizza and has storage space for the trees is now under construction.

Colin

*my eyesight is fine, thank you...

Saturday, 23 October 2021

Gimmie Shelter (and other snowbound detail)

I'm making progress with the rebuild of 'Christmas Tree Halt', with short bursts of work almost every day taking each step at a time.

The Wills halt building was primed and painted, ironically in pretty much the same colours it was moulded in, but the painted finish is much nicer in my eyes. The moulding dictates that there should be posters ether side of the doorway, so I searched online for suitable vintage looking Christmas themed designs. The chosen posters were reduced to size in Gimp and given the effect of a frame around them, then printed on glossy photo paper. Once fixed in place the whole structure was matt varnished to remove the sheen from the prints.


The shelter was glued in position and the snow (more filler) built up all around it whilst the glue set. As I had a weight on top holding it down I could not add snow to the roof at this stage.

I have also managed to plant a short length of fence, more Wills halt leftovers. I had to create a little trench in the scenery to get this to sit correctly, but once I was happy I glued it in place and added more snow all around. Just visible to the left in the shot below is the extra piled up snow I've added in front of the rock faces as these areas looked fat too flat before.


Once the shelter and fence were firmly in position I could add snow to the horizontals of the fence and the roof. The rooftop snow had a little PVA mixed into the initial layer to aid adhesion to the painted surface. The corrugations are still visible in places and I've achieved a snow dropping off the edge effect. On the right I've tried to give the impression some snow has recently dropped to the ground


The sign and bench from the Mk1 version of the scene are now in place and blended into the ground. There are still a few more areas to attend to before I start to paint the snow in it's final coating, such as to fill the areas of bare ground where the trees will sit. It is funny how the snow actually looks better and cleaner in the current photos than in reality! 


Oh, and I must clean up those rails...

Colin