Sunday, 23 April 2023

'The Headshunt' - Taking a Trick-Shot

As alluded to in my previous post I have been considering the design of a new diorama to fit in a small photographic lightbox. Although I like that design, over the weekend I had a little play to see if there is an alternative, involving the recently refreshed 'The Headshunt'. 

When taking the most recent pictures of 'The Headshunt' I had been working in the shed with a basic LED strip light, but for the background I had used a large matt white plastic photographic sheet that my wife had picked up very cheaply. In the past I had always photographed this diorama on my desk using my standard desk lamp and whatever was to hand as the background, so the thought occurred to me that the sheet might be useable in the same way. The experimentation began... this is the set-up used, with a bonus glimpse of the new storage box being used as a height booster.


A pretty standard 3/4 shot. This is very satisfactory but I must trim the longer grass strands!


The awkward reverse-shot. Pleasingly the new grey edging is almost invisible in this and the next shot compared to the old black strip. My thoughts were turning to ways to reduce the white space, wondering if standing a carriage there might be the answer. 


Looking down the line. An anecdote from the rebuilding process is that I managed to snap the point lever during the work, hearing it ping across the shed never to be seen again. A new lever was found and colour matched to the original base.


The next day I thought I would try out the carriage trick for a shot pointing to the left, I think this works rather well and I'm baffled why I have never thought of it before!


This led to a further thought (dangerous, I know...) of a 'prop' of a half-coach that could be placed at the far left, and in combination with a couple of figures posed in conversation could "fill the gap" in photographs without having to have the coach right up against the subject matter. 

Overall I am very happy with the outcome, although I may try using a bit of one of the free Railway Modeller backscene pieces as a further trial in due course.

Wednesday, 19 April 2023

Developing a Diorama

As I have mentioned when describing recent changes to my diorama The Headshunt I have been trying to create a new photographic diorama that can be used within a small (12" x 12") lightbox. There have been a couple of false starts to say the least, however the work carried out on the older diorama has created a renewed interest in getting the job done...

I had conducted a little experiment with one of my 70mm deep scenes, just to see how it would work on camera, and in all honesty with a bit more depth it could work. However what this shot does highlight is how any such scene needs to have a fairly solid back piece (wall/fence/hedge) to really work, and the problem of how to treat the area where the track goes off the edge of the scene.


So the thought came to me that if there could be a building over the track at one end, and maybe a gate at the other, with wall or similar in between, an enclosed photo 'set' could be created. The idea in my mind was that it was some sort of workshop overhauling miniature railway stock, recalling photos of Fairbourne Railway locomotives outside Trevor Guest's workshop at Wollaston. 

Having located some of these in John Milner's 'Rails Through the Sands' I briefly fell into a rabbit hole of research, as I tried to find out a little more as there were two distinct buildings pictured. Luckily an article by John Tennant in 'The Narrow Gauge' no. 238 (Summer 2016) identified that there were two buildings in use, the 'bottom shed' and newer 'top shed'. They can both be seen in RAF aerial imagery from 1961 hosted by Historic England - Guest's yard is in the triangle of roads towards the top-left of the image. I adapted what I now know as the 'top shed' as the basis of this sketch.
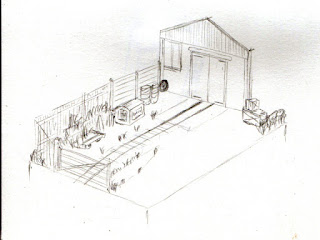
The sketch reveals a host of background junk, and how by leaving the front third of each side clear, maximum camera angles are available in a small space of 8" x 6". In order to try out the idea I built a quick mock-up in the medium of cereal box and double-sided tape and placed it in the light box to try a few photo angles.

Generally speaking the concept worked, and a few trial shots resulted from different angles with a couple of locos used for the test shots. The grey and white makes balancing the images rather fun but that would not be an issue with a fully-developed scene. There is also the possibility of adding a temporary backscene piece behind the wall rather than relying on the lightbox.

There was a slight concern though, one that is not so apparent in the picture above... Although the lightbox kicks out an impressive amount of light, the further forward an item is the more the foreground starts to get into shadow. So when I used a slightly larger loco in the box, the front end isn't quite as well lit as the rear. I had encountered a similar issue on a couple of occasions that I had used 'The Headshunt' in the box end-on (not the greatest of ideas!).

So I had an idea, what if it cut the back two corners of a scene at 45 degrees? Prototype number two was therefore assembled from leftover cereal packet card.


This way the scene can be pushed further backwards into the light box and the front of a longer loco should be better lit. A Slaters gate makes a special guest (no pun intended) appearance here, as I only have the one of these it would have to be removeable to go at the end where it needed to be in the background.

The result is that there does appear to be an improvement in the lighting of long-loco shots. In this view the section of wall in the centre is up against the back of the light box.

The downside to this idea is that it does away with the workshop building, but it then occurred to me that there is actually a possibility of doing the 45 degree cut at just one end and having the best of both ideas...

Colin

Friday, 14 April 2023

A bit of work down 'The Headshunt'

Those with long memories may recall that last summer I had intended to give my larger O9 diorama 'The Headshunt' a scenic makeover, but in the end carried out a similar exercise on my 009 layout 'The Old Quarry Line'. Fast forward to March this year, and frustrated with my lack of success with a new photographic diorama to fit in a small lightbox, I decided to revisit my planned work on 'The Headshunt'. Firstly, a reminder of how it looked...
 

As well as needing some new scenic work, the other thing that was really troubling me was the heavy black surround in 5mm ply. This particularly looked awful at the left hand end where it crossed the track and platform. So I carefully (with a mallet and heavy-duty scraper!) removed it. Nothing fell apart so the front strip had similar treatment, leaving everything a little vulnerable until they were replaced. The replacements are from 3mm ply, gently rounded on the front upper edges to reduce their impact, and are also about 1mm lower. Painted grey rather than black they no longer dominate the diorama.


The two holes in the new front trim are an indication of another long-envisaged aspect of the rebuild project, as they are securing holes for a ply/hardboard cover to protect the scene in storage. 

Within the scene itself the new areas of foliage can be seen left and right. As with work on 'Beck Bridge' and 'The Old Quarry Line' these use teased-out coir hanging basket liner, sprayed in two shades of brown, and various foliage mats, stems and other items to create a varied effect. I have also added Martin Welberg tufts and some MiniNature flowers in moderation.


The pile junk behind the headshunt has grown a little, as all piles of junk do... The wagon is a KB Scale Hudson frame with Black Dog adaptor piece, with wooden deck. This was completed some time ago and saved for a use such as this. Adding this led to a rearrangement of the oil drums, which sounds easy but they were very well stuck down! The green one was moved elsewhere and the red/yellow one moved into it's place, it just looked better that way... The more subtle addition is a cab frontspiece on the right, part of an old A1 Models etch carefully painted and weathered.


Overall I am very happy with these long-awaited changes, one advantage of the delay has certainly been the use of the grey surround in place of black, in part inspired by seeing James Hilton's work recently. Working on 'The Headshunt' has certainly kept things going on the modelling front for the last few weeks too. Thoughts have now returned to the new photographic scene but nothing concrete has happened... yet.

Colin


Friday, 31 March 2023

The March of Time

Time has flown by in the first quarter of 2023, and from a modelling perspective there has been little to report. I spent some time trying to build a photographic diorama that could fit in my square-foot lightbox but that went through several iterations without success. However it has led to a long-overdue refresh of another project, more to be revealed soon... 

The last week or so has been one of reflection, having realised I've been modelling in O9 now for 20 years! A lot has changed in that time, from there being very few products aimed at representing 15" gauge prototypes accurately to there now being a wider choice in many mediums. I like to think I've had a small part to play in that via a range of bogie coaches for the Avalon Line range. 


Sadly the news came last week that we had lost Avalon's Howard Martin. I think the first time that I met him, at a 7mm NGA Burton show, I introduced myself as "his worst customer" on the basis that I was an O9 modeller who didn't buy his products! Despite this he was always very keen to see my work in O9 and encouraged me to create masters for Steve Bennett to cast bogie coaches based on those running on 'Shifting Sands'.

Although built by Julian Andrews, Howard was of course the person I associate with the 'Avalon Brickworks' layout having seen it many times on his stand at exhibitions. This has made me take another look at my baseboard and track over the past weekend to see it that plan could perhaps be revived in some way rather than replaced. We shall see...


I'll leave you with this shot of the original layout, with Avalon Line loco and coach built to O-16.5.

Colin


Friday, 17 March 2023

Revisiting the Corkboard

It's been a quiet month since I last posted and actual model-making has been in abeyance for one reason or another. That hasn't stopped the thought processes though...

Since seeing James Hilton's work at Doncaster I have been playing with a few ideas to revive the small corkboard layout I started a few years ago. I think I have now finally reached the conclusion that the "Avalon Brickworks" plan isn't going to achieve what I want to do and needs a rethink. As a reminder, after a year or so of inactivity it presently looks something like this:


So why doesn't it work? There are a few things, some practical and some just "me". One of my bugbears with it (of my own making) is that the track sits in a tray formed by the outer framing of the board. On 'Shifting Sands' I raised the track on thin balsa to overcome this and I regret not doing the same here in "lockdown" conditions. The other practical issue is that the facing point arrangement makes positioning MicroTrains magnets tricky, leaving a magnet on the main line behind the right-hand point in an awkward position, OK for swapping sets of wagons but less so to actually "shunt" individual wagons. The curve in the inner siding pushed the magnet back there leaving little room for manoeuvre. 

The offset circuit of James' 'Canal Street Wharf' inspired plan 1 with a siding added within the circuit. The idea is that it would be fully scenic all around, rather like my 009 layout 'The Old Quarry Line'. At one point I sketched in a loco spur top right outside the circuit but I felt that it made things look unbalanced so it was lost from the final version of the plan.


I then wondered how it would look with the offset of the circuit the other way around, i.e. with the point on the side further away from the baseboard edge. I redrew this as plan 2 which actually confirmed what I thought, that it looked more spacious the other way around with the siding closer to the centre of the board. On both versions there is plenty of space for uncoupling magnets on the straight lines from both arms of the turnout.

These ideas need a complete lift of the existing trackwork, but that is not a bad thing as it will deal with the bugbear of the sunken track. My thinking is either to add another layer to the board top to raise the trackbed, or the more extreme idea to flip the board over and add a new trackbed layer on what is presently the underside of the framing. This would allow some dramatic scenery below track level such as a bridge over a stream. 

However, plan 2 did lead to another train of thought, completely different to the original concept, plan 3...

This is something of a cross between 'Shifting Sands' and an Inglenook! The sidings at the front are a 3,2,4 capacity layout, which isn't bad for the space. All have nice straight runs off the points so uncoupling/coupling should not be an issue. The sidings at the back are intended to be hidden and can hold a loco and 3 wagons.

So back to that "me" issue... I had struggled to find a suitable theme and setting for the original plan. Whilst many feel comfortable with O9 in an industrial setting it isn't something I can relate to, certainly not with my current rolling stock. Steering clear of this theme, I would be looking at depicting a modern-day estate railway of some sort, concentrating on stock used for maintenance of the railway itself and the land, e.g. loads of ballast, sleepers, fencing material, cut trees etc, maybe animal feed. 

As to what will get built, we shall see...

Colin


Monday, 13 February 2023

Doncaster Delights

With slightly more advanced planning than last year (I had decided to go weeks before, not on the day) I headed up the road to Doncaster on Sunday for the BRM 'Festival of Railway Modelling'. With a similar plan to last year I intended to concentrate on the layouts and those traders I had identified as having items of interest...

The most recent issue of British Railway Modelling had a strapline on the cover about building a model of a miniature railway. The resultant static model, using parts from West Hill Wagon Works and commercial kits, really captures the spirit of a miniature railway and I had a good chat with Phil Parker about its creation.


Continuing the theme of the smallest exhibits at a large show, it was a pleasure to see the display of layouts by James Hilton, including 'Canal Street Wharf' in OO-6.5, representing 18" gauge. Seeing this has made me start to consider how I could adapt and simplify my stalled 'Avalon Brickworks' style layout to a similar format...


James' double-stacked micro layouts were a joy to see, proving that something so simple but focussed can actually have a lot more impact than some of the larger layouts on show. These smaller layouts really are 3D picture frames and their seeming lightness in construction fascinated me. After a long chat with James many more thoughts were in progress...


Almost directly opposite James' display was the other layout that really grabbed me, the7mm scale 'Harlyn Pier', which has a beautiful seaside setting, with the sea on the backscene and provision for the same of ice cream, rather like my own 'Shifting Sands'!


As there were traders present that I am unlikely to catch at any other show this year I partook in a little shopping, nothing too grand but items that should come in handy over the next few months...

Colin

Saturday, 11 February 2023

The Green Machine

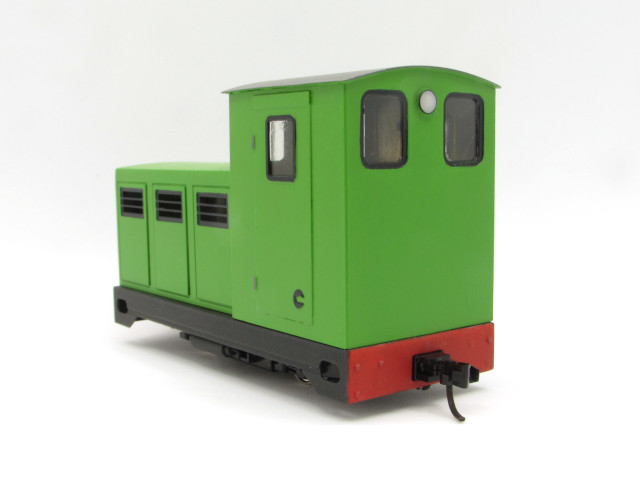
We last saw the A1 Models 'Albert' in a sneak-peek in between painting and varnishing. Following application of a coat of Halfords matt lacquer I've now added the finishing touches, working slowly through a post-it note of jobs. Firstly the windows were glazed using 10 thou clear styrene behind the openings, secured with Johnson's 'Kleer' (old-school formula), and the headlights filled using Araldite. Doing this before the cab and bonnet were glued together meant I only had to make up one mix to do both ends, whereas on 'The White Rose' I had to do each end in turn as the light has to sit facing upwards to set without sagging. 

The headlights squeezed the last from my Araldite so I bought an alternative epoxy product in the local motor spares shop to join the two assemblies together, which seems to have worked OK. On the cab front a turned brass A1 Models air horn was added - this one a version designed with cab front mounting in mind. Deft deployment of the epoxy and careful propping allowed this to be secured in place whilst the cab and bonnet were glued together. 


Despite the matt lacquer the underframe looked a little too shiny so the opportunity was taken to overspray a coat of Humbrol matt varnish to this part, followed by some light weathering in the form of dry brushing. This side-on view shows how the Kato chassis is convincigly hidden by the air tanks and the deep solebar.

Inside the cab I added a driver figure, one of the "rubbery" Prieser clones sprayed in grey primer, washed over in black-grey and then the skin and shirt picked out in appropriate colours. Subtle but effective enough when viewed through the cab windows. The 'L' section pieces provided with the kit have been used to locate the cab and bonnet in place, they are easily adjusted to get a secure grip and good location.


Underneath the chassis can be seen the mounts for the MicroTrains couplers, and the strips of lead window flashing added either side of the chassis to add some extra weight. There is scope to add more here or above the footplate if it proves necessary after testing.

With this model completed and in the display cabinet there are currently no O9 models on my workbench... There is a bit of reasoning behind this, I had a bit of a surprise when I went to put 'The White Rose' away after the recent modifications as I realised I hadn't actually allocated a storage box for it! A suitable box was located in the form of a Peco 009 example, but there is a shortage of space in the stock boxes so I need to have a careful think about what goes where in a limited space...

Colin