Sunday, 24 December 2023

The Lady and the Lamp - Christmas Tree Halt

It's that time of year again to defrost the pizza and have some 009 Christmas fun. As usual the Minitrains Bagnall 'Isla' is in charge of getting the presents to Santa in time.

I always like to add something new to the scene each year and this year I have added a Lady, and a Lamp. I've always thought there should be a hopeful passenger on the platform, awaiting the train into town for some last minute shopping, so we now have Mrs Goggins, a Dapol figure painted in Christmassy greens and reds to match the colour palette of the scene. lamp standard, one of the standard Merit/Modelscene ones with a frosty finish (over-sprayed matt varnish) and plenty of snow-mix to blend it in. 

The gas lamp is one of the standard Merit/Modelscene ones with a frosty finish, created using over-sprayed matt varnish and plenty of snow-mix to blend it in around the base and on the flat surfaces. After some debate about whether there should be snow on the top if it heats up, there is a fine layer and we have to assume it has snowed since it cooled down.


I had a crazy idea the other day to paint the Snailbeach hopper in blue lettered for the North Pole Snow Co. - I might have to lay off the cheese over Christmas! 

Wishing all readers a Merry Christmas.

Colin
 

Thursday, 30 November 2023

Teenage Kicks

Another adventure in time, but on this occasion a trip revisiting my own past. Late 1991/early 1992 I built my first model bus kit, a Tower Models Leyland National. Finished in my own ivory/red/grey livery it was the first of many, forming the initial backbone of a contemporary model fleet and membership of the Model Bus Federation. Those days are long gone but when Peco re-released the kit a few years ago my interest grew and I bought the kit in the Bure Valley Model Shop on our Norfolk holiday in 2019. 

As I am still between railway projects I thought it would make an interesting follow-up to the Peco Police Box build. It hasn't all been plain sailing but that is largely "me" issues rather than anything to do with the kit. In many ways the kit is quite basic but with a few adjustments it can be improved to a satisfactory standard. The main changes I have made have been to the front end, wheels and to detail the interior.


Past experience had taught me to ignore the instructions, which say to build from the floor up, and to build from the roof down with the interior units fitted from below after painting. This allows much better joining of the ends to the roof. Front end improvements have involved taking a 1mm strip from above the bumper, opening out the windscreen at either side (which will require a new screen to replace that supplied) and rounding the corners of the destination and cove panels with tiny fillets of Milliput to better represent the prototype. I have also chosen to build the model as a 'B Series' example with no roof pod and the 9 small vents on the front and nearside, all formed from tiny strips of 5 thou styrene.


On the offside I have added the fuel filler in a recess midway along the side and the footstep cutout below the emergency door. On both sides I scribed in the flap in the lower fairing behind the rear wheelarch. The wheels caused some head scratching as the kit originals that sufficed in my teenage years no longer made the mark, luckily I had a set of ABS Models Leyland wheels to hand that had lived under a modified Dinky "Yellow Pages" Atlantean (another type that formed the backbone of my model fleet). They aren't perfect but will do until/if I can source anything more accurate. I've added a very slight steer to the front axle for realism.


The interior has seen the most work. As supplied this is quite basic and many of the seats featured blowouts in the moulding. I have added a step in the doorway, correctly raised drivers seat and scratchbuilt cab detail, a nearside luggage rack, offside longditudinal seat, handrails on all standard seat backs from staples and styrene strip and modesty screens in front of the raised seating area. Several online photos were used to get these details looking correct. There are also two glass screens to add behind the driver and in front of the luggage rack, made from clear 40 thou styrene to be added after painting. Just visible in this shot are the mud flaps I have added under the floor from 20 thou styrene.

I am happy with how this project has progressed after several frustrations, the next step will be to paint everything, which may take a little longer!

Colin


Thursday, 23 November 2023

Sixty

23rd November 1963, Gerry and the Pacemakers are in their final week at number one with 'You'll Never Walk Alone' (to be deposed by The Beatles the following week), US President John F. Kennedy's assassination in Dallas dominates the headlines and on BBC1, an old man enters a blue box and an adventure begins...


Happy 60th Anniversary Doctor Who!

Colin


Wednesday, 1 November 2023

Doctor Who - 60th Anniversary Diorama

My Doctor Who mini-diorama to celebrate the 60th anniversary of the show is now complete and ready for display. Final preparation involved drilling two holes to accommodate the pins in the Tenth Doctor's feet to allow him to stand looking pensively into the distance.


The TARDIS itself is not fixed in place (otherwise it would struggle to take off…). To help locate it place I set a magnet into the ground and superglued some offcuts of paperclip underneath the floor to match.


Whilst the magnet locates the TARDIS it doesn't hold it too firmly, you can tip the diorama to about 45 degrees before gravity takes over!


The completed scene is now ready to take it's place in my display cabinet and I am considering options for the next project...

Colin


Friday, 27 October 2023

This is Planet Hex

Whilst I had considered putting together a diorama depicting a scene from a Doctor Who episode to display my TARDIS and Doctor figure, I have opted in the end to take the simpler option to create a very basic display base which perhaps takes it's inspiration from Wargaming rather than railway modelling. 

Wanting something different from my "standard" display pieces I have taken a design clue from Gallifrey and created a hexagonal base, which is 70mm deep in a concession to my standards! To create a hexagon with the parallel lines a set distance apart and the length of each side initially unknown required use of a protractor to draw out the first corner and then a pair of compasses to plot the remainder of the points. This was drawn out on 6mm MDF and cut to shape.


The edges of the base were treated with superglue and sprayed with accelerator to harden them, before smoothing back and repeating. The whole piece was then painted in grey emulsion from a tester pot. I then added a layer of 5mm foamcore slightly smaller in dimensions as the basis of the landform. A square was marked out as the space required for the TARDIS to sit in, then the remainder carved away as the basis of the landform. A layer of additional foamcore was added at one point to add extra relief.


A layer of PVA over the foamcore was followed by DAS modelling clay, textured with the bristles of a paintbrush to add texture. Once the DAS had set the surfaces to be treated as rocks were scraped away/textured with a dental probe and two additional rocks made from more DAS were added at the front corner.


The rocks were painted with grey emulsion paint and once dry washed over with black-grey acrylic to get into the crevices, and then dry-bushed with various shades of grey, beige and green to highlight the texture. 


Once the rocks were dry I added the ground cover, this used a mix of emulsion paint, PVA and grey tile grout, applied with a brush and then a mix of ballast, fine turf fine sand sieved over whilst wet and tamped into place and allowed to dry. It looks rather regular at this point but will be broken up in the next stage.


To give the impression of a hostile, barren planet I added brown grass tufts from the Peco range, cutting some into smaller clumps to break up the evenness of the size. Some weathering powders were added into the ground surface to vary the colours and texture a little. At this stage the edges of the piece were painted in grey primer in a contrast to the wooden trim pieces I usually use. This is something of an experiment and can be changed if desired in the future


In the next update I will reveal the completed piece with the centrepieces of the scene added. Watch this space...

Colin


Tuesday, 24 October 2023

To Caistor and Cleethorpes

I thought some railway content on the blog was in order after a few weeks of  Doctor Who. On Sunday, with clear skies after the stormy weather of the previous days, I headed across Lincolnshire to Caistor for the annual model railway exhibition. Despite many flooded fields I found that the roads were largely clear, the only bit of surface water encountered being a big pool on the A46 (although I discovered on my return home that the outgoing route I had taken via Bawtry was now closed due to flooding).  

Town hall shows can bring a mixed variety of layouts, the highlight for me being Paul Windle's 'High Stamley', an atmospheric 009 layout placing the railway in the landscape in a relatively small space. It also runs very well to a pattern that the operators know and provides movement most of the time, including on the road. There's also a very large dog from a popular animation hiding in a corner!


Further narrow gauge interest was 'Welton Park', the O9 layout from the Market Deeping club that was at Narrow Gauge Now back in July. On the standard gauge front two layouts representing the BR blue era caught my attention, 'Boston Frodsham' and Ken Gibbon's 'Lapford Road', which I hadn't seen for a  few years. What was noticeable here was that with a few exceptions most of the stock was of an older generation sensibly detailed up, including Triang-Hornby Mk2 coaches, an Airfix class 31 and Airfix kit brake vans. Other layouts were full of the latest toys but perhaps lacked the consistency across the board.


It is not a huge show and after an hour and a half, (and a small expenditure on some narrow gauge items from a trader) I opted to head the relatively short hop to the coast to Cleethorpes to call in on the Cleethorpes Coast Light Railway. The Guest 0-6-0DM 'Rachel' was in charge, and do not worry, giant spiders have not attacked her, she was dressed up for the Halloween season. After a train ride and some lunch I walked up the floodgate to get a couple of photographs.


To be pedantic you are beside the Humber estuary at this point and the actual sea is tantalisingly in the distance, so as the weather was so nice I walked up the marine embankment to a point just past the currently disused CCLR Humberston station, from where I could see the sea, Spurn Point and both of the Humber forts. Ironically exactly a year ago to the day we had stayed in a caravan just here and I had watched and photographed the sunrise from the balcony. I regretted not having my "proper" camera with me on this visit, but the picture below from my phone has turned out reasonably well.

(Click for larger version)

The days that followed have turned to much less pleasant weather and the brief trip to the coast has allowed the longer days of summer to stay fresh in my mind for a little longer. As the nights draw in and the clocks go back I tend to find that these memories help. What will also help is working out what the next modelling project will be, that may take a little longer but don't be surprised if an influence from Caistor creeps in...

Colin


Saturday, 21 October 2023

The Colour of the TARDIS

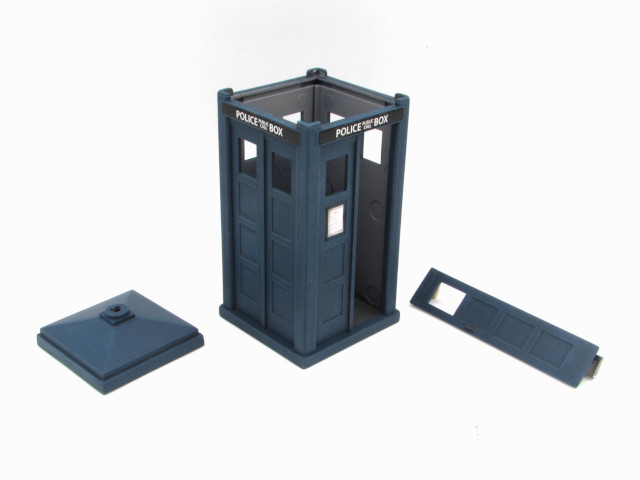
When we last saw my conversion of the Peco Police Phone Box to represent the tenth Doctor's TARDIS it was ready for scrubbing up for the paintshop. Cleaned up it was sprayed with grey primer and I checked for any blemishes that required attention. I then checked photos of the TV prop and something became very obvious that had completely passed me by...

The Peco roof has (quite correctly for a Metropolitan Police Phone Box) three "tiers" to the structure. The 2005 TV prop has only two, in fact the majority of the TV props only have two... I couldn't ignore this and resorted to reconstructing the roof by slicing off the top tier and opening out the resultant giant hole in the second tier to inset the top tier into. It was rather messy (and still is on the inside) but Milliput soon smoothed it out. After a re-prime of the roof I applied a black-grey wash over the whole structure as a base for painting.

Painting proper could now commence, at the beginning of the project I had searched for an appropriate blue paint, eventually choosing Citadel 'Stegadon Scale Green' as the best potential match. Despite the name, it is blue, and actually closely resembles BR Rail Blue! I applied three coats, the first straight from the tub but applied in a dry-brushing motion to leave a little of the accumulated dark grey in the recesses. The second coat was lightened with a drop of grey and again applied in a dry-brushing style to not 100% cover the first. The last coat was lighter still and less heavily applied. This process built up a nice 'patina' on the panelling. I then painted the floor grey, washed over with black-grey, and the boxes for the lettering in matt black.


The above photo shows the transfers in place for the 'Police Box' lettering. In order to prepare the matt surface for these I applied three coats of 'Kleer' to gloss the surface. After applying the decals another coat of 'Kleer' sealed them in place, before a weathering wash was applied over the whole panel to tone down the black and white, both colours I tend to avoid. The Peco decal for the sign on the door was a little undersized for the TV prop and this was substituted with a version found online printed onto matt photo paper and applied after carefully peeling away the back layers of the paper,

The window frames were picked out with a fine brush in the blue paint. One feature of the 2005 TV prop was that the windows appeared white behind the glass. I eventually resorted to spraying the backs with white primer, but not fully coating, to give a translucent effect. The white was a blessing as I wanted to add an interior printed on matt photo paper, in a similar manner to the TV prop. Again this uses an image downloaded from the web, printed with multiple version of the door sign.


Once the components had been matt varnished and the windows fixed in place, the interior print was cut to size and folded to shape. Some thin strips of basswood were applied at either end and the centre in order to balance out the effect of the window mouldings that sit approx 1mm behind the sides. You can just see the top of the centre piece at the rear.


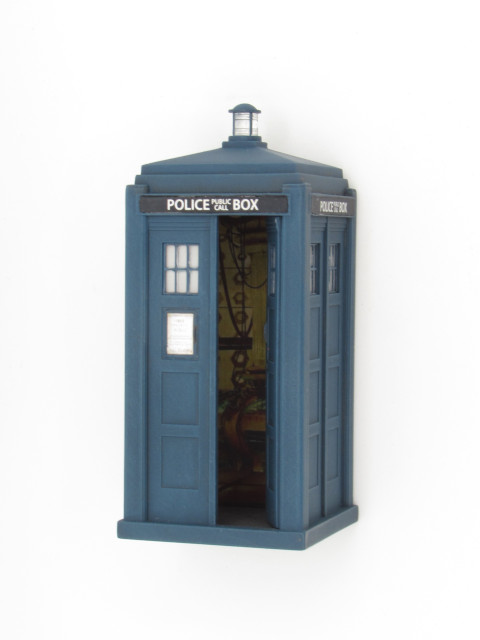
With the interior print in place I could then add the door, gluing it in place using the supports onto the wall rather than along the hinge line. The roof, to which I had previously added the lantern, was then added the next day. From this angle it just looks like a Police Box, although strictly speaking the door on the real thing opens outwards...


But if you turn it around you can clearly see it is bigger on the inside! It is actually quite difficult to see the interior without shining a light in, but at least I know it is there.


So we have a TARDIS, we have a Doctor, the next post will look at the creation of a diorama base to bring the elements together.

Colin