Sunday, 12 February 2012

To Intrepidly Go...

I've had a few setbacks on the painting front of late - which I have put down to being a bit out of practice, but I can now say that this is on the right track:


Since a second sprayed coat of blue (I said there were setbacks...), this has had three coats each of the roof and solebar grey, and red bufferbeams. Details have been touched in, including the headlights (which will get a dollop of Araldite once varnished) and door handles. Transfers are a mix of the Dapol whiskers and SMS transfer lettering, applied with MicroSet and MicroSol:


This is a key project for me in many ways, whilst it is the first item to be finished since I got back into the swing of things, it is also perhaps the last dedicated item to be built for 'Shifting Sands' - future projects are still in the dreaming phase!

Friday, 10 February 2012

Carrying the Goods

As regular readers will know, my O9 modelling has mostly centred around passenger carrying miniature railways, as these are of the greatest interest to me, and are perhaps the most realistic use of the scale/gauge combination as 9mm is closer to 15" gauge than 18" gauge in 7mm scale.

However, from time to time I've tried to dabble in industrial and/or estate prototypes, most notably recently with the never to be completed 'Misterton Fen Tramway'.  In it's latest build phase I did put together a couple of 3-plank dropside opens and described them alongside a gauge convertible i/c loco here.


The one on the left used the chassis and resin floor from the twin-oil barrel carrier that used to run in the 'Shifting Sands' works train, whilst that on the right was a new build on a spare Black Dog chassis.  These two wagons finally made the paint shop recently for a blast of red oxide primer, but not until I had replaced some of the bolt heads on the ends with Grandt Line mouldings.  They can be glimpsed in the background of this workbench shot:


Painting the two wagons turned my thought to adding to the fleet. I hit on the idea of a chassis swap for another of the 'Shifting Sands' works fleet, a rebuilt Black Dog chequerplate flat. This was carefully stripped down, removing the floor and extra some sideframes I had added from Plastruct section. The floor has been rebuilt to sit on an RCL skip frame (which in a previous plan was destined to be a static drum carrier due to issues with the wheels on MicroTrains magnets).  This will be permanently coupled to a partner to alleviate this issue.


With a MicroTrains coupler added at one end, a rather nifty link to the other wagon was constructed by shaping and twisting a long brass split pin to resemble a prototypical coupling bar - even if it does end sat in the loop of another split pin on the other wagon:


Meanwhile, the Black Dog Mining chassis emerged as a one-plank, fixed side open. This is a simple build in styrene on the recycled Shifting Sands flat wagon frame, using a floor from an abandoned Gn15 wagon project.  Detail comes in the form of Evergreen strip, rod and some Grandt Line bolt heads:


As Dave Lister of the mining ship 'Red Dwarf' would have it, there are always a few parts left over.... the wagon above was to have been another 3-plank, so the off-cuts of the sides and ends have been joined by a floor, like the wagon above this is recycled from an older project, to form a ready to build kit. This may benefit from the fake channel section frames removed from the Shifting Sands flat and the 'research' into using Dapol railbus axle boxes....


Sunday, 5 February 2012

Building an Avalon Line Enclosed Coach Kit - 2

I've made a few changes to the build of my Avalon like kit, some forced by necessity (having castings only) and some by my choice to use MicroTrains bogies rather than the kit originals.

I created a roof using my usual method involving 20 thou styrene (in this case recycled supermarket ice cream carton lid) an empty cola can, pyrex jug and boiling water.  In simple terms the styrene is cut to the approx shape of the roof, taped to the can using scotch tape and placed in the pyrex jug.  Boiling water is poured into and around the can and as if by magic the styrene takes the shape of the can.  That is the simple version, this roof actually uses two visible sections and six hidden strengthening parts, plus strip and sheet styrence for strength!

Underside of the roof - triple layered styrene to try and avoid warping.

Roof in situ, the join in the upper surface is covered with a 10 thou strip.

As the image above shows, under the solebars I have added the strengthening framework, however I have added this to the chasis frame rather than directly to the body.  In order to do this I have added styrene fillets at each end to support the framework.

The chassis frame with added chassis framework.

Styrene fillets add strength to the joins between underframe and side frames.
The picture above also shows how I have mounted a MicroTrains coupler mount to the chassis.  This involved filling the cast hole and re-drilling 0.5mm closer to the end, then opening this out to 3mm to take the mounting supplied with the MicroTrains bogies.

The bogies themselves are a hybrid between MicroTrains and Avalon components.  The Avalon sideframes are cut from the bogies and thinned down - for this (and most other sanding in the project), I used a pound shop emery board.  The MicroTrains bogie has had all side detail cut and sanded off, and the parts joined using Araldite.

Modified MicroTrains bogies with Avalon side frames.
With the bogies completed this coach must be ready to join the queue outside the paint shop....

Thursday, 2 February 2012

Sometimes I can't resist the urge to tinker...

As can be imagined, I'm starting to build up a small stock of Dapol railbus underframe parts and for some time I've wondered what the suspension and axlebox parts could be used for in narrow gauge modelling.  Of course they could be used for loco underframes - as per the original version of the industrial i/c loco, but where would the fun be in that?!

I've wondered what use they would be for wagon underframes, so taking already-used parts from the old i/c loco chassis, I had a play:


Top of the picture is a BlackDog 6ft chassis for comparison.  The sample under that uses the Dapol suspension wrong way up without the spring, I think that this would pass quite well in O9.

The bottom sample uses the Dapol axlebox right way up and chopped about a little (lot) the idea is to fill up the gaps either side above the axlebox with filler, this would be more suited to O-16.5 or Gn15.

Oh well, kept me occupied for half an hour....

Sunday, 22 January 2012

Building an Avalon Line Enclosed Coach Kit

Frustrated with watching paint dry (badly), and inspired by a trip out to the 7mm NGA members' day at Derby, I decided to scout about for a quick project to occupy my time.  My eyes fell onto an Avalon Line kit for a 12-seat enclosed coach that had been sat awaiting my attention for many years. This was one of the first sets of parts that Steve Bennett had cast from masters that I had designed for Howard Martin at Avalon Line.

Having been sat in my cupboard all that time the sides and floor of the kit had taken on a banana-like shape, so theses were immersed in hot water and then flattened between a glass worktop protector and glass drinks coasters, held flat by that good old standby of Lima loco weights (every ex-OO modeller of a certain age has a stash of these!).  All flash was removed using a sharp craft knife and parts cleaned up using nothing more than pound shop emery boards.

The chassis was assembled first:


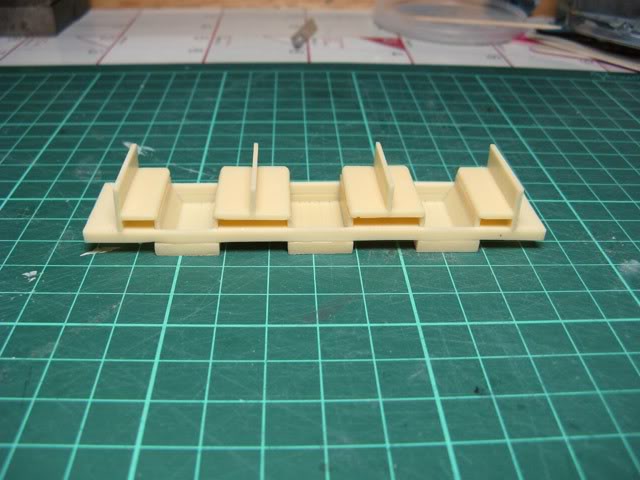
Araldite Rapid epoxy adhesive was used, the footwells were set into the chassis frame dry and the adhesive carefully delivered to the joints using a cocktail stick.  The seats were then added on top - this was just possible from one mix of the glue!

The sides and ends of the body were assembled in a slightly different way, due to an unintended tumblehome in the sides I opted to use superglue to attach these to the ends (so as to straighten the bow and set quickly), then re-enforced the joins with Araldite from inside.


So far this build has been as per the intended sequence, I'll be showing a few tweaks I've made in a future post.

Sunday, 15 January 2012

The Great Barnes, Clayton and Lowke Connundrum

It may sound like a firm of solicitors caught up in a Sherlock Holmes tale, but the purpose of these scribblings is to give an idea of the dilemma I'm currently having as to what outline my embryonic 'Atlantic' will take in the future.  Given that I will probably only have one shot at building an Atlantic (donor chassis are not easy to come by at my near-Yorkshire kind of price), I want to ensure that the final choice is one that I'm happy with.

So what are the options?  Ruling out the earlier Bassett-Lowke class 10 and 20 'Little Giants' on size (I've already blown the class 30 drawings up to 7.5mm scale), there are three key options to consider in outline:

1) Bassett-Lowke Class 30 outline, - 'Synolda' or 'Count Louis'...

'Synolda' on a visit to the Kirklees Light Railway
'Count Louis' at the Evesham Vale Light Railway
The classic Greenly design of these locos is a big plus point for me, however there are many differences between the survivors (and indeed the lost machine 'Sans Pariel' had a flatter cab roof), note the different drop in the rear footplate for example, whilst 'Count Louis' retains it's later cab, possibly built by Trevor Guest.  The greatest temptation is perhaps 'Count Louis' with the larger Fairbourne tender, not one for the purist but at least a Kato bogie chassis can be secreted away in there.

2) Clayton/Cannon Iron Foundries/Hunt outline - 'Sutton Belle' or 'Sutton Flyer'...

'Belle' and 'Flyer' with authentic stock at Cleethorpes
The two Atlantics that I am most familiar with, 'Belle' is very much an "improved class 30", constructed by Douglas Clayton (and indeed originally named after him) from Bassett-Lowke castings, whilst 'Flyer' is a later, further refined design completed by Hunt's for the Sutton Miniature Railway.  They may superficially look the same, but as with the surviving class 30s, there are many differences.  Tender drive would be a Kato 4w unit disguised as a 6w tender.  My biggest problem here is which one to choose - and how to explain to people that I won't necessarily be building the other one!

3) Barnes 'Albion' outline - 'Joan', 'John' etc

'John' at the Evesham Vale Light Railway
I'll be honest, in the past I've always looked on the Greenly designed, Albert Barnes built Atlantics as inferior to the class 30s.  I am of course wrong, perhaps my view was tainted by the pictures of the Rhyl line in the 80s in a rather run down state.  However, as the picture above shows, they can scrub up rather well, also evidenced by the recent restoration of 'Michael' at Rhyl.  I'd need to drop the ex-V2 Cartazzi truck at the rear and find a suitable wheelset, but these rugged machines have an advantage over the others in that the driving wheels are spaced slight further apart.  Tender drive would be as above, the disadvantage here is a slightly more open tender frame, less easy to hide that Kato unit!

4) The outsider - the 'freelance' approach...

It isn't inconceivable that a miniature railway operator could have built a loco themselves, perhaps like Douglas Clayton they bought the castings and drawings from Bassett-Lowke and slowly built it over a period of time?  We have no idea how many other sets of 15" Atlantic castings Bassett-Lowke sold that were never built, there may have been many, or simply none.  Or perhaps a complete new build?

Austin Moss' Atlantic project at Windmill Farm
 In the world of miniature railways, almost anything is possible!

Thursday, 12 January 2012

Washed Up

It's funny how you forget things that you have done with a purpose.  Having washed and cleaned two locos ('Intrepid II' and an industrial i/c loco), summary parts and two wagons for painting and placed them in my drying boxes, I opened the airing cupboard door and remembered that when I constructed the new shelves I had installed an extra one over the hot water tank specifically for keeping these boxes out of the way of the towels and sheets...