Sunday, 13 March 2016

Stuck in a Siding

A couple of weeks ago I was offered a couple of Avalon Line 12-seat semi-open coaches by O9 modeller Andrew Blackwell and the offer was too good to turn down. One of the pair was actually my first build of this kit after I had produced the masters for Steve Bennett to cast. Andrew had decided to reduce the height of both coaches to better reflect the originals running of Shifting Sands. Doing this to an already built kit must have been an interesting task!

On arrival I noticed that the coach I built had a distinct warp and I put this down to the way I had built the roof all those years ago. Carefully removing the old roof I managed to replace it, but not without having to do a few other jobs on the way. It was whilst doing this I inadvertently managed to break one of the sides - it's best not to ask how! Although I fixed it it still looked a bit wonky, so I sought another solution. I have often thought of the idea of a coach sat at the end of a siding, or in a workshop, with a few body panels missing as if awaiting or under repair - here was the opportunity...


As can be seen, several panels are missing, I replaced the whole solebar with Plastruct section that matched the original casting, having opened out one panel and completely replaced another with just uprights. I also added uprights under the exposed seat ends to make them it less like the seat backs floated in thin air.


On the opposite side just one panel was opened out. As this exposed the nut that secures the bogie in place I added an air tank from a Dapol Drewery Shunter kit to disguise it. The coach was previously equipped with modified MicroTrains bogies but I have fitted a set of Avalon Line ones for static use. I therefore filled in the gap in the headstocks for the coupler and added a cosmetic coupling pocket that had seen service on a previous static coach (one of the 4-wheel ones that sat behind the caravan on Shifting Sands).

Whilst tinkering with Avalon Line coaches I altered the bogie mounts on my fully enclosed example, removing the MicroTrains pin and socket arrangement and replacing it with the system used on the majority of my bogie stock with a 12BA nut trapped under a styrene mount. The bogies have washers Araldited top and bottom to allow the bolt to pass through neatly. This is a much more robust system than the previous one.


Colin

Sunday, 6 March 2016

Keep Banging the Drum

A few weeks ago I posted a picture of an oil drum with hand pump that I had built following an example Ian Holmes had made for Gn15. I can now report that it is completed and painted/weathered.


It is sat on another recent "quick" project, a scenic wagon built on a wobbly Black Dog chassis withdrawn from active service and reunited with a basswood floor I made some time ago. New couplers are Black Dog castings I picked up at Narrow Gauge North yesterday (see sometimes I can work quickly!).

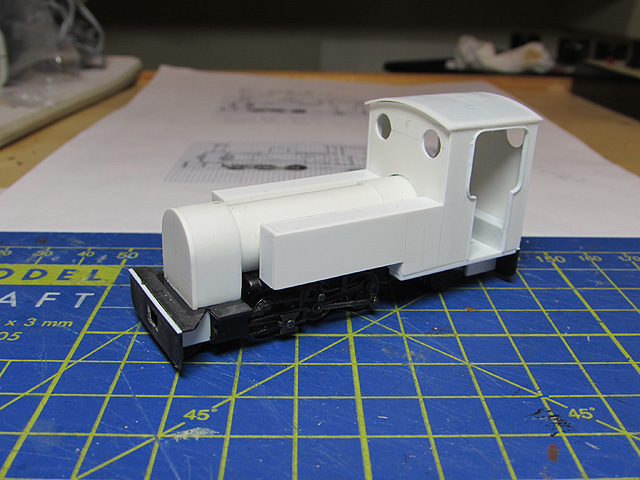
I have made a little progress with the Exmoor this week. All of the work now is that little more involved but the reward is that the detail starts to build up. Earlier this week I added beading along the edge of the cab footplate from 10x10 thou styrene strip, tops to the tanks from 10 thou sheet and a smokebox door from 20 thou styrene cut with a circle cutter.


Today I have added a few more details, including the sandpot in front of one of the tanks and mechanical lubricator in front of the other. These are constructed from various styrene sections and strips, although the sandpot lid is an Airfix mineral wagon buffer head! Both of these parts will have to remain removable until after painting so have wire re-enforcement built in to aid location and strength. Moving to the boiler I have added bands of 5 thou styrene to the barrel and hinge and strap detail to the smokebox door. It is starting to look a little more locomotive like!


Colin

Saturday, 20 February 2016

A Railway Week

Many moons ago I would find that I had enough annual leave left after Christmas to have a week off in February, and I would sometimes get the idea that some great railway project might come out of it. I'll be honest, it rarely did, so in recent years I've steered clear of calling it a 'railway week'.

This year might have been slightly more productive. It started with the trip up the road to Doncaster for the 'Festival of British Railway Modelling', a slightly overwhelming event but one where this year I managed to purchase several items for future and ongoing projects - and managed to forget I would need a part for a new project that is now satisfactorily well on the way into being. To find out what it is, read on...

I've even managed a couple of trips to 15" gauge railways. Tuesday saw me head to the coast to see the latest developments on the Cleethorpes Coast Light Railway. Here the new owners are making more visible progress, Lakeside station now has a much longer through platform and the terminal bays are being inset into the platform surface to give a multi-purpose area. The 'Smallest Pub on the Planet' is having a makeover and there are improvements in the workshop too.


Friday afternoon saw a contrived trip home from the shops via the Sherwood Forest Railway, where 'Pet' has a fresh coat of paint and a new roomy, comfortable tender, the driver's head is now below cab roof height and the effect looking through the cab is very effective (the same can of course be said for no.24 above!).


After a false start on Sunday (you may have read the last post about oil drum therapy), my new project occupied a couple of afternoons and one morning during the week. Having been challenged to create something over the next few months I have dusted off an old scheme to build a model of an Exmoor Steam Railway 0-6-2T on a Bachmann chassis. This is a concept that I have had under consideration for some time but which for various reasons hasn't happened. Chiefly there was the promise of a resin kit from Avalon Line to fit their own 0-6-0 chassis, but with the chassis no longer available and the kit moving from development stasis to standstill, I decided that the time was right.


I have reached the point structurally where there is nothing much else to add - everything beyond this point will be fettling and detailing. This is a good point to have reached as I have undertaken all the work so far in my time off this week, it's back to reality next week so time will be much more limited and suited to adding smaller parts. Speaking of which, the part I didn't buy at Doncaster was a smokebox door handle, hopefully I can pick something up at the forthcoming Lincoln show.

More details of the build can be found on the Miniature Railway World forum, where a concerted effort is being made to revitalise the forum after a quiet period.

Colin

Sunday, 14 February 2016

Simple Things

Ever get to that point where the big new idea you have started to work on isn't working, and you just know that you have to stop, there and then, and down tools? No? I suspect not, most of us just push on to make it "right"... But that doesn't always work, it often goes wrong and it is a skill to learn when to stop.

I had a moment like that this afternoon with what could be a landmark project. So I stopped. Shuffling some odds and ends around the workbench my eyes rested on an oil drum that dated back to my very early 7mm scale efforts. By no means a detailed item, it annoyed me a little as it had no detail on the end, you would not get any liquid in or out! I then remembered a project my friend Ian Homes used to feature on his website to build a hand pump for an oil drum, his was for use alongside Gn15, but it could work in any smaller scale.


My version uses a length of florist's wire approx 1mm diameter, 0.5mm diameter brass wire, "layout" electrical wire, and the buffer from a Dapol Drewery shunter kit. Two in fact... One buffer was drilled through between the two round protrusions on the shank and then cut down, being drilled 0.5mm for the handle. The other buffer had the two protrusions drilled out, and then carefully sliced off as rings, which were used on the drum end to add the required detail. The florists wire was bent to shape and had the electrical wire added to the end as the hose. The hand-pump was slipped over the other end of the wire and super-glued in place, and then glued into an appropriate hole in the end of the drum.


All in all a very quick project that overcame the feeling that the previous job was going wrong. I'll get back to that another day...

Colin

Sunday, 31 January 2016

Mickleover, Markeaton and Magazines

An annual January trip out is to the 7mm NGA's Trent Valley open day held at the community centre in Mickleover, Derby. There was a great selection of exhibits again this year, from the West Midlands area group's modular layout to several small layout concepts. As the West Midlands group includes Allen Law of MG Models I was able to select some flat brass from his secret box of kits (who needs a trade stand?!). I also a picked up a diverse collection of odds and sods, which will no doubt make their way into future projects at some point...

I spent some time chatting with Andy Greenslade, editor of the Association's "Minimum Gauge Handbook" about various potential ideas, one of which involved the Fairbourne Railway's catering van in a diorama (don't get too excited just yet), which was followed by a ride in genuine ex-Fairbourne Railway stock at the Markeaton Park Light Railway on the way home.


On arrival home the latest issue of 'Narrow Lines' from the 7mm NGA had arrived, featuring my article on the Chivers O9 coach kit and some conversions involving Dapol railbus parts. Nothing readers of the blog haven't already seen, but vital in spreading the O9 word! There are a couple of other O9 articles to come, so watch that space....

Colin

Monday, 18 January 2016

The Path To... (Part 2)

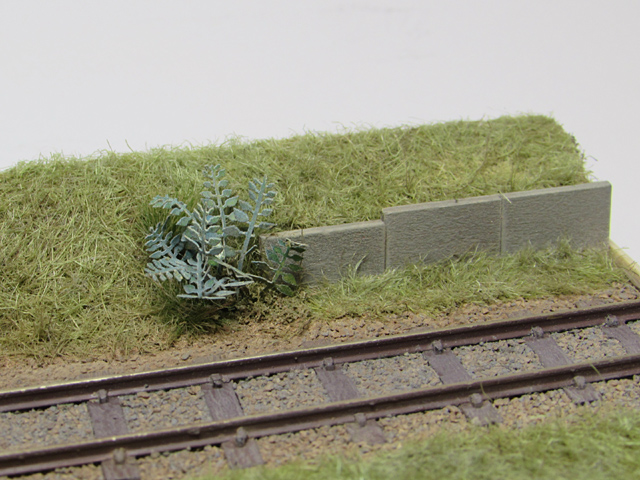
When we last looked at this micro-diorama the basic scenery had been completed using ground foam and hanging basket liner. The next stage was to add some texture and colour variation to the grassed areas using some Silfor 'tufts' and Gaugemaster/Noch laser cut plants.


With the glue dry I carefully dry-brushed the tufts with a light grey/green mix of acrylic paint to reduce the sheen, and applied matt varnish to the laser cut plants to tone them down a little.


I also set about many areas of the scene with weathering powders, applying greys to the ballast and pathway areas, some earth tones around the edges of the grass beside the ballast and path, and finally some blown sand around the path edges and steps.


As you may have already guessed, the idea is to show that this is the path to the beach and hint at a seaside location. Perhaps the path to... Shifting Sands?


I do plan to add some signs warning of the crossing, but until then it has gone into the display cabinet. My usual light-wood surround and lettering completes the scene - or does it? As an experiment I have added a small backscene in the display cabinet to add to the illusion of depth. The beach hut scene is my own photo taken at Chapel St Leonards, given a watercolour filter in 'Photoshop' and printed on canvas photo paper.


Whether it is an experiment to be repeated, we shall see, I'm always looking at how items can be displayed and there are pros and cons to the micro-diorama approach, not least that it shows up that the cabinet shelves are not totally flat!

Colin

Monday, 4 January 2016

The Path To... (Part 1)

'Son of Up-cycle'

Started as an experiment made from MDF offcuts mitre-fixed end-on this is intended as one of my slimline dioramas that fit in my wall-mounted display case. As it uses track from the original 'Up-cycle' and more recycled material it really is the next step in the Up-cycle saga! In original form it was too narrow and I had put it to one side awaiting inspiration. Doodling saw me first add a building along the rear to add depth, followed by the thought of adding a strip of timber and building up the ground level in a bank, inspired by the cafe area and steps on 'Shifting Sands'.


A balsa strip was added along the rear to add 5mm to the depth, and as a basis of the banking and steps. Being carveable balsa is idea for this task as a hard edge to the top of the bank has been avoided. Steps are built up from foamcore and mount board. Button polish has been used on exposed timber and card surfaces to toughen it up and help avoid warping.


Slow progress was then made, partly to check that the MDF base wasn't warping under the stresses of scenic applications. The banked area has been filled with kitchen roll and covered with strips of newspaper held in place with diluted PVA.  Ballasting has taken place, Woodland Scenics materials secured with 'Kleer'.


Basic textures were added to the concrete steps, tarmac path and ground areas. Both made use of Green Scene textured paints, concrete for the steps, general muck for the tarmac. The latter had some plaster added to lighten it a little. The ground used my mix of paint/PVA and plaster left over from 'The Headshunt'. Think plywood planking makes up the crossing timbers.


Both the steps and path had some adjustments to both texture and colour, with a little weathering added. More colour variation will be built up in due course using weathering powders. At the far end some of my pre-made paving slabs form a short section of retaining wall. The ground areas have been covered with what is described as 'Shifting Sands earth mix' - Woodland Scenics fine earth and fine sand for the coastal sandy look.


Once the turf was dry and excess vacuumed off, PVA was applied again and hanging basket liner applied. Even the hanging basket liner was recycled, the other side of the pieces used on 'The Headshunt'! Once left for 3-4 hours this was carefully teased away to leave plentiful grass coverage. This was trimmed back with a disposable razor and nail scissors to give the effect below.


In part 2 I'll show the extras added to the grassland and the final weathering of the trackwork and pathway.

Colin