Thursday, 31 March 2022

A spot of Tree-cycling

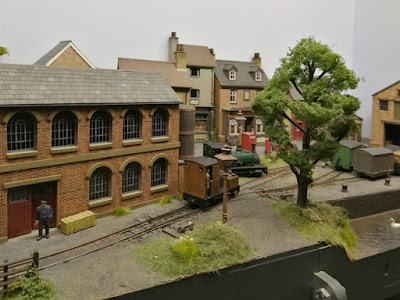
Just over a year ago I constructed a wire-framed tree as something of an experiment, inspired by, but by no means anywhere as good as the writings of Gordon Gravett. 

Mooching around in the workshop at the weekend my eyes fell upon this tree in its resting place on a shelf. I was never quite happy with this, for it's size it didn't really have the bulk it should have and even adding in a couple of extra (not very well secured) branches didn't help. As it was collecting dust and showing some signs of decay I opted to strip off the foliage for potential reuse and cut my losses... except that as I stripped it back I started to wonder if with a little re-arrangement of the existing branches it might have enough bulk as a half-relief tree.

There was only one way to find out and having stripped back a lot of the old bark mix I was able to re-manipulate the branches to suit the half relief style. The two add-on branches had fallen off but were re-configured in new locations with much more secure attachment. New branches were also added in a similar fashion and everything secured with lashings of Araldite.


Feeling there still wasn't enough branch density I had a rummage in the scenics box and found some Hornby R8857 'Wire foliage branches'. The foliage was no great shakes and what there was of it was removed. I then unwound the bottom end of the branches and re-wound them around the branches, again securing with Araldite. These branches are the yucky brown ones in the image above. I also opted to add more fine wire branches to the existing branches to again improve the density.

The result feels a lot more satisfactory than the original arrangement, the next job will be to re-finish the trunk and work back up all the branches, I am intending to use DAS Stone for this, prior to a new mix of bark paint going on.

Colin


Saturday, 26 March 2022

Unfinished Business

Just over a year ago I posted about a new build loco project that had stalled in December 2020. It didn't restart until some point in 2021, where a set of channel frames eventually emerged and changes were made to the cab. Although I cannot pin down when the 2021 work took place, it may have co-incided with receipt of the Kato 11-109 chassis on which the loco sits, my first of the new generation chassis. However the loco then went back in the drawer until late February 2022

The 2021 work had given it channel frames rather than plate ones and also a revised cab. I think at that point I had realised that it actually looked too like it's inspiration (SMR No.3), so I made changes to overcome this. Drawing more inspiration from the RH&DR's 'Redgauntlet' I looked towards the original build of that loco, where it sported round spectacle windows on the cab front. My spares box revealed an A1 Models 009 etch that I had attempted (and failed) to convert to O9 but the cab front and roof were salvageable, and were incorporated into the rebuild. All the Feb 2022 onwards work has built on this theme.


As well as the A1 etches I have used parts from the MG Models fret of grilles, louvres, hinges etc to make the hinged bonnet side doors and front grille. Other bonnet details include a RT Models headlight, and filler caps made from Dapol Drewery coupling rod pins. The exhaust was in the spares box, used in a previous test build. The air horn on the cab roof is No.3's original fitting, I think either a Crownline or early A1 Models casting.


A look from the other side reveals that I had to cut the etched grille down and this side of the surround is in fact styrene strip. Under the channel frame the suspension/axlebox units are cribbed from the Black Dog O&K design but with a few differences. I had hoped to use the original axlebox mouldings from No.3 on here but the started to disintegrate on clean up so instead I dug further back in my modelling career to find some etched ones last used on a model I made in my youth. I had to strip layers of Humbrol gloss paint off to clean them up!


Around the back of the cab can be seen the 2021 modifications made to open out the rear window to follow the roofline. Another RT Models headlight features here, the position still echoing No.3. The coupler blocks on the buffer beams are scratchbuilt, but retrieved from the scrap box having been recovered from a previous project.


With the cab and driver figure removed, we can see the rudimentary detailing. The control panel is from the Dapol Drewery kit with a Peco track pin as a control. The gearbox is represented using a Drewery sandbox with another pin. The original sand dispenser forms another lever, purpose unknown! A modified wagon handbrake forms a (brake?) lever at the rear of the cab, and the driver has a thin cushion to sit on. I'd offer more comfort but headroom is limited a little, commercial figures won't fit so he is a Chinese Prieser copy suitable cut about.

Next stop is the paint shop...

Colin

Friday, 4 March 2022

Conversion Potential

Having reassured myself that I was going to try and stick to O9 projects and not get distracted by 009, I have to reveal that I have bought an 009 kit this week. However, this is with good reason... I've always been a fan of Chivers Finelines kits, the mouldings are always well defined and detailed in the O-16.5 and O9 kits I've had and the 009 ones I've seen in the past. When Matt Chivers announced this week that there were two new bogie wagons released in 009, RC811 (flat ends) and RC812 (rounded ends), I took a look and immediately saw O9 potential.

The dimensions are 79mm long and 24mm wide, which in 7mm scale is approx 11 ft by 3 ft 6ins wide, which for a 15" gauge miniature railway is a reasonable size for a works wagon, possibly built on an old open coach chassis. 

This isn't a new idea - in the past I had obtained a Peco L&B bogie open with a similar aim in mind but had found that the detailing was too fine for it to work quickly and easily in O9. In these new Chivers kits the detailing is very suited to 7mm scale, again with a miniature railway eye on it father than heavy industry.


My RC812 will join the kit stockpile for future build, despite the temptation to jump straight in. I did however realise that I needed to add some suitable wheels to the stockpile too, so eBay was scoured for suitable Graham Farish ones, it is good to have then available again!

Colin

Monday, 28 February 2022

The Humble Van

One O9 wagon that has ducked the limelight is my very simple 4w van, built back in 2012 and never really used that much. At the time it was built I described it as a "quickie build using a spare Black Dog Mining under frame and some Parkside Dundas 4mm scale van doors. The pointed roof is just to be different!". The Black Dog chassis was swapped out for a Peco chassis and Black Dog chassis adaptor not long after being built, which actually had the effect of lowering the whole wagon down, as I omitted to leave the Peco weight above the chassis. As the N gauge axleboxes were largely hidden I did nothing about hiding them. 


Whilst creating the wagon fleet for the project I wanted to include the van but also wanted to add a little more height - it is to large 15" gauge dimensions so not as big as commercially available O9 vans. By popping out the Peco chassis I was able to reinstate the weight, and add a little extra above the chassis as well. Overall I have only added 1mm to the height but it does make a visual difference, of course the knock-on effect of this was to require a change to the coupler position. With the axle boxes now exposed I have repurposed what was left of some RCL Hudson boxes used on a previous Peco conversion.


Paintwork has been matched with the original and the whole van given a fresh coat of matt varnish - apart from the roof where I had created a pleasing worn metal finish in places that I wanted to preserve the gleam of! 

In other news the more recent of the 5ft wagons was running awfully on test and after investigation has had its fake Black Dog style axleboxes removed and replaced by Wizzard/51L HRC001 Highland Railway grease axlebox castings - I had made the previous joint between axlebox and chassis frame too solid to get the wheels in freely, the new ones are only fixed to chassis so can move to allow the wheels in/out. The new fittings were painted and weathered to match the existing paintwork.


The Chivers R&ER Theakston wagon has now received MicroTrains 1023 couplers which look a lot better balanced than the 1015s fitted originally. I opted to retain the 7mm Bemo wheelsets rather than replace with smaller Peco examples.

Colin
 

Monday, 14 February 2022

An afternoon at the races

Back in September I went to a small local exhibition and was quite content with being at a smaller show. I wasn't planning to go to the much larger exhibition at Doncaster racecourse but after some thought decided at about 11.00 on Sunday morning to make the short trip to the show. My plan was to concentrate on the layouts and to try and ignore the trade...

The layout I really wanted to see was the smallest there, Michael Campbell's Loctern Quay, and I wasn't disappointed! I managed a couple of snaps on my phone:


Not long after taking the pictures Michael's phone rang and I was handed the controller(!) With a Minitrains loco and MicroTrains couplers it was very easy to operate, with photo-card tiddlywink computer to generate the trains. I liked the interaction where Michael asked members if the audience to pick cards and he says this does sometimes result in them hanging around a bit longer to watch "their" train being formed.


I think I spent more time in front of this layout than any other at the show, so thank you Michael for braving the trip North!


One thing that struck me were several layouts that placed the railway well in it's landscape. 'Loctern Quay' does this well in an urban setting, but one of my favourites was 'Blueball Summit' in 2mm finescale - possibly the finest scenic modelling there, I overheard someone say what I had thought, that is was almost a smaller scale 'Worlds End'.


I did spend a little money in end, as it had died down considerably after 3pm I had another walk around and a quick look at the trade stands, where I picked up a secondhand but unopened Parkside Dundas 009 chassis kit - largely because it had the old style wheels in it, which are useful if you ever need them for scenic purposes as they blacken up easily. I also picked up a secondhand but new-in-box Peco 009 point, looking online once home I found I had paid about 1/2 price for both. There are bargains out there for narrow gauge modellers...

Colin

Saturday, 12 February 2022

All tooled up with no place to go...

Last seen a few weeks ago, the rebuilt tool wagon is now completed, varnished and weathered. The project suffered a setback midway through painting and had to be stripped, re-primed and a fresh start made. As a change from the original grey the new colour is Vallejo blue-grey with strapping and underframe in black-grey and the roof in a slightly lighter mix of the same.

Sadly the lighter colour and photos seem to over-emphasise that the roof section of the wagon does not fit as well as it should do and there are a few gaps, especially along the edges of the lifting sections. This is acceptable as they are meant to be separate parts but also annoying as I should have spotted the fit issue before painting, especially after the strip down! Here I've posed the tool wagon with the open wagon that shares the same underframe design, showing how the rebuilt wagon now fits in with the new builds.


Sneaking through the paintshop and the last of the post-New Year wagon projects is an additional plank added to a Black Dog style 'Tops' wagon in the style of an improvised local modification. In common with the drop-side wagons the strapping joining old and new is made from cut-down Grandt Line fishplate mouldings. The extra plank and corner supports were constructed as a separate unit, painted and then added to an existing wagon built last year. The timber shade is deliberately different to the original wagon to emphasise the "add-on" nature.

With the completion of these two the paintshop is now strangely empty, but rumour has it that the engineers are looking for some more wagons to tinker with...

Colin

Sunday, 6 February 2022

Anchor-esqe in O9

A couple of weeks ago I took delivery of a new O9 locomotive from John Flower at A1 Models. He had advised that something was on the way and I had mis-read the email thinking it would be etched, imagine my surprise to receive a 3D print and for it to be a proper 15" gauge miniature railway outline locomotive!


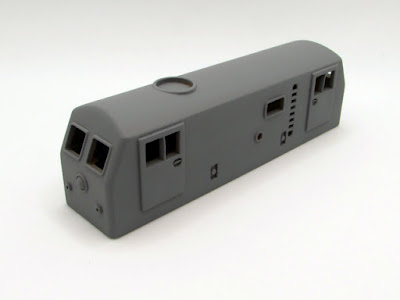
Now of course that shows it after a bit of treatment as I forgot to get a decent shot of it as it came, but you can get an idea from John's pictures on eBay (and indeed buy one). The print quality as it comes is smoother than the last Alan Keef loco, but not quite to Shapeways FUD standards (but not as brittle).

The design is based on 'Royal Anchor', built by Charles Lane of Liphook at the pub of the same name, tested at New Romney and then resident at Ravenglass for many years before moving to Carnforth and subsequently to California. Dimensionally it is pretty spot-on, to be hyper-critical the cab front should be gently curved across the width and the front windows maybe a touch bigger but I don't find that too distracting. The doors really ought to be flush with the sides and by John's own admission he has forgotten to add the bufferbeams! I will be completing the model as a freelance 'inspired by' machine, typical of a 1960s miniature railway style.

The first job was to prepare the print, as the roofline was a little ridged I actually went over the curve of the roof with an emery board to start the smoothing process, then after a clean up sprayed red plastic primer as the initial coating, as seen here:

That tends to make things look worse than they are! After 24 hours drying, 400 grit wet and dry was then used to smooth back the finish, using home made sanding sticks. After another clean up, yellow filler primer was then sprayed and after another 24 hours drying, 800 grit, used both wet and dry used to smooth a lot of it away, resulting in a Wisconsin Central/EWS camouflage finish (!)


After a further clean-up I then opted to spray the roof and cab window areas in another coat of filler primer, and after another 24 hours smoothed everything back with 1200 grit, used wet, ready for a last clean and then a coat of grey primer.

The print slips nicely over the cheapest Bachmann US N gauge bogie diesel chassis, in my case a U36B. It will also fit over a range of other suitable chassis in a similar mould. I've posed it on the Bachmann chassis but I will check how well it performs before making a final choice as I have an Atlas chassis that would also fit which has the advantages of flywheels and maybe smoother starting. I suppose it depends on how much it will actually get used... 


More as the project develops.
 
Colin