Sunday 26 January 2020

An afternoon at Derwent Road

A trip to the Pontefract model railway exhibition gave me a change to catch up with Bill Flude and his O9 layout 'Derwent Road'. I've followed this with interest online and it certainly exceeded my expectations on this first viewing. Although not quite my own personal style of O9 modelling (it represents a 18" rather than 15" line) it is very close in some ways, with it's carefully selected stock including some 15" prototypes, and a couple of things that I can claim a hand in...

An overview of the layout.


Sitting in that back siding is a battery locomotive that I built (and painted) many years ago and the coach hiding behind the station building is a modified Avalon Line 'Exmoor' style kit.


'Kestrel' is a model of a Groudle Glen locomotive, the prototype is tiny for it's 2ft gauge line and scales well to 18" gauge on a Minitrains chassis.


Fiddle yard exits at both ends of the layout are well disguised, presentation is firmly in the 'cameo' style.


A view down the layout past the modern houses with a sand train approaching. Every loco has sound speakers and the layout itself also has a secondary sound system, which proves very atmospheric!


Finally this should prompt a 'round tuit' for me - the James Hilton/6point5 Minimum Gauge model of 'Jubilee'. Must dig my kit out!


The traders at the show provided a few useful items to assist future projects, and I certainly left feeling a little bit certain about the direction of a few future plans. Prepare for Plan C...

Colin

Sunday 19 January 2020

A lesson from 'Walkley and Wright'

I spent yesterday assisting my Dad operate his new micro layout 'Walkley and Wright' at the Worksop Transport Exhibition. Built to a 300 square inch challenge the main board is 35 x 8" with a fiddle stick to the right within the area requirement. It's standard gauge but the presence of a Hornby Ruston lends it some narrow gauge flavour.


It is set-up in the same way as 'Shifting Sands', on it's storage box with lighting/pelmet supports bolted on (in fact they are the same ones), sat on a table provided by the venue.

Herein lies an interesting layout design lesson. When 'Shifting Sands', at 2ft deep, is operated like this it is rather comfortable, as the back of the layout is right in front of you and the main area of the layout is all visible. Put a narrow shunting plank there and it is further away and you have to bend over to see where the stock is to uncouple! My 'Plan B' board is a similar depth and this has got me thinking about a few things, with a rash assumption it gets built, is a shunting layout and got invited somewhere...

Maybe a strategically mounted camera would help?


Colin

Saturday 11 January 2020

The Beck Bridge - Under Blue Skies

I couldn't resist having a little tinker with the photo of 'Pandora' on the 'Beck Bridge' diorama...


This shot of 'Jay' got similar treatment.


Both skies are genuine Lincolnshire coastal views, taken at Humberston on the Cleethorpes Coast Light Railway back in February last year. I may create a sky board of some sort to shoot against in due course but thought a bit of trickery was in order as an experiment.

Colin

Wednesday 8 January 2020

The Beck Bridge - A New Horizon

Whilst going through various options to develop the 'Beck Bridge' recently I realised that for photography purposes it was bothering me that there was a whacking great gap in the backgound of pictures. From some angles the black edging along the back was showing through, as demonstrated in this natural light shot of 'Flower of the Forest'. This was difficult for me to disguise in editing.


I pondered over this and realised that I could add in a scenic piece to represent the beck flowing away from the scene. After some trials an image that I had downloaded in my research phase was flipped horizontally and given a painted effect. It worked from normal viewing angles but when I muttered something about making the trees on the print out look right, a friend suggested to me that I might try to use the 'Decoupage' technique used by card makers to get a 3D effect. I liked this idea as it could fill the "black edge" at the back of the board effectively without too much bodgery required. As a trial I printed my intended backscene out three times on thin card and carefully layered them using mounting board between the layers.


Satisfied with this I created a two-layer decoupage, in theory a back layer could be added if a fixed backscene was added (or as an extra stand-alone layer). Rather than print onto card I printed onto matt photo paper and then glued this to the card, the result is a slightly more intense colour compared with the mock-up.


The line of cut varies from the mock-up as I took the bottom piece across the pipe, which does give a nice effect. The edges of the trees and bushes were cut as carefully and randomly as I could without driving myself crazy. Once cut the cut edges and the back of each piece was treated with Button Polish (shellac) for strength and durability. Between the layers is a piece of mounting board also treated with Button Polish, the top of which and the upper edges of each piece being painted with a green-grey acrylic to help hem blend in to the printed images. In front of the image new growth in the form of Sea Foam bushes and some Peco long grass hide the joins effectively.

From the back it looks like this, the back piece is some 1/32nd ply cut to shape, Button Polished and then painted with matt black as per the rest of the surround. I've tried to be as neat as possible but it won;t usually be seen!


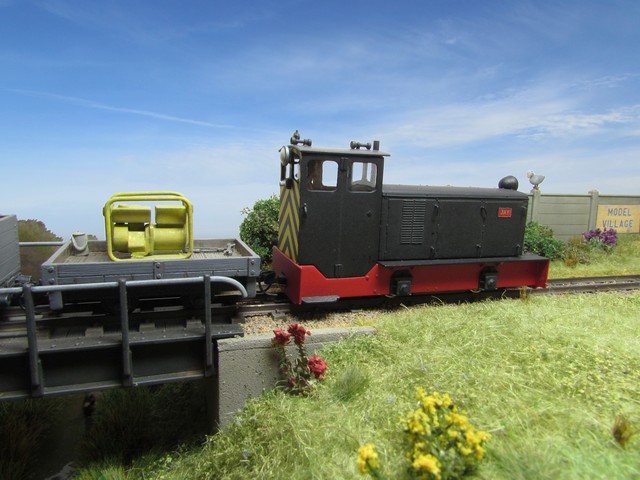
Under the bridge now looks like this, extra Peco long grasses were added towards the back of the water to hide the join and disguise a bit of the black surround taht insisted on showing through.


A slightly different angle from the first picture but this does illustrate that the new backscene piece and greenery are doing their job. The greenery alone could have helped but the backscene really helps to add depth.


I'm really happy with how these changes have turned out, certainly some of my more negative thoughts about the diorama have now gone, it will have to be stored out of sight rather than on display but for photography purposes I am certainly a lot happier to use it. I may still opt to add a couple of items at the right hand end to better fill the end in but that can wait for another day!

Colin

Monday 6 January 2020

What in the name of Bassett-Lowke?!

This isn't the blog post I was going to write today, that can wait.

I just wanted to point out that real Bassett-Lowke locos look like this...


Or this...


'nuff said.

Colin