Monday 26 February 2024

Finishing Touches for Number 6

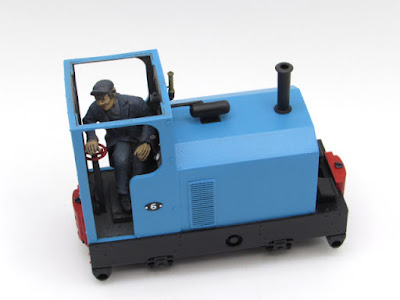
Work progresses on the FK3D Motor Rail 'Simplex', firstly with a little weathering... 

Initially I focussed on the underframe, where I first sprayed with Humbrol matt varnish before starting the weathering itself. To achieve this relatively easily I used post-it notes to mask off the bodywork during the spraying. This gave a much flatter base to work the weathering into, including colour washes, dry-brushing and a few oily/wet patches. On the bodywork some lighter blue was dry-brushed around the body edges to give a lightly-worn effect and weathering applied to the grilles, chimney/exhaust and air tank on the bonnet top. 


Once I was happy with the weathering I glued the driver into place using the pin in his posterior in the hole drilled into the seat support, having to clamp him down whilst the glue dried as otherwise he did not sit into the seat properly. Unfortunately his feet don't quite touch the floor but I'm not sure what I can do about that! The cab roof was then glued in place and again had to be clamped as it had a slight bow to it. 


At this stage I had thought I was finished but having revisited David Malton's drawing in the Railway Modeller I realised that 'Druid' retained the Motor Rail handrail at the bonnet end despite there being nowhere for someone to really stand and hold on for dear life! I therefore fabricated one from 0.9mm brass wire and soldered it together in an improvised jig.
 

After cleaning up the soldered joints the handrail was blackened and then painted to a faded black finish and sealed with matt varnish, before carefully gluing in place into two carefully pre-drilled holes on the front footplate.


Photography of the completed loco on the mini-diorama and 'The Headshunt' shows how well the Kato chassis vanishes into the murk in layout conditions. I believe taking the skirting away from the base of the print has really made a difference in this area. However, the finished loco is currently residing in the display cabinet on a shelf at eye level, where the chassis is all too conspicuous...

Colin

Saturday 17 February 2024

Simplex Number 6

Since I last posted about the FK3D 'Druid' print a couple of weeks ago I've been busy with the paintbrushes and masking tape and the result is an LCLR-style Simplex. One of the downsides of the (almost) all-in-one print is that delicate masking is required between the underframe and the bonnet/cab areas to get a neat result, but well worth the effort. 

The blue is Citadel Lothern blue as used on my 009 LCLR coach and loco, applied in three coats with the paint thinned as required to help alleviate brush marks. The red and black from Vallejo, the latter reduced in blackness with a spot of WW1 beige. The whistle was picked out in Vallejo brass whilst the printed oval plates on the cab sides and rear, which had troubled me at first, were painted black with white boltheads to complement the numbering, taken from a Replica Railways 4mm scale 'Rail Express Systems' rub-down sheet. Number 6 reflects the running number of 'Druid' at the ALR, despite this being a freelance interpretation.


The cab interior was treated with a coat of thinned black-grey and then various items were picked out in different colours. This was actually quite tricky to reach some of the features. The driver figure is the Monty's 'Industrial Driver' figure that I had prepared for the O9 railcar last year but didn't use as he was slightly on the tall side. A length of 1mm brass wire was Araldited in a hole drilled in his posterior and a corresponding hole drilled down the seat support to accept it. Milliput was used to add some "shape" to fill the bucket seat in the cab (Thinking about it, I may have flattened out his original shape for the railbus project...).

The driver has had a touch-in on the original paint job and a waft of Humbrol matt varnish. The loco itself has had a coat of Halfords matt varnish but is actually quite satin. I'm hoping this can be knocked back with some careful weathering and since taking the photos I started this process by masking the bodywork with post-it notes and spraying the Humbrol matt varnish over the underframe, which has the immediate effect of knocking back the shine.

Colin


Thursday 1 February 2024

A Simple Simplex

The FK3D 'Druid' print has been selected as my next O9 project and outwardly it really did not need much work as it stood, just the removal of the support struts in the cab openings. However to add a touch of individuality I opted to remove the skirting under the underframe and around the axleboxes by a combination of cutting an drilling. A fine razor saw was used to make 6 cuts on each side, behind each re-railing bar and either side of the axleboxes. I then scored along the top edge with a craft knife and drilled out a series of holes to weaken the skirt. With a pair of pliers I could then cleanly remove the excess and clean up the edges using an emery board files and wet and dry sandpaper. 

Whilst this approach reveals a lot more of the Kato 11-109 chassis I feel it also makes the loco look a lot better when sat on the track, as the rails are visible and it looks less like it is hovering. The fuel tank and ladder on the side of the Kato chassis have been cut away to make it less obvious at a casual glance.

The only other change I have made is to strengthen the top edges of the cab sides with a length of 0.5mm handrail wire formed into a long 'U' section between the ends, just visible here after primer had been applied. The fine cab detail of the print is clearly visible, I have adapted a driver figure but he is being camera-shy at the moment. 

The print has had an initial coat of plastic primer followed by a rub down, a small amount of filling on the cab front to hide a print line and then a second coat of grey primer. It really has been that simple. The intention is to use a Lincolnshire Coast LR style light blue livery, I've always felt that 'Druid' had a lot in common with the LCLR style!

More soon...

Colin