Showing posts with label FK3D. Show all posts

Sunday, 22 February 2026

Odsock's Lister in Green

I had originally intended to reveal the painted FK3D Lister a few days ago but the original set of photos revealed a chip in the paint on the driver figure's hat and I just couldn't un-see it... hence repairs and a re-shoot. As a bonus that time gap allowed me to fit the couplings to the model and properly finish it off.


Normally when painting a locomotive model I use a process of primer> main colour (spray or by hand)> and then ancillary colours, but for this model I wanted to try something different, more akin to the way I might paint an item of machinery or a figure. Once the grey primer was on I ran a fairly heavy black-grey wash over the model, making sure it sat in the many crevices, angles and recesses of the print. I then masked off and painted the coupler blocks and brake wheel, firstly red-brown as an undercoat and the dry-brushing red over the top. Similarly the bonnet front was masked off and dry-brushed with several coats of a light grey. The intention was to allow the darker colour to remain in the recesses and add depth.


With the paint on the coupler blocks, brake wheel and bonnet front fully dry, I then masked them off to protect then and started to apply the green. Vallejo 'Flat Green' is the order of the day (again!) with a spot of a darker green added in to make a future stage easier. The colour was applied with a large flat brush and was again almost dry-brushed. I was particularly keen not to flood the solebar areas with colour as my intention was to use the dark grey base to provide some extra shadow and create an impression of more depth. The darker wash also shows around the grilles on the bonnet and in may other little spots.


The green had covered in one coat, but I then ran over it again very lightly with the undarkened colour, subtly highlighting the edges of raised detail. Other details such as the gear lever were picked out in appropriate colours and some extra dirt effects added in places. The 'Lister' logos on the bonnet side were dry-brushed in the light grey and I attempted to do the same in green to the 'AUTO TRUCK' lettering on the front. Meanwhile the driver had been painted, again dry-brushing over a dark grey wash, using subtle colours so he doesn't stand out too much. Everything was treated to a spray of Humbrol acrylic matt varnish to seal it all in and give a flat finish.


Finally my attention turned to the couplings. The print does have NEM style receptacles designed to take a Peco coupler, but not at "standard" height. I did try a Greenwich NEM style coupler but it didn't locate properly and even if bent down to the lower height would have stuck out a fair way. In the end I have used a pair of standard Greenwich couplers (the ones I had actually used to experiment with on O9 models a few months ago) located at the base of the block and bent upwards to the correct height. A rather unusual modification is that the loopholes that usually hold the coupler loop have been bent upwards and actually now help locate the coupler into the coupler box. A new hole was drilled in the shortened shank and a Peco trackpin through the coupler block, secured with superglue, holds the coupler in place. 


Colin


Tuesday, 3 February 2026

Odsock's Lister

Although my intention had been to use the Abbey Light Railway style Simplex on 'odsock Corner the reality is that it may be a little too big for some of the clearances. It does get around but only just, so something a little smaller would be more suitable. That same Christmas a couple of years ago I also received a print from the same source (FK3D) for a Lister, and I have now started to work it up into a useful locomotive. 

The print doesn't need much work, most of what I have done isn't really visible, but I did find that I had to scrape away a bit of material underneath to get the Kato 'core' to fit. Part of me thinks that it ought to go in a bit further but I don't want to push my luck... As always a coat of grey primer really enhances the print, there is a lot of detail on there that you cannot see when it is reflecting the light!


Underneath the squeezed in Kato chassis is visible. I have drilled out part of the balance weights at either end of the body, but for different reasons. The right-hand end was in order to add 'liquid lead' as part of a scheme to counter-balance a whitemetal driver (the bonnet also had a suitable compartment opened up and filled). The left-hand end was to reduce the weight a little, although it could be used for weight if another driver is ever used. The weights were secured with slow-setting epoxy.

The body separated from the chassis. As the base plate used was from a 11-108 chassis, moulded in shiny grey plastic, I have carefully prepared it with 1200-grit wet and dry, cleaned it up, primed with plastic primer and then top-coated with matt black aerosol paint to get a hard-wearing, matt finish. The 3D printed top clip, that holds the motor in place, was also treated to this finish, as both are visible at certain angles.


The driver is from the 'Heroes of the Footplate' range and is a casting I've had many years, his right arm is adjustable and has been in a number of different positions as he's been offered up to different locos over time. Adjusted again, it sits naturally over a control lever. His right foot is on a pedal that had actually broken off the print, it was shortened to suit before being added back in place. I had to build up his posterior with Milliput to sit neatly in the tractor style seat. He's held in place by a combination of holes in the footplate to accommodate 0.5mm brass wire in his feet, and a rather painful looking spike in the centre column of the seat...


Whilst I said I hadn't done much to modify the print there was one thing that I did change. The tops of the axle 'W' plates had triangular cutouts where they should have continuous sloped sides, so these were filled in with Milliput and carefully smoothed to shape. The only other thing I changed was to replace the gear lever with a Peco track pin with a touch of epoxy to shape the head, as the original seemingly "vanished"...


Painting has now commenced, so the usual rule applies until you see it again!

Colin


Saturday, 8 March 2025

Caravan and Cake

I recently had one of those annual occurrences that involves cake and a few beers, and in amongst the presents were a couple of O9 models to build. On the left is a FK3D print of the Motor Rail/Simplex 'Caravan' which is designed to fit the Kato "core" in the same way as their Lister model, which will go a long way to overcome the issues I resolved on the 'Druid' print.


On the right is a self-directed present, a Unit Models 1-plank wagon cast resin kit. Years ago I built a Unit models 2-plank wagon kit but it didn't lead to any more purchases, this one was prompted by seeing Stephen Clulow's 'Apadobe Mine' at the 7mm NGA even to Mickleover in February (or January 32nd if you prefer...) It was a pleasure to meet Stephen for the first time and see the layout in operation, you can read more about his models on his blog Steve's Narrow Gauge Railway Adventure.


Stephen operated using a mixture of Black Dog Mining and Unit Models wagons and this prompted me to have a look again at the kits at the Doncaster exhibition the following week. Having purchased a 3D print Heywood-style wagon at Mickleover I now have a few "out of the box" projects to be getting on with in the coming months.

As for the special day, we had a trip on the Sherwood Forest Railway and Bob Colley treated me to the birthday headboard for the run!


In the next couple of weeks there should be developments to report on both 'odsock Corner and a project that I have been keeping under wraps...

Colin
 

Saturday, 9 November 2024

Beyond the Kato 11-109 - the 11-108!

Back in February I completed number 6, a Simplex from FK3D styled on the Abbey Light Railway's 'Druid'. This ran on a Kato 11-109 as intended by the maker, although I had revealed a little more of it by removing the false 'skirt' under the underframe to make the end result more realistic. However, I always thought that it looked a little too 'perched' on the chassis, in particular too much clearance under the re-railing bars was a bit off-putting.

The inspiration for what follows was actually my yet to be built FK3D Lister locomotive, which takes advantage of a feature of the new-generation Kato chassis being built around a 'core' of weights holding the motor, flywheel, drivetrain etc to the point that the upper cover really only stops things falling out of place. I had also discovered the version of the Kato chassis (11-108) that had very little detail and was in fact noticeably narrower than the fake locomotive sideframes of the 11-109. My initial thoughts to somehow use a chassis without a cover and wondering how to fix it in place, turned to using a further-reduced 11-108 to lose 1mm in ride height.

The starting point, number 6 on a 11-109, with a frame height of 14.5mm and the 11-109 sideframes filling the space underneath.

The alterations required the the 11-108 chassis (stock Kato image used). The aim was the leave a raised area in the centre to match the opening in the body of the 3D print. In particular I will draw your attention to the cut at the right hand end of the top - do not cut to the right of the raised area as this will remove the clip that stops the motor moving backwards, I started this but soon realised my error! Cut along the opening about 1.5mm in from the edge instead and then file down the area to the right. All cuts were made with the top cover removed from the motorising unit.


The resultant conversion is seen with the original 11-109, we can see how much narrower it is and how the end platforms are lower than the 11-109 frame. The areas over the axleboxes were at about the same height as the 11-109 frame but I have chamfered them away to fit into the cut-away area under the body. I have painted the axleboxes matt black to better hide them and switched the baseplates over to give the new chassis the sprayed matt black one from the original chassis. 


In order to secure the new chassis in place I have used two screws which pass through the endplates into holes drilled in the underside of the body, centre at the rear and to one side at the front. As the motor protrudes out of the top of the cut-down chassis I had to remove an area under the bonnet of the print and reposition the weight that counterbalances the whitemetal driver figure. This view shows the slightly angled areas that will form the main interface between the new chassis and the body, inboard of the strips that sat on the 11-109.


The end result is a 13.5mm measurement to the top of the frame, bringing the rerailing bars closer to the rails and looking a lot less perched with the bonus of fresh air between the axleboxes and the ends of the loco.


So, was it worth it? I think so! Now you might be wondering why I didn't just cut away the old frame and carry out the same modifications, well I find the Kato plastic a little awkward to work and the less I had to remove the better, especially along the length. I also have memories of taking too much away from a 11-103 in the past and actually rendering it useless... but at least I have a spare motor for my older locos...

Colin

Monday, 26 February 2024

Finishing Touches for Number 6

Work progresses on the FK3D Motor Rail 'Simplex', firstly with a little weathering... 

Initially I focussed on the underframe, where I first sprayed with Humbrol matt varnish before starting the weathering itself. To achieve this relatively easily I used post-it notes to mask off the bodywork during the spraying. This gave a much flatter base to work the weathering into, including colour washes, dry-brushing and a few oily/wet patches. On the bodywork some lighter blue was dry-brushed around the body edges to give a lightly-worn effect and weathering applied to the grilles, chimney/exhaust and air tank on the bonnet top. 


Once I was happy with the weathering I glued the driver into place using the pin in his posterior in the hole drilled into the seat support, having to clamp him down whilst the glue dried as otherwise he did not sit into the seat properly. Unfortunately his feet don't quite touch the floor but I'm not sure what I can do about that! The cab roof was then glued in place and again had to be clamped as it had a slight bow to it. 


At this stage I had thought I was finished but having revisited David Malton's drawing in the Railway Modeller I realised that 'Druid' retained the Motor Rail handrail at the bonnet end despite there being nowhere for someone to really stand and hold on for dear life! I therefore fabricated one from 0.9mm brass wire and soldered it together in an improvised jig.
 

After cleaning up the soldered joints the handrail was blackened and then painted to a faded black finish and sealed with matt varnish, before carefully gluing in place into two carefully pre-drilled holes on the front footplate.


Photography of the completed loco on the mini-diorama and 'The Headshunt' shows how well the Kato chassis vanishes into the murk in layout conditions. I believe taking the skirting away from the base of the print has really made a difference in this area. However, the finished loco is currently residing in the display cabinet on a shelf at eye level, where the chassis is all too conspicuous...

Colin

Saturday, 17 February 2024

Simplex Number 6

Since I last posted about the FK3D 'Druid' print a couple of weeks ago I've been busy with the paintbrushes and masking tape and the result is an LCLR-style Simplex. One of the downsides of the (almost) all-in-one print is that delicate masking is required between the underframe and the bonnet/cab areas to get a neat result, but well worth the effort. 

The blue is Citadel Lothern blue as used on my 009 LCLR coach and loco, applied in three coats with the paint thinned as required to help alleviate brush marks. The red and black from Vallejo, the latter reduced in blackness with a spot of WW1 beige. The whistle was picked out in Vallejo brass whilst the printed oval plates on the cab sides and rear, which had troubled me at first, were painted black with white boltheads to complement the numbering, taken from a Replica Railways 4mm scale 'Rail Express Systems' rub-down sheet. Number 6 reflects the running number of 'Druid' at the ALR, despite this being a freelance interpretation.


The cab interior was treated with a coat of thinned black-grey and then various items were picked out in different colours. This was actually quite tricky to reach some of the features. The driver figure is the Monty's 'Industrial Driver' figure that I had prepared for the O9 railcar last year but didn't use as he was slightly on the tall side. A length of 1mm brass wire was Araldited in a hole drilled in his posterior and a corresponding hole drilled down the seat support to accept it. Milliput was used to add some "shape" to fill the bucket seat in the cab (Thinking about it, I may have flattened out his original shape for the railbus project...).

The driver has had a touch-in on the original paint job and a waft of Humbrol matt varnish. The loco itself has had a coat of Halfords matt varnish but is actually quite satin. I'm hoping this can be knocked back with some careful weathering and since taking the photos I started this process by masking the bodywork with post-it notes and spraying the Humbrol matt varnish over the underframe, which has the immediate effect of knocking back the shine.

Colin


Thursday, 1 February 2024

A Simple Simplex

The FK3D 'Druid' print has been selected as my next O9 project and outwardly it really did not need much work as it stood, just the removal of the support struts in the cab openings. However to add a touch of individuality I opted to remove the skirting under the underframe and around the axleboxes by a combination of cutting an drilling. A fine razor saw was used to make 6 cuts on each side, behind each re-railing bar and either side of the axleboxes. I then scored along the top edge with a craft knife and drilled out a series of holes to weaken the skirt. With a pair of pliers I could then cleanly remove the excess and clean up the edges using an emery board files and wet and dry sandpaper. 

Whilst this approach reveals a lot more of the Kato 11-109 chassis I feel it also makes the loco look a lot better when sat on the track, as the rails are visible and it looks less like it is hovering. The fuel tank and ladder on the side of the Kato chassis have been cut away to make it less obvious at a casual glance.

The only other change I have made is to strengthen the top edges of the cab sides with a length of 0.5mm handrail wire formed into a long 'U' section between the ends, just visible here after primer had been applied. The fine cab detail of the print is clearly visible, I have adapted a driver figure but he is being camera-shy at the moment. 

The print has had an initial coat of plastic primer followed by a rub down, a small amount of filling on the cab front to hide a print line and then a second coat of grey primer. It really has been that simple. The intention is to use a Lincolnshire Coast LR style light blue livery, I've always felt that 'Druid' had a lot in common with the LCLR style!

More soon...

Colin
 

Saturday, 20 January 2024

Future Echoes

It's been a quiet few weeks since I posted at Christmas, and it does seem a bit late to be wishing readers a Happy New Year!

I have spent a little time recently considering "what next?" and "what's achievable?" There are various thoughts at play and despite the appeal of something that the Shifting Sands stock can run on, another part of me wants to push in a different direction. I've always struggled with non-miniature railway O9, but I may now have a helping hand... my dad wasn’t sure what else to buy me for Christmas and I was out of ideas, so this was a complete surprise on Christmas day. I thought “that's too light to be a mug” when I was passed the almost square box...


This is  3D print from FK3D based on the 2ft gauge Abbey Light Railway's Simplex rebuild 'Druid' to fit a Kato 11-109 chassis. It is certainly not to miniature railway proportions but very believable as an 18" gauge locomotive. 

The irony was that I had actually asked for a FK3D print from my sister, who I wouldn’t see after Christmas. I was relieved it was not the same print, although I suppose there is no limit to how many of these you might want and potential variations thereof...  


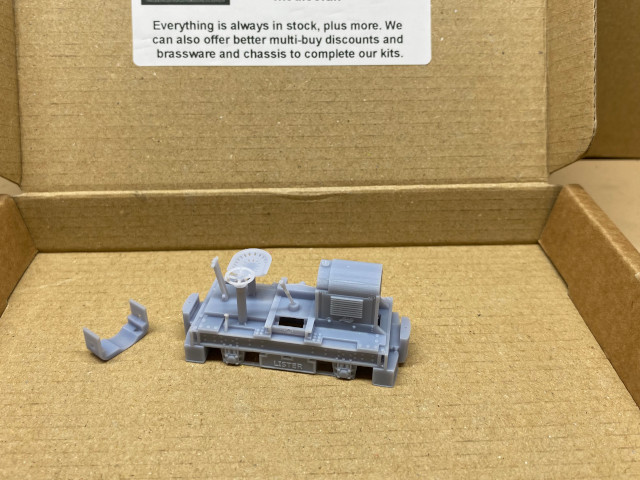
So a few days later I opened up this little Lister, a very finely detailed print that will require careful painting. I was contemplating adding it to the 15" gauge fleet as a companion to the railcar on a slightly crazy micro layout scheme, but the arrival of the Simplex has meant that I am presently working through a few ideas for something else... 

There's not a lot of modelling underway at present, the Leyland National is slowly heading through the paint shop, currently in reverse, but in a few idle moments I have been working on a driver figure for the Simplex, but he's being photo-shy for now!

Colin