Showing posts with label Micro layout. Show all posts

Thursday, 7 May 2026

'Up-cycle' Revisited?

Probably the last doodle for the wrapping paper box board for now, covering the last of the considered track arrangements. This time the evolution of my 'Upcycle' scheme from many years ago, but on a brand new board, not upcycled! Nothing too specific, a yard with assorted junk, a siding with an oil drum for fuelling locos and a nondescript hut...


Incidentally, I dry-assembled the board at the weekend, really just to check the mechanics of whether it could actually desk-sit. It can, just, but might raise more questions than answers about the ideal location of electrical connections and switches.


Colin

Wednesday, 29 April 2026

Three Point Doodles - Take Two

As promised, we return to the theme of the miniature railway depot/shed scene for another plan. This time however I have flipped the plan back-to-front (the wonders of photo manipulation!) so the lead-off leaves the scene behind a building. I have not drawn it here, but the idea of revealing the interior of the front-right building was appealing. This version does need a fiddle stick off to the right to allow locos and stock to be exchanged. 


One thing I have become very conscious of is that I have a suspicion that I am under-estimating the sizes of some of these structures for the board space/height, especially to keep it in the box. Looking at these shed scenes again, the long, flat structure across the three tracks, based on the running shed at Cleethorpes, looks too 'flat' and really needs to be two structures with a step in the frontage to add some variety. These plans would definitely benefit from mock-ups as a next stage if developed further.

The last of the current batch of plans probably gets the structure sizes about right, and for the first time the loop and siding plan gets a sketch!   


This is very much in the vein of a scenic test track, the scenery is fairly stripped back to two small structures - a bus shelter and grounded wagon body, plus fencing and shrubbery. Yes it needs more fiddle yard than desirable but if it is for my own enjoyment only...

Colin

Sunday, 26 April 2026

Three Point Doodles

I've found myself doodling again... several times... I'll spare you all dumping all the designs in one post, so here are the first two, based on the 'Tragbar/Chetley' plan. I realised that I may not have really done this justice in my original mock-ups, and looking carefully the rearmost, L/H point was aligned wrongly. 

The first plan on the revised template is designed to be simpler scenically than the Inglenook plans, although it shares some common elements. There are less buildings and any provision for concealed, rear operation, point controls is dealt with by a low rock face. A grounded 18" gauge wagon body (which I've possibly drawn a little too small) from 422 Modelmaking components sits behind a sleeper-edged platform. This arrangement will allow operation of a passenger train formed of couple of 4w coaches and for another locomotive to release the incoming locomotive.


In many ways I'd like to build something that stock and motive power from 'Shifting Sands' can operate on. In this sort of space the obvious idea is to model the "other" shed of the railway (the one at Shifting Sands itself cannot possibly house everything!). This plan turns things on their head, but only very slightly... The scenic area is shortened to allow a small fiddle area on the board itself, so it is truly self-contained. New style Peco loco lifts would be deployed to lift locos on and off the layout to take their turn at the sheds.


We shall return to this theme very soon...

Colin


Sunday, 12 April 2026

Ingle-doodles

I had some time over the weekend so created a template from my Inglenook v3 mock-up that could be used as a basis for sketching some scenic ideas. When I originally worked through this idea the look of the right-hand end was established in my mind, and the left hand to be simple and have plenty of greenery and a grounded NG wagon body. 

The more I thought about it, the low height of the backscene (95mm) would actually make this look rather odd, especially as there was no height for trees. Conversely, in this small space I actually felt the need to constrain the railway in some way... So this was sketch 1, I gave up on adding more detail as I realised those buildings might be a bit grand in scale!

The building end flat against the backscene was intended to use a (4mm scale) 3D print I picked up recently, it appears in the next two sketches at proportions closer to reality! 

I liked the lay of the buildings in that original sketch but needed to reduce them to much smaller buildings. There are no 7mm equivalents of the Wills kits to bash so I looked at alternatives. One is a very old set of Highfield vacuum formed sides that I have for a Highland Railway brake van, bought cheaply with the idea of building a grounded body. Here it sits in the centre of the scene, with a concrete hut based on a 422 Modelmaking kit on the right.

The grounded body (and extension on the right) serves to cover the pull rods that would be fitted to the points to allow operation from behind. These will have to sit within the backscene to allow the whole unit to fit on the box and therefore enclosed from the scenic side.  Although I liked this arrangement I had concerns about the angle the grounded body would sit along the backscene, with the roof potentially getting narrower to the right as space runs out.

However, by switching the grounded body to the right-hand position (on checking the website the 422 building transpired to be a little too long) it sat a lot better, with the bonus of more space around the door. In the centre I have added a new brick/tile building representing the back of an open-fronted farm store, the roof carefully calculated to meet the backscene at full width and angle away from it.

I've given the right-hand end building a bit more space on this version of the plan, having realised it was too small in the originals. The open-sided variant in the original plan looks great but would not serve to hide the potential to sneak this line off-scene if/when a fiddle-stick is added.

Colin

Sunday, 5 April 2026

Easter Reflections

Six Easter's ago I started creation what should have been my next layout, an O9 version of the Julian Andrews brickworks plan, later known as 'Avalon Brickworks' in the stewardship of Howard Martin. We were in lockdown and the weekend saw rapid progress on the layout during the day and depletion of a small keg of Hobgoblin (Ruby) in the evenings, and maybe afternoons... All the details


This project became bogged down in difficulties about what it should represent and what should run on it, I could have persevered but it was later all lifted due to the following reasons:
  • The curve at the top-right hand corner was never smooth enough and really needed completely relaying.
  • The angle and curve in the middle siding could never be decided on (in many ways due to me persisting trying to use MicroTrains couplers) - now actually I think it looks right as first laid!
  • The fiddle yard siding was later extended and curved and always seemed to get in the way.
  • I should have raised the track bed up from the board surface as I did on 'Shifting Sands', it always looked too 'sunken' around the edges.
As it was, the track was recovered, the curved rail mostly got used up on 'Odsock Corner' and the points and board await re-use, hence why most recent planning uses a 'Y' and Right-hand point. That current layout planning presents some dilemmas, there are several competing ideas that come up against practicality and reality. 

You may have seen the ideas on these pages in the last few weeks, centred around the Scale Model Scenery board for a Really Useful 'wrapping paper' Box . The most recent, posted on April 1st, was not really trying to fool anyone other than myself! That scheme needed a substantial run-off board to work effectively and there are space considerations as to where it could actually be operated - it would inevitably end up only being able to be set up in the workshop and having to have rolling stock transported out to meet up for a running session. I think at the moment I really want something that can live and be operated in the house...

The inglenook variations on that board hold a little more possibility for this by using them as a desk-sitter, but the board length will only just fit across the desk and with a solid wall either side I foresee issues getting it into place reliably. The original 'Upcycle' scheme that was abandoned well before Easter 2020 was a little shorter in length and perhaps better for it, although it could have benefitted from a little more depth. Height-wise it was designed to fit into a space and was going to present a challenge with fairly low-key scenery up to hedge/fence height.

However, at the moment, the idea of a single board that is shorter than the 30" of the Scale Model Scenery board, desk-sits easily and has low height scenery to store away with ease, is quite appealing. If it could offer a continuous run and some shunting possibilities, have a fairly generic setting and use the stock built recently with Greenwich couplers, it might tick a lot of boxes. If it looks like what was laid six years ago, that will be entirely a coincidence...

Food for thought...

Colin 


Wednesday, 1 April 2026

Boxing Clever

After some thought, maybe all that messing around with Inglenook variations is OK, but sometimes all I want to do is model more of a miniature railway scenario...?


Now it would probably benefit from a slight curve into the scene on the right, taking the platform out of parallel with the board edges and pushing the headshunt into the corner 'Shifting Sands' style...

Hmm...

Colin


Sunday, 29 March 2026

Thinking in the Box

Taking the planning for the wrapping paper box project a step further, last weekend I mocked up the v3 Inglenook using the actual board parts and real points and stock to see if it actually worked in practice rather than theory. A few scraps of ply also got involved along the way...

The passenger coach here is substituting for a longer wagon, to test for some variation in the stock used. However the option is there for short passenger workings into the headshunt. I am conscious that the Lister is a fairly small loco and others, such as my Simplex, are a little longer - there isn't much extra clearance in the headshunt once the end of the board is taken into account plus any scenic treatment.
One option would be to have the board open-ended at the headshunt end to give a little more breathing space. This would provide a nice contrast with the necessarily closed-in sidings end. Here I've mocked up the positions of the wall and shelter leaning off it, but more importantly there is clearance in the sidings to allow three wagons to sit behind a magnet but still be recoverable beyond it.

Thinking back to the headshunt issue, a week on I opted to mock up the other possibility to breathe a little extra length into the space. This uses a second 'Y' point in place of the right-hand point and this affects the angle of the headshunt and the angles and curvature in the sidings. What it does not do is help me re-use the right-hand point that I intended to use from a previous project!

In many ways I think I prefer the way the sidings sit in the version with the right-hand point and having had another look today I think it should be possible to remove about 1/4" or rail between the two to squeeze a little more out, and angle the headshunt into the corner. We shall see...

Colin

Sunday, 22 March 2026

Living in a Box

At Christmas, after a well-placed hint, I received a Scale Model Scenery baseboard kit designed to fit into a 'Really Useful' wrapping paper box. The intention is to produce something that can (hopefully) live in and be operated in the house. possibly as a 'desk sitter', although clearances may be on the tight side for that ambition. I haven't built the board yet but marked out the space (730 x 207mm) on some Amazon packing paper and played about with point templates, various rulers and a bit of post-production to run through a few options. 

The obvious one is an inglenook, a "standard" 5-3-3 seems possible but the second version is more a 4-4-2 with a shorter headshunt, the idea being that the rearward longer siding could have a rough platform to receive a simplex and a couple of 4w coaches from a fiddle stick run-off connected top-right.

The next option is to go for two points facing each other, along the lines of my earlier desktop-sitter 'Upcycle', again a passenger operation ought to be possible to the rear right hand line using a fiddle stick connected top-left. 

It's not too far from there to what to me is a very familiar plan adding another point... I have described this as 'Tragbar' as it is a mirror of an arrangement popularised in Scale Model Trains by the late Chris Ellis building the build of a layout of that name. It is more familiar to me as my Dad and I built a layout to this plan many years earlier called 'Chetley'. We hid the line top-right as a fiddle yard on the board but again this idea uses an optional fiddle stick. 

Next is a version of the plan I was previously looking at on the small cork board, a loop and siding. Whilst all of these plans benefit from a fiddle stick, this one requires it for full operation. However it would be possible to shunt it as a tuning fork without it for a quick operating session.

The final plan is actually a return to the Inglenook theme and has been created more recently than the other images. This switches the fiddle-stick line to the longer siding and the headshunt is a dead end. In some ways I prefer that as it creates a real restriction to the length rather than the possibility of cheating off down a fiddle stick! 
To fit in the box the board doesn't actually have much height to the backscene boards, 95mm - so buildings are something that have to be considered carefully. We are in the territory of huts, grounded van bodies and high walls. I envisage the line at the back running behind a wall, that get's higher and then has a lean-to over the middle line. Some shrubbery behind the back line would make it's disappearance complete as it wraps over the hole in the sky...

More soon...

Colin


Saturday, 12 April 2025

Mosslanda Musings

A few weeks ago I was browsing in Ikea and just happened to pick up a Mosslanda picture shelf, the latest item in their inventory that has appealed to micro layout builders. It has been championed by the likes of James Hilton on his blog and Ian Holmes on his Micro Model Railway Dispatches YouTube channel. Interestingly they have different ideas about use, scale and construction style and I find myself in agreement with aspects of both of their approaches.

Whilst James favours smaller scales and a minimalist approach to trackwork, Ian has shown a scheme in 009 incorporating pointwork that caught my eye as a potential desk-sitter micro layout. Playing about with a few bits of track I devised the scheme below as a potential O9 shed scene, the wooden mock-up representing a shipping container or flat-roofed shed - a two-road shed would be in low relief on the left.

.

I'll be honest and say that I think it probably looks a little too "busy", so an alternative is this 'tuning fork' scheme that could have a lot in common with my old Gn15 project 'Ambassador Works' as a shunting layout, with a warehouse building along the back with a loading dock.


A third option would be more along the lines of some of James' work, with a single-line scene of some sort. I've not felt the need to mock that up - yet...

Colin


Friday, 19 July 2024

A Cozy Office - Completed

I'm not sure how a month has gone by since anything was reported from the world of 'odsock Corner, things are progressing quite slowly due to a combination of factors but are at least progressing... we'll return to what has become the saga of the wall and gates in due course, but for now the little office is complete.


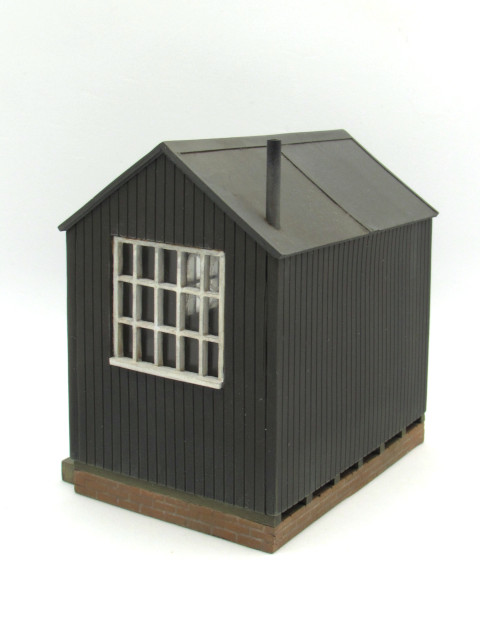
Wanting to totally contrast with the example on Shifting Sands this one is painted in a dark colour with red brick base. The base and the main part of the building were painted as separate units and only brought together at the varnishing stage. Even with this split I had to carry out a fair bit of masking of the wooden cross-pieces under the floor and brickwork to achieve a neat finish.

The main part of the structure saw masking to allow the window frames to be sprayed with white primer, after which the masking was reversed and the walls painted in Vallejo Dark Olive Drab. A wash-over in a darker shade enhanced the plank lines, then dry brushed with lighter shades to enhance the plank edges. Window frames were treated to a top coat of off-white and a lot of weathering to reduce their brightness. In contrast the roof is largely washes of greys over the original primer.


The interior details were painted up and added into the hut, the desk squeezing in along one end wall. The chair was located in place into two pre-drilled holes with two short pieces of 0.5mm brass wire in the rear legs, cut down from their longer length as used to hold the object whilst painting. The stove was positioned as closely as possible under the chimney on the roof using a length of brass wire as a guide.


The Titfield Thunderbolt poster was added to the wall as a little extra detail, coming from a sheet free with a magazine years ago. It covers a couple of air holes in the casting and a mark I made on the wall fitting the seat... 
 

At this stage I realised that there was perhaps a little too much detail painting on the interior as you cannot really see them with the roof in place! I have made passive provision for lighting via a hole in the base and floor around the door frame area to thread a wire through, although I have no plans to add this at this stage.

Colin

Wednesday, 10 May 2023

Getting Something Moving - Or Not

As I'm having a bit of a sort out and re-ordering of projects, one of the many issues was ‘Getting Something Moving’ and somehow making it work for me. 

Well the title of the project is now somewhat ironic because nothing is moving. It has been in existence now for three years, I suppose that when I started building in that lockdown Easter it was what I wanted to do but now looking at it with hindsight I'm not so sure... I've tinkered with it a few times since then but it still doesn’t gel. As seen recently I've spent some time playing with different track plans that will fit on the board and spent some time trying to work out if the current track plan could actually be made to work for me without having to do anything too destructive, but the more I looked at it the more the amount of work it needed to achieve what would work felt a little bit overwhelming due to time constraints.  

Well I say current, however despite surviving three Easters since construction started, just one Coronation later...


I had always said that I'll keep the track down on the board until I'd definitely made my mind up whether to retain the track plan, it looks like now I'm at that point! Everything has been recovered from the board and we shall see what develops next. I freely admit I struggle to work with 09 concepts that aren't 15 inch gauge railways as I know them which are as generally speaking passenger carrying pleasure railways. Anything slightly industrial or agricultural to me doesn't sit right. Others (Bill Flude and Graham Watling in particular) manage it far more eloquently than I do.

Colin

Friday, 17 March 2023

Revisiting the Corkboard

It's been a quiet month since I last posted and actual model-making has been in abeyance for one reason or another. That hasn't stopped the thought processes though...

Since seeing James Hilton's work at Doncaster I have been playing with a few ideas to revive the small corkboard layout I started a few years ago. I think I have now finally reached the conclusion that the "Avalon Brickworks" plan isn't going to achieve what I want to do and needs a rethink. As a reminder, after a year or so of inactivity it presently looks something like this:


So why doesn't it work? There are a few things, some practical and some just "me". One of my bugbears with it (of my own making) is that the track sits in a tray formed by the outer framing of the board. On 'Shifting Sands' I raised the track on thin balsa to overcome this and I regret not doing the same here in "lockdown" conditions. The other practical issue is that the facing point arrangement makes positioning MicroTrains magnets tricky, leaving a magnet on the main line behind the right-hand point in an awkward position, OK for swapping sets of wagons but less so to actually "shunt" individual wagons. The curve in the inner siding pushed the magnet back there leaving little room for manoeuvre. 

The offset circuit of James' 'Canal Street Wharf' inspired plan 1 with a siding added within the circuit. The idea is that it would be fully scenic all around, rather like my 009 layout 'The Old Quarry Line'. At one point I sketched in a loco spur top right outside the circuit but I felt that it made things look unbalanced so it was lost from the final version of the plan.


I then wondered how it would look with the offset of the circuit the other way around, i.e. with the point on the side further away from the baseboard edge. I redrew this as plan 2 which actually confirmed what I thought, that it looked more spacious the other way around with the siding closer to the centre of the board. On both versions there is plenty of space for uncoupling magnets on the straight lines from both arms of the turnout.

These ideas need a complete lift of the existing trackwork, but that is not a bad thing as it will deal with the bugbear of the sunken track. My thinking is either to add another layer to the board top to raise the trackbed, or the more extreme idea to flip the board over and add a new trackbed layer on what is presently the underside of the framing. This would allow some dramatic scenery below track level such as a bridge over a stream. 

However, plan 2 did lead to another train of thought, completely different to the original concept, plan 3...

This is something of a cross between 'Shifting Sands' and an Inglenook! The sidings at the front are a 3,2,4 capacity layout, which isn't bad for the space. All have nice straight runs off the points so uncoupling/coupling should not be an issue. The sidings at the back are intended to be hidden and can hold a loco and 3 wagons.

So back to that "me" issue... I had struggled to find a suitable theme and setting for the original plan. Whilst many feel comfortable with O9 in an industrial setting it isn't something I can relate to, certainly not with my current rolling stock. Steering clear of this theme, I would be looking at depicting a modern-day estate railway of some sort, concentrating on stock used for maintenance of the railway itself and the land, e.g. loads of ballast, sleepers, fencing material, cut trees etc, maybe animal feed. 

As to what will get built, we shall see...

Colin


Monday, 13 February 2023

Doncaster Delights

With slightly more advanced planning than last year (I had decided to go weeks before, not on the day) I headed up the road to Doncaster on Sunday for the BRM 'Festival of Railway Modelling'. With a similar plan to last year I intended to concentrate on the layouts and those traders I had identified as having items of interest...

The most recent issue of British Railway Modelling had a strapline on the cover about building a model of a miniature railway. The resultant static model, using parts from West Hill Wagon Works and commercial kits, really captures the spirit of a miniature railway and I had a good chat with Phil Parker about its creation.


Continuing the theme of the smallest exhibits at a large show, it was a pleasure to see the display of layouts by James Hilton, including 'Canal Street Wharf' in OO-6.5, representing 18" gauge. Seeing this has made me start to consider how I could adapt and simplify my stalled 'Avalon Brickworks' style layout to a similar format...


James' double-stacked micro layouts were a joy to see, proving that something so simple but focussed can actually have a lot more impact than some of the larger layouts on show. These smaller layouts really are 3D picture frames and their seeming lightness in construction fascinated me. After a long chat with James many more thoughts were in progress...


Almost directly opposite James' display was the other layout that really grabbed me, the7mm scale 'Harlyn Pier', which has a beautiful seaside setting, with the sea on the backscene and provision for the same of ice cream, rather like my own 'Shifting Sands'!


As there were traders present that I am unlikely to catch at any other show this year I partook in a little shopping, nothing too grand but items that should come in handy over the next few months...

Colin

Friday, 3 December 2021

The best laid plans... can be changed

The appearance of 'Brooking Vale Brewery' in the latest 'Modeller has prompted some further thought about my stalled O9 micro layout project. Although the builder of that layout did not reference it, I was reminded of my source material, Julian Andrew's United Brick (Avalon Brickworks). I revisited this to see what it was that didn't quite gel for me, aside from issues about a credible scenario... I realised part of the issue might be that I had watered down one of the elements of the original (and many of it's imitators) by moving the inner siding towards the running line rather than it going towards, or even through a building in front of the backscene. Indeed I had physically moved it forward twice since the track was first laid.

I pondered what could be done if I swung the siding into a 6" radius curve and to move the Petite Properties structure to this location. So I drew out a 6" curve on good old cereal packet and also created a new mock-up of the structure as I realised it would look better reversed. By moving the bigger tree forward from the backscene it potentially hides the line running through the backscene a little better.


I have used part of the older mock-up to disguise the right-hand-side curve. I think I would actually go for a slightly taller, maybe wider, but definitely more bland structure here, possibly in corrugated material. The key to this structure appears to be that is should be seen but not to draw the eye to it, and the more I think about it the more the Petite Properties kit would not meet that criteria!


I still think I am some way off (re)starting this build. Whilst it remains an aspiration to complete it, having worked on the Christmas pizza and taking great delight in the simplicity of it, part of me yearns to do something quite simple and accessible for my next project, but I am not sure what...

Colin

Saturday, 20 November 2021

Santa's Gotta Brand New Sack

The presents in the open wagon on 'Christmas Tree Halt' were troubling my mind a few weeks ago. The reduction in size of the originals was the obvious solution at the time but part of me wondered if the eventual solution was to have a sack of presents represented in the wagon. I thought nothing more of it until I took a trip to a local model shop that is sadly closing at the end of the year (http://www.thegoodsyard.co.uk/). I was hoping to get some 009 flexi track but they were out of stock, however I did pick up a few bargains...


All were in the £1 box and being 7mm scale I was going to pop them in the "some day" box. I've no idea who NMB Models are/were, address on the back in is Immingham, but the more I looked at those sacks once I'd returned home the more it occurred to me they could be the answer to a present wagon load in 4mm scale. Even the smaller parcels might pass as presents if painted up in a suitable way...

In order to create the new load I started with a piece of 20 thou styrene scribed as a false floor, to hide the fact that inside the wagon it still has 7mm scale planking. I arranged the sacks to overlap, filling the area underneath the left-hand sack with Milliput, carefully shaped to match the casting. The parcel castings were cleaned up and used as larger presents (must be train sets and TVs!) to fill the gaps. I adjusted two of them in size to give a little more variety. All were placed carefully with the label hanging downwards.


After a coat of grey primer I gave everything a wash of watered-down Vallejo grey-black and once dry carefully picked out the floor planks in timber colour, and the sacks in a slightly darker red shade than the final shade. The presents were picked out in different base colours and then the actual red shade almost dry-brushed over the sacks giving a pleasing depth effect. the ribbon on the presents was picked out in Vallejo brass, as I had no gold to hand!


Once varnished the load was slipped into the wagon, it isn't glued in place but is a tight enough fit. I'm really happy with how this has come out, whilst the old present load worked to a degree I think this actually looks better and is more in keeping with tone and texture of the scene as it exists.


Colin

Wednesday, 10 November 2021

Christmas in a Box

Having spent the time to restore/rebuild 'Christmas Tree Halt' I decided that I would have to find a way of safely storing it for the eleven months that it might not be required. I was mindful of the fact that the damage to the original version may have occurred due to it being badly stored - I'll never know. 

Given that the trees are removable the easiest option would have been to locate a suitable 'Really Useful Box' but having looked at the options I would have needed an 11 litre box, and they were not available locally. It would also have involved a cost, and when you have a selection of materials to hand building your own box makes some sense...

There is a distinct recycling theme here, construction of the bottom half of the box used some 8mm ply from an old box that a friend passed on to me in January 2020, having held vintage car parts, in the days when things were packaged properly! The hardboard for the base came from the back of an old wardrobe disposed of when my daughter moved in January this year and the thinner ply diagonally in the corner and dividing the main box is some of the last bits of lovely veneered ply that came from a wardrobe disposed of many moons ago.

The lid is a further piece of ex-wardrobe hardboard with 25x12mm timber surrounding the edge, this was new material purchased specifically for layout-boxing, with the Avalon Brickworks layout in mind at the time. If I could have found some suitable material to recycle...

The pizza layout fits in neatly in the large compartment, and the two trees fit in the smaller compartment, retained by a system of trunk peg holes and special supports in the centre. The smaller compartment top-left is intended to hold the battery pack and any other bits and pieces that need to stay with the layout. I need to devise how the pizza can be padded into the space, it is deliberately not too tight a fit!

Along the back edge of the box can just be seen the two pieces of thin aero-ply that cover the encapsulated nuts that allow the lid to be secured in place. Holes were carefully drilled through with the lid clamped in place, then opened out from the inside to hold the nuts. The nuts were Araldited in place and the thin ply plates, with holes punched using a hole punch rather than drilled, were fixed in place as a belt-and-braces approach to stop the nuts falling through in the unlikely event the Araldite failed.

With the lid in place and secured the box ought to provide adequate protection for the layout, I just have to remember that unlike the covers for my other layouts that bolt to the baseboard, this one cannot be stood on end! All timber surfaces and hardboard edges have received a coat or two of yacht varnish to protect them from moisture and it has really lifted the appearance of the plywood sides.

Overkill, maybe... but I've actually quite enjoyed the build process.

Colin


Sunday, 31 October 2021

A White Christmas

I had unofficially set myself a target of getting the 'Christmas Tree Halt' rebuild completed by the end of October, lots of reasons but mostly to ensure it was completed for December! I think I might have made it...


Since last week's update the major change is that I have painted the snow. As daft as it sounds this is key to the effect that I am after, as I wanted a snow finish that was durable (i.e. not too much loose material glued down) and repairable (in case of sticky fingers). This is why I paid so much attention to texture at the filler stages... My method has been to use Vallejo 70919 'Cold white', thinned very slightly with water and with a drop of Vallejo retarder medium added, painted using a soft brush (to avoid brush marks) and as each area is painted a very sparing sprinkle of Deluxe Materials 'Icy sparkles' added. You cannot see the sparkles in the photos but they do glimmer if the light is right!


The Noch trees have been fixed to their barbeque skewer pegs and slot neatly into the tubes set into the scenery. In the foreground I have added the bare bushes around the fence and shelter, with a smaller patch to the right. These are largely recycled from last year's efforts, but broken into smaller sections and a effort made to make them look more like bushes than trees. These were painted with the Vallejo 'Cold white' for the snow effect and again some icy sparkles sparingly added.

Last year I had hoped to add some ribbon around the base of the scene to help emphasise the "decoration" element of the concept, but had nothing to hand and no time to go out looking. With more time on my hands this year I was able to obtain something suitable, I always knew I would probably end up in the craft section of Boyes for this but had not perhaps foreseen making the purchase in their Barnard Castle branch!*


The ribbon was attached using double-sided tape, it really adds to the effect of the whole scene "floating" as you cannot really see the black-painted supports underneath.

There is one more item to add in due course but all the work I wanted to do to bring the pizza back to life for 2021 is pretty much done. A few adjustments have been made to the wagon for this year, notably adding Peco couplers in place of the bent bits of wire it ran with last year, and adjusting the load to not look quite so over-powering (although they are still HUGE presents!).


Attention is now turning to safe storage, it isn't easy to create a box that slips over a pizza and bolts in place, so a box that accommodates the pizza and has storage space for the trees is now under construction.

Colin

*my eyesight is fine, thank you...

Saturday, 23 October 2021

Gimmie Shelter (and other snowbound detail)

I'm making progress with the rebuild of 'Christmas Tree Halt', with short bursts of work almost every day taking each step at a time.

The Wills halt building was primed and painted, ironically in pretty much the same colours it was moulded in, but the painted finish is much nicer in my eyes. The moulding dictates that there should be posters ether side of the doorway, so I searched online for suitable vintage looking Christmas themed designs. The chosen posters were reduced to size in Gimp and given the effect of a frame around them, then printed on glossy photo paper. Once fixed in place the whole structure was matt varnished to remove the sheen from the prints.


The shelter was glued in position and the snow (more filler) built up all around it whilst the glue set. As I had a weight on top holding it down I could not add snow to the roof at this stage.

I have also managed to plant a short length of fence, more Wills halt leftovers. I had to create a little trench in the scenery to get this to sit correctly, but once I was happy I glued it in place and added more snow all around. Just visible to the left in the shot below is the extra piled up snow I've added in front of the rock faces as these areas looked fat too flat before.


Once the shelter and fence were firmly in position I could add snow to the horizontals of the fence and the roof. The rooftop snow had a little PVA mixed into the initial layer to aid adhesion to the painted surface. The corrugations are still visible in places and I've achieved a snow dropping off the edge effect. On the right I've tried to give the impression some snow has recently dropped to the ground


The sign and bench from the Mk1 version of the scene are now in place and blended into the ground. There are still a few more areas to attend to before I start to paint the snow in it's final coating, such as to fill the areas of bare ground where the trees will sit. It is funny how the snow actually looks better and cleaner in the current photos than in reality! 


Oh, and I must clean up those rails...

Colin