Showing posts with label Christmas Pizza. Show all posts

Saturday, 21 December 2024

Seasons Greetings

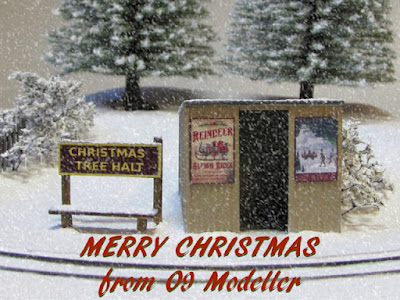
Where has December gone? There are some exciting scenic developments to report on 'odsock Corner' but they can wait for another day as we switch to 'Christmas Tree Halt'. New additions this year are the post box and a canine companion for the lady waiting on the platform. Both are castings I've had for years, bearing the hallmarks of teenage gloss paint...


Wishing all O9 Modeller readers the best for the season and I hope Santa brings all the modelling goodies you have on your list. If you are in need of any modelling inspiration then why not give our friends at the Micro Model Railway Dispatch a visit? Issue 16 has just been published and 'Christmas Tree Halt' appears way back in issue 3. Talk about time flying!

Colin


Sunday, 24 December 2023

The Lady and the Lamp - Christmas Tree Halt

It's that time of year again to defrost the pizza and have some 009 Christmas fun. As usual the Minitrains Bagnall 'Isla' is in charge of getting the presents to Santa in time.

I always like to add something new to the scene each year and this year I have added a Lady, and a Lamp. I've always thought there should be a hopeful passenger on the platform, awaiting the train into town for some last minute shopping, so we now have Mrs Goggins, a Dapol figure painted in Christmassy greens and reds to match the colour palette of the scene. lamp standard, one of the standard Merit/Modelscene ones with a frosty finish (over-sprayed matt varnish) and plenty of snow-mix to blend it in. 

The gas lamp is one of the standard Merit/Modelscene ones with a frosty finish, created using over-sprayed matt varnish and plenty of snow-mix to blend it in around the base and on the flat surfaces. After some debate about whether there should be snow on the top if it heats up, there is a fine layer and we have to assume it has snowed since it cooled down.


I had a crazy idea the other day to paint the Snailbeach hopper in blue lettered for the North Pole Snow Co. - I might have to lay off the cheese over Christmas! 

Wishing all readers a Merry Christmas.

Colin
 

Thursday, 23 December 2021

Merry Christmas from O9 Modeller

It's that time of year again, 'Christmas Tree Halt' sits on display in the living room as a little bit of entertainment and has also made an appearance in the third issue of the 'Micro Model Railway Dispatch' edited by Ian Holmes. You can download a copy here: MMMR Dispatch 3 

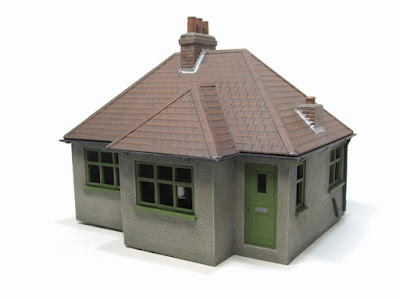
On the workbench the Dapol bungalow conversion has been receiving various paint effects, which have been transformational in how it appears. I will explain these in more detail at a later date, but at the moment it is awaiting a coat of matt varnish to seal everything in place. The Christmas period generally sees the workbench slow to a halt, so it will likely be the new year before this is applied.


Once back into the swing of things there will hopefully be some progress on a layout in one form or another. Until that time, I'll wish all O9 Modeller readers a Merry Christmas and a Happy New Year.

Colin


Saturday, 20 November 2021

Santa's Gotta Brand New Sack

The presents in the open wagon on 'Christmas Tree Halt' were troubling my mind a few weeks ago. The reduction in size of the originals was the obvious solution at the time but part of me wondered if the eventual solution was to have a sack of presents represented in the wagon. I thought nothing more of it until I took a trip to a local model shop that is sadly closing at the end of the year (http://www.thegoodsyard.co.uk/). I was hoping to get some 009 flexi track but they were out of stock, however I did pick up a few bargains...


All were in the £1 box and being 7mm scale I was going to pop them in the "some day" box. I've no idea who NMB Models are/were, address on the back in is Immingham, but the more I looked at those sacks once I'd returned home the more it occurred to me they could be the answer to a present wagon load in 4mm scale. Even the smaller parcels might pass as presents if painted up in a suitable way...

In order to create the new load I started with a piece of 20 thou styrene scribed as a false floor, to hide the fact that inside the wagon it still has 7mm scale planking. I arranged the sacks to overlap, filling the area underneath the left-hand sack with Milliput, carefully shaped to match the casting. The parcel castings were cleaned up and used as larger presents (must be train sets and TVs!) to fill the gaps. I adjusted two of them in size to give a little more variety. All were placed carefully with the label hanging downwards.


After a coat of grey primer I gave everything a wash of watered-down Vallejo grey-black and once dry carefully picked out the floor planks in timber colour, and the sacks in a slightly darker red shade than the final shade. The presents were picked out in different base colours and then the actual red shade almost dry-brushed over the sacks giving a pleasing depth effect. the ribbon on the presents was picked out in Vallejo brass, as I had no gold to hand!


Once varnished the load was slipped into the wagon, it isn't glued in place but is a tight enough fit. I'm really happy with how this has come out, whilst the old present load worked to a degree I think this actually looks better and is more in keeping with tone and texture of the scene as it exists.


Colin

Wednesday, 10 November 2021

Christmas in a Box

Having spent the time to restore/rebuild 'Christmas Tree Halt' I decided that I would have to find a way of safely storing it for the eleven months that it might not be required. I was mindful of the fact that the damage to the original version may have occurred due to it being badly stored - I'll never know. 

Given that the trees are removable the easiest option would have been to locate a suitable 'Really Useful Box' but having looked at the options I would have needed an 11 litre box, and they were not available locally. It would also have involved a cost, and when you have a selection of materials to hand building your own box makes some sense...

There is a distinct recycling theme here, construction of the bottom half of the box used some 8mm ply from an old box that a friend passed on to me in January 2020, having held vintage car parts, in the days when things were packaged properly! The hardboard for the base came from the back of an old wardrobe disposed of when my daughter moved in January this year and the thinner ply diagonally in the corner and dividing the main box is some of the last bits of lovely veneered ply that came from a wardrobe disposed of many moons ago.

The lid is a further piece of ex-wardrobe hardboard with 25x12mm timber surrounding the edge, this was new material purchased specifically for layout-boxing, with the Avalon Brickworks layout in mind at the time. If I could have found some suitable material to recycle...

The pizza layout fits in neatly in the large compartment, and the two trees fit in the smaller compartment, retained by a system of trunk peg holes and special supports in the centre. The smaller compartment top-left is intended to hold the battery pack and any other bits and pieces that need to stay with the layout. I need to devise how the pizza can be padded into the space, it is deliberately not too tight a fit!

Along the back edge of the box can just be seen the two pieces of thin aero-ply that cover the encapsulated nuts that allow the lid to be secured in place. Holes were carefully drilled through with the lid clamped in place, then opened out from the inside to hold the nuts. The nuts were Araldited in place and the thin ply plates, with holes punched using a hole punch rather than drilled, were fixed in place as a belt-and-braces approach to stop the nuts falling through in the unlikely event the Araldite failed.

With the lid in place and secured the box ought to provide adequate protection for the layout, I just have to remember that unlike the covers for my other layouts that bolt to the baseboard, this one cannot be stood on end! All timber surfaces and hardboard edges have received a coat or two of yacht varnish to protect them from moisture and it has really lifted the appearance of the plywood sides.

Overkill, maybe... but I've actually quite enjoyed the build process.

Colin


Sunday, 31 October 2021

A White Christmas

I had unofficially set myself a target of getting the 'Christmas Tree Halt' rebuild completed by the end of October, lots of reasons but mostly to ensure it was completed for December! I think I might have made it...


Since last week's update the major change is that I have painted the snow. As daft as it sounds this is key to the effect that I am after, as I wanted a snow finish that was durable (i.e. not too much loose material glued down) and repairable (in case of sticky fingers). This is why I paid so much attention to texture at the filler stages... My method has been to use Vallejo 70919 'Cold white', thinned very slightly with water and with a drop of Vallejo retarder medium added, painted using a soft brush (to avoid brush marks) and as each area is painted a very sparing sprinkle of Deluxe Materials 'Icy sparkles' added. You cannot see the sparkles in the photos but they do glimmer if the light is right!


The Noch trees have been fixed to their barbeque skewer pegs and slot neatly into the tubes set into the scenery. In the foreground I have added the bare bushes around the fence and shelter, with a smaller patch to the right. These are largely recycled from last year's efforts, but broken into smaller sections and a effort made to make them look more like bushes than trees. These were painted with the Vallejo 'Cold white' for the snow effect and again some icy sparkles sparingly added.

Last year I had hoped to add some ribbon around the base of the scene to help emphasise the "decoration" element of the concept, but had nothing to hand and no time to go out looking. With more time on my hands this year I was able to obtain something suitable, I always knew I would probably end up in the craft section of Boyes for this but had not perhaps foreseen making the purchase in their Barnard Castle branch!*


The ribbon was attached using double-sided tape, it really adds to the effect of the whole scene "floating" as you cannot really see the black-painted supports underneath.

There is one more item to add in due course but all the work I wanted to do to bring the pizza back to life for 2021 is pretty much done. A few adjustments have been made to the wagon for this year, notably adding Peco couplers in place of the bent bits of wire it ran with last year, and adjusting the load to not look quite so over-powering (although they are still HUGE presents!).


Attention is now turning to safe storage, it isn't easy to create a box that slips over a pizza and bolts in place, so a box that accommodates the pizza and has storage space for the trees is now under construction.

Colin

*my eyesight is fine, thank you...

Saturday, 23 October 2021

Gimmie Shelter (and other snowbound detail)

I'm making progress with the rebuild of 'Christmas Tree Halt', with short bursts of work almost every day taking each step at a time.

The Wills halt building was primed and painted, ironically in pretty much the same colours it was moulded in, but the painted finish is much nicer in my eyes. The moulding dictates that there should be posters ether side of the doorway, so I searched online for suitable vintage looking Christmas themed designs. The chosen posters were reduced to size in Gimp and given the effect of a frame around them, then printed on glossy photo paper. Once fixed in place the whole structure was matt varnished to remove the sheen from the prints.


The shelter was glued in position and the snow (more filler) built up all around it whilst the glue set. As I had a weight on top holding it down I could not add snow to the roof at this stage.

I have also managed to plant a short length of fence, more Wills halt leftovers. I had to create a little trench in the scenery to get this to sit correctly, but once I was happy I glued it in place and added more snow all around. Just visible to the left in the shot below is the extra piled up snow I've added in front of the rock faces as these areas looked fat too flat before.


Once the shelter and fence were firmly in position I could add snow to the horizontals of the fence and the roof. The rooftop snow had a little PVA mixed into the initial layer to aid adhesion to the painted surface. The corrugations are still visible in places and I've achieved a snow dropping off the edge effect. On the right I've tried to give the impression some snow has recently dropped to the ground


The sign and bench from the Mk1 version of the scene are now in place and blended into the ground. There are still a few more areas to attend to before I start to paint the snow in it's final coating, such as to fill the areas of bare ground where the trees will sit. It is funny how the snow actually looks better and cleaner in the current photos than in reality! 


Oh, and I must clean up those rails...

Colin

Monday, 11 October 2021

It's starting to look all white...

A little progress on the Christmas pizza. I have been slowly applying filler around the edges of the board, then inside the track but not over the central area. The central area has had a coat of a mix of the same filler but mixed about 4:1 with PVA in the hope this can avoid any cracking over the softer base. Everything is largely thin layers in a bid to further avoid cracking issues. The two "eyes" in the centre of the scene are where the trees will sit, rather than plonked in the snow as per the mk1 version there will be a bit of exposed ground cover visible. In the centre of each patch is a tube fitted to accommodate the removable trees, these extend down through the polystyrene into the MDF base.

Whether applied at full thickness or the PVA mix, the filler was smoothed into place with a putty knife (or in the case of inside the circuit, butter knife...) and textured using a stiff paintbrush. A wet brush was then lightly run over the top to smooth the texture a little. I'm not sure the amount of texture is quite right in places and I may smooth any really high spots with fine wet or dry before adding the final colouring. 


Some of the left over filler/PVA mix was stippled into the previously smoothed area between the rails which has given a much better finish in this area. I now need to clean up the rail edges and have a test run to ensure it still works! Attention will now turn to painting the Wills halt building, some fencing and the rock faces before the next stage of snow work is attempted.

Colin

Sunday, 26 September 2021

An Unseasonal Chill

Earlier in the month I had spotted some ready-mixed filler at a reasonable price in the largest shop in the village and bought it to see how it faired, as snow...

It had been on my mind for a while to revisit the remains of 'Christmas Tree Halt', the 009 pizza I built very quickly last December, which had been stripped down after mould or some other irritant had appeared in the snow cover. In truth the board had actually been stripped back completely earlier in the year, the track relaid using Roco sleepers/secondhand rail and even painted and weathered with a non-winter scene in mind. After adding corrugated card around the outside and in the centre I had lost interest again...

With filler to hand I soon found myself carefully filling in around the track. Taking my time, rather than rushing as I had before. I actually filled outside and inside the rails in separate sessions, and split the work into small manageable chunks rather than trying to do it all at once, which I felt helped keep control of the filler. I also tried not to create the final finish on the first application! Between the rails an extra layer was added, a mix of the filler and PVA effectively skimmed on and cleared from rail sides. After a little cleaning up I was relieved that it still worked!

With the track embedded I added the bases of the roadway and platform from card, and created the raised central area from polystyrene, subtly different in shape to the original. New features on the Mk2 version are some rock faces made some time ago using Plaster of Paris in improvised foil moulds, and a Wills station halt shelter, left over from the 'Humberston' diorama. Don't panic about the black blobs, they mark where the trees go, marked in felt-tip pen and then wetted during scenic treatment. In the background of the picture above can be seen some early trials of snow mix using Vallejo Foundation white and the new filler.

The Wills shelter has had a few tweaks to make the parts sit a little more comfortably and give the impression of framework over the doorway. The original station sign and bench should sit to the left. Platform edging is very thin balsa, overkill maybe as it will be covered in snow, but the original build lacked relief in this area.


One of the plaster-cast rock faces. This has been blended into the polystyrene landscape using some white modelling clay that had originally been bought to bed in the track, but was not shall we say the market-leading brand and seems to shrink quite a bit, causing me to go back over the gaps a few days later. It will all get a covering of snow in due course! To hold everything together all exposed polystyrene and some of the clay was covered in strips of kitchen towel fixed in place with dilute PVA.

So far so good, the next job is going to be to create sound fixtures to plug the trees in, I'm thinking of cutting into the polystyrene to add pre-drilled wooden blocks that a dowel in the tree base can locate into.

Just in case anyone thinks this is madness in September, I'm enjoying doing it with time to spare and better conditions for things to dry out. I'm also fairly certain I can be finished in time!

Colin

Wednesday, 17 February 2021

Pizza Ponderings - Fresh Toppings

Some issues with the recent Christmas Pizza have led me to strip back the scenery to almost a bare board with embedded trackwork. There is a chance that I won't be reinstating the snow scene, at least in the same form, having found that keeping track clean and snow were not really compatible! The trees and other bits have been recovered for reuse but in the meantime I've been thinking what could be done in terms of a "re-theme". 

I recalled a sketch made some time ago for an O9 scene, representing an estate railway, split into three views of a roadway with vehicle/office or station/yard.


I have now created a couple of sketches of how it could look in practice. From the roadway side (without the vehicle in place) it can be seen that a Port Wynnstay hut and Peco phone box are envisaged, oddly enough both kits are to hand...


The yard side features a grounded van body, inspired by the Peco O-16.5 one used on 'The Headshunt' (indeed there may be a side from it somewhere!) and a series of junk bits.


During the early construction of the Christmas pizza a friend asked if the mounds were going to be sand dunes or snow, which must have struck a chord... A more recent pair of pizza sketches depict the familiar territory of a passenger-carrying seaside miniature railway, but a more run down, lower key setup than that depicted on 'Shifting Sands'. 


The sketch on the right uses an ice cream van as part of the disguise of the circuit, and whilst not split directly into thirds as per the estate plan sufficiently breaks up the scene. Wanting to see how it might work I made a sketch of how it might look.


It is funny how I can visualise these ideas but not the layout that I am currently stalled building - the Julian Andrews brickworks inspired scheme...maybe it will come in time?

Colin


Wednesday, 16 December 2020

Christmas Tree Halt

I think most micro layout builders have thought at some point about building a seasonal scene, myself included. I thought about it again in November this year in light of having acquired what I thought was a thick cardboard 30cm cake board earlier in the year. However I reckoned that I might have left it a bit late at my rate of progress so decided not to. Roll on a week or so and challenged to create a Christmas decoration for a virtual Christmas meeting I simplified the plan down, and this is the result...


More of a decoration than a serious layout, on starting construction I discovered the board was more likely MDF than card when stripped of the foil covering. I added some strips of recycled 8mm ply underneath to strengthen it. The track is some (very) secondhand N gauge flex track with the rails curved using an improvised rail bender. This was surrounded by mount card, and covered with wood filler. The rest of the scenery is polystyrene and card covered with wood filler, then a layer of white paint/filler/PVA mix and the snow itself is largely paint. Two Noch fir trees form the centrepiece and are accompanied by some smaller, bare sea moss trees, recycled from my daughter' s winter diorama.


The sign and bench are scratchbuilt from timber scraps, treated with button polish (shellac) and lightly painted. The sign was printed on photo paper and fixed in place.


The loco is my modified Minitrains Bagnall 'Isla' and the brake van modified from a Dundas WHR kit. The wagonload of presents was constructed especially for the project and started life as a scratchbuilt O9 body that was surplus to requirements, it was narrowed down, extra floor plank ends marked on and placed on a Colin Ashby 009 chassis. It contains miniature presents made from balsa blocks wrapped in miniature wrapping paper downloaded online and printed! 


Although 009 at the moment, in theory an O9 version is possible if the right stock was available...

Colin