Perusing Phil Parker's blog I spotted that he had recently completed a
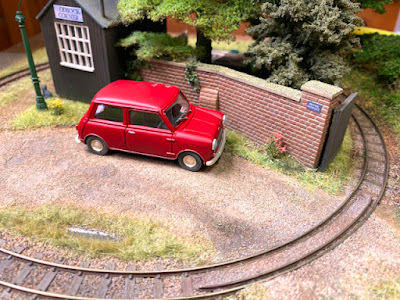
7mm scale Mini from the Airfix/Heller kit. It is a later model than my Mk1 but interesting to see an alternative approach to modelling one. It did prompt me to carry out one more job on my model, to secure it in place on 'Odsock Corner. But before that I did a little extra painting and scenic work to add a moss effect to the top of the wall, having realised it still looked far too clean!
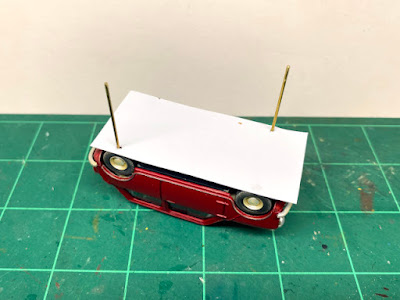
So last weekend Saturday morning started with the Mini on it's roof with 1mm brass wire poking out of two of it's tyres... Before going any further, you may notice that I have added some body colour paint to the chassis piece under the front and rear bumpers. This was a result of a review of some more prototype photos and by Phil's model. It looks a different shade here under the light but in place on the layout it is not noticeably different.

I had been wondering for some time how to fix the Mini in place without actually sticking it down. For the Vauxhall Astra on 'Shifting Sands' I used the screw hole that previously held it into the packaging and a suitable bolt through the baseboard. No such luck here... and my original idea to use long 12 BA bolts into the tyres failed when I realised I had nothing long enough. I calculated the thickness of the baseboard and other layers to be getting for 20mm! Using a template I drilled into the tyres and fixed the rod with epoxy resin. It is seen below checking all is well prior to the next stage.
The template was then used to locate and drill the holes in the layout, initially at 1mm but then to 1.5mm to allow a little leeway and for the differences in materials (the wires tended to get stuck having gone on a wander through the foamcore layer over the main ply baseboard top). Here I have held the template using a cocktail stick in the first hole and I am drilling the second hole.
With the holes drilled I positioned the car and then undertook one of those jobs that needs three hands... I held the board on it's side, pushed the car down to the road surface and underneath, slid the inside of a small chocolate block connector over the wire and screwed it on tightly. Did I say three hands? make that four... This actually the system used on 'Shifting Sands' to hold the lamp-posts in place and allows for the Mini to be removed if required at a later date.
Whilst carrying out this work I decided that at some point soon I'll paint up my two remaining Pigeon castings to add to the wall ready to take aim at the car having no doubt added more mess to the wall!
Colin


