Showing posts with label Avalon Line. Show all posts

Saturday, 28 June 2025

'Avalon' - Finishing Touches

'Avalon', my subtle reworking of a completed and pre-painted Avalon Line loco is now completed. Having realised that the model was lacking an exhaust I produced one from a length of brass tube, sitting in an appropriately sized hole drilled in the bonnet top.


As an added refinement I added a support on the cab front using a recycled split pin - without realising that one side had no pin from a previous use! It is not noticeable in practice. Both the tube and split pin were blackened using Birchwood Casey gun blue prior to fixing in place. Vallejo gunmetal was used as the basis of the final colour with additional weathering.


I have also added wire loops to the industrial couplers in a 'U' shape, with the top of the side through the coupler also representing the pin of the coupler. These loops were also blackened with gun blue and the bit that was not meant to be there painted with matt black and the pin weathered with gunmetal.


The position of these loops was set in such a way that a MicroTrains coupler can be manually coupled, seen here with my tool wagon. Whilst automatic uncoupling is not possible, for use on a layout such as 'Odsock Corner' that is not going to be an issue!
 

With the completion of 'Avalon' my workbench is looking rather empty and we are getting to that part of the year when modelling slows down considerably and at the moment I don't really have the inclination or motivation to start anything else... So having made a promise to myself just over a year ago to update the blog weekly on a Saturday, and having pretty much stuck to that, I think we are probably now heading for a hiatus... 

Colin

Wednesday, 25 June 2025

'Avalon' - a midweek extra

These photos were meant to be pretty much the final ones of 'Avalon' with it's new LRS/Narrow Planet plates in place, but I realised that despite my diligent work, there was something missing...


There is no provision on the model for an exhaust! - so along with adding a wire to the couplers to meet a MicroTrains equipped wagon, I am now adding a suitable pipe from brass tube in front of the cab.


A quick look underneath reveals that I actually primed the chassis frame despite it being invisible in any normal circumstances. It somehow felt more complete that way...

More soon.

Colin


Saturday, 14 June 2025

Avalon Loco Progress

Work is progressing well on the reworking of the pre-built Avalon Line loco.  Although I want to keep as much of the original paint finish as possible, I felt that the all-encompassing grey finish needed something to both break it up and add some colour. The obvious and realistic thing to add was an area of red to the buffer beams and/or the coupler blocks. In the end the latter were carefully masked off, only to find that I had no red oxide primer to hand...


After a trip to the local motor factors Hycote primer was applied and then two coats of red acrylic paint.  At first this looked rather stark but with matt varnish and weathering applied they have blended in rather well. The tool box in the cab also benefitted from a touch of colour, a metallic blue and one of the in-cab levers gained a red handle.


Meanwhile I had to source a suitable driver figure. I suppose Although I have some 3D printed seated figures none are in a driving pose but I also have a small stockpile of whitemetal and plastic figures to use...  I seem to recall that this figure was likely bought in Burton Town Hall, but at one of the DEMU shows rather than the 7mm NGA convention where I would have seen Howard and Steve and not bought models like this! 

You may notice that he's had a little surgery (and was a pain to photograph)..


The cap pulled over the eyes to the nose really struck me as not great for any driver, it was only after trying to pose the arms that I realised that maybe the manufacturer meant a road vehicle driver rather than a locomotive driver, and that was his chauffer's cap!  The new head, secured with a short length of 0.5mm wire, was sourced from my oddments of plastic figures and is of Preiser origin. 


What was originally supposed to be a jacket and trousers has become a boiler suit. Painting was my usual primer/dark wash/almost dry brush of colours and to ring the changes the main colour is green, contributing to the splash of colour methodology. His hands are rather big (maybe he's wearing driving gloves) but I don't think is too noticeable once he's in the cab. He looks like he's in control of the loco even if he hasn't got a full grip on the controls.


More soon, as that final picture reveals, things have progressed well...

Colin


Saturday, 31 May 2025

Avalon and Austria

Last seen on arrival in January (An Avalon Arrival), work has finally progressed on the pre-built Avalon Line locomotive that I acquired from 7mm NGA secondhand sales. Since the last post my theory that the model had been built and finished by Steve Bennett has been confirmed via a contact on Facebook. Apparently there were several models in the Avalon and Black Dog ranges finished in this way for direct sale, making this an interesting bit of O9 history.


I also left the last post on a bit of a cliffhanger in relation to my plans to power the model, whether to try and repower a Farish 08 chassis or investigate using a Halling 21mm wheelbase unit. As you might guess from the title, the Halling unit won. Due to the way the postage charges work it makes sense to order more than one at a time, so I acquired units for some other projects too.

As they come the modern Halling units are tiny, even compared to the Kato 'core' from their modern chassis. There really isn't much to aid fixing it in place in your chosen model so I had to carefully plan how it would fit into the void of the model. The solution is seen below... 


Taking things at first principles, I opted to create a sub-frame and carefully measured the space available under the loco body and the space the chassis required to 'clip' into something (there are clips either side of the motor). With a few scribbled plans I found could suit both (just), with only 1.5mm difference at either end. I marked out and cut a piece of 40 thou styrene to which Evergreen strip was then added above and below this to strengthen it. Once set a "nibble" was taken at either end to fully clear the worm gears. Below this recess is a small 20 thou piece that firmly holds the end of the chassis under the worm.


Platforms extend at either end sit onto the positions within the body designed to accommodate the Farish chassis. The joins for these are re-enforced to hopefully prevent sagging. Two tiny screws in opposing corners hold the sub-frame in place within the loco. In the recess above the frame I added some adhesive window lead strip to add some weight, and also added more strips behind the sideframes of the body. A further piece of lead in the bonnet end is ready to counterbalance a whitemetal driver figure, currently undergoing surgery!


More soon.

Colin


Saturday, 11 January 2025

An Avalon Arrival

As mentioned a couple of months ago in O9 Archaeology, the revived 7mmNGA sales operation under  has recently turned up several interesting O9 items of late and it has provided an opportunity to acquire a few older commercial O9 models that are no longer in production. With a little Christmas money to spend I picked up another couple of items in early January, including another unopened Owen Ryder kit, this time the Heywood open wagon. Yes, other models are now available of this but I never got around to buying one from Howard Martin when the range was revived...


Since Howard's passing I've felt a small pang of guilt that I actually do not have anything in my collection that truly reflected the Avalon Line range so the opportunity to purchase a ALD2-9 diesel was also taken. It is actually a built and painted example very close in appearance to the one illustrated on the old Black Dog Mining website but differs in small details, including the coupler position. 


I therefore believe that this may actually have been finished by Steve Bennett. It has clearly never had a chassis fitted as the paint underneath shows no signs of wear. In fact an attempt to pose it on a motor-less Farish 08 chassis failed as it was too tight a fit! I am looking at the options to power it, the obvious low-cost way (as the source is in stock) would be to make some careful adjustments underneath to take a Kato 'core' and accept that the wheelbase won't match the axleboxes, but that it won't be too obvious.


An alternative would be to look at repowering the 08 chassis with a Tramfabriek motor but I have some qualms about having a 6-coupled chassis hidden away under there. To my surprise the 08 chassis has been propelled around the 5" curves of 'odsock Corner without any issue. However, a further alternative in the form of a Halling motor unit has been suggested by members of the NGRM Online Forum so that will also be investigated.

Colin


Saturday, 12 August 2023

Buffers and Baggage

For a while I really couldn't be motivated to get anything going on the workbench, however the weather was really telling me to stay indoors and do something so I came up with a couple of schemes to get started on. 

The first was a reworking a Black Dog Mining (style) wagon as a luggage trailer for the O9 railcar, filling the cutouts for MicroTrains couplers and fitting pre-painted Black Dog coupler/buffer blocks in their place to accommodate a link-and-pin coupler to the railcar. A careful touch-up of the paintwork has made a pretty neat job of the changes.


Of course a luggage trailer needs some luggage, so a root around found a Preiser backpack, suitcase and bag, all pre-painted some time ago. To this I added an older style case using a modified ammo case from a ground crew set, and a bike from a rather basic 3D print I had acquired, possibly from Avalon Line. This filament print required a fair bit of fettling to look anything (and you have to ignore it's square frames!), and I had to add my own pedals from a bent staple and 5 thou styrene. The other side is very poor, but you'll not see that...


Bringing it all together, this is the result with the load fixed in place using 'Tacky Wax', I hope the bike was placed in carefully on top of that luggage! I need to fashion a 'U' shaped wire coupler to engage with the loop on the railcar ends.


The other task I set myself was to add buffers and nameplates to the light green A1 Models "Albert" diesel. I had always planned to have buffers, as per the Littlehampton prototype, but had failed to  scratchbuild any buffer shanks to my satisfaction. At the Doncaster show in February I bought some cast oval Dundas 009 ones, and prepared these in red primer before opting in the end to replace the oval heads with turned 4mm round ones, which in this use really make a difference.


I have also finally named the loco, it begins with 'A' but it is 'Amelia' rather than Albert. These are Narrow Planet plates that had previously done a temporary stint on an 009 Gmeinder. With all of these smaller parts for both projects painted and fitted on the dreary days, finally a nicer day appeared when I was able to give everything a waft of matt varnish over the changed bufferbeams on both projects.


In other news, I'm also having (yet) another try at a mini photo diorama to fit in the light box, but simplifying things compared to previous attempts and mock-ups. I'm even working on some ideas for the project after that... 

Colin


Friday, 31 March 2023

The March of Time

Time has flown by in the first quarter of 2023, and from a modelling perspective there has been little to report. I spent some time trying to build a photographic diorama that could fit in my square-foot lightbox but that went through several iterations without success. However it has led to a long-overdue refresh of another project, more to be revealed soon... 

The last week or so has been one of reflection, having realised I've been modelling in O9 now for 20 years! A lot has changed in that time, from there being very few products aimed at representing 15" gauge prototypes accurately to there now being a wider choice in many mediums. I like to think I've had a small part to play in that via a range of bogie coaches for the Avalon Line range. 


Sadly the news came last week that we had lost Avalon's Howard Martin. I think the first time that I met him, at a 7mm NGA Burton show, I introduced myself as "his worst customer" on the basis that I was an O9 modeller who didn't buy his products! Despite this he was always very keen to see my work in O9 and encouraged me to create masters for Steve Bennett to cast bogie coaches based on those running on 'Shifting Sands'.

Although built by Julian Andrews, Howard was of course the person I associate with the 'Avalon Brickworks' layout having seen it many times on his stand at exhibitions. This has made me take another look at my baseboard and track over the past weekend to see it that plan could perhaps be revived in some way rather than replaced. We shall see...


I'll leave you with this shot of the original layout, with Avalon Line loco and coach built to O-16.5.

Colin


Thursday, 5 January 2023

Tramcar Triumph

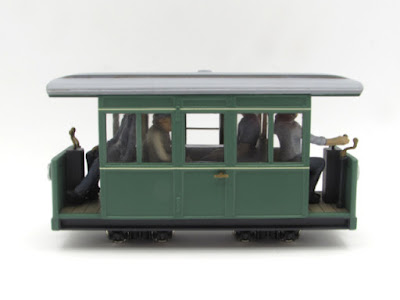
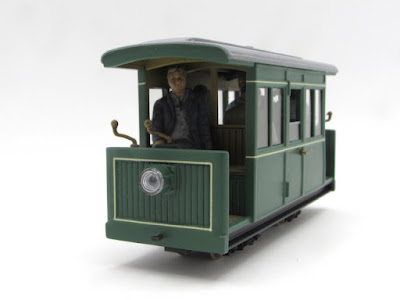
The O9 tramcar was varnished in a spare moment on Christmas Eve, using Halfords matt lacquer as an alternative to Dulcote or a Humbrol aerosol. This is the first time I have used this product and the verdict is that I am pretty impressed with it, having just a little sheen that is not inappropriate for coaching stock or locomotives.

With the paintwork completed and festivities out of the way I moved on to a list of tasks to further completion: 

  • Fitting the controllers and brake handles in place on each balcony
  • Fitting 7mm NGA door handles on the centre doors
  • Flush glazing the side windows using 20 thou styrene fixed in place with Kleer. The door drop-frames have a band of chrome trim along the top using a sliver of car body trim strip
  • Weight (self-adhesive window lead) added in pockets between the body sides and seat supports
  • Figures fixed in place in the centre compartment and balconies


There was some hesitancy over a suitable driver figure (or figures...) Five candidates were prepared for this task! Left to right, they are:

  1. Chinese Preiser copy in a slightly soapy plastic. Used in initial testing of the seating and generally good, but not 'hands on' enough for my liking as the main driver.
  2. Monty's Models industrial diesel driver, posed with this hand on the controls. Whitemetal, so to balance him out...
  3. S&D Models young man, relaxed pose for the back platform.
    I then started to worry about the whitemetal figures adding weight in the wrong places, high centre of gravity etc on the Kato bogie chassis so looked for a plastic option again, leading to...
  4. Chinese Preiser copy (old man with stick) in hard plastic, modified to seated position with hand on the controls and head-swapped. Enthused I also created...
  5. Chinese Preiser copy (young lady hand in hair), modified to seated position with her other hand on the controls.


Whilst the plan was to use 4 and 5 at either end of the car, I did wonder if someone with a hand on controls at each end might actually look too much, so the end result was 5, with 1 at the other end, relaxed but poised hand on knee to take control. It is rather a good job that I had created the lady driver, as when it came to it, despite careful measuring and checking, no.4 was a little too tall for the space and looked wrong. I'm sure he will be useable elsewhere, he nearly got lined up to drive the A1 Models 'Albert' but as the driver of that will be barely visible that seemed a bit of a waste.


I had a little setback fixing the roof in place when I found that the glue I had used had failed, it was an old tube of solvent-free UHU that has clearly seen better days, not drying out. So I cleaned up and applied from a fresh tube, held everything in place with elastic bands whilst drying and this time it seems to have done the trick.


With the figures in place I added some more weight in gaps identified around the Kato chassis and then popped the Kato 11-105 in place. The roof was then added as described above. If I have one minor gripe with the finished model it would be the join between the coach sides and roof, however at "normal viewing distance" this is a lot less noticeable than in the photos.


Whilst I have applied a minor amount of weathering along the edges of the fake clerestory on the roof (as this would be a place unlikely to get cleaned) I have yet to add any weathering anywhere else other than a wash on the Kato bogies to tone them down. I will no doubt add something subtle in due course. For now it has taken a spot in the display cabinet for admiration. 

Colin

Saturday, 8 October 2022

Clerestories and Controllers - O9 Tramcar Progress

We last saw the O9 tramcar build with the bulkhead panels in place on the floor and some seat supports in place on the platform ends. The seats are now in place either side, made from Slaters planked styrene backed with 20 thou sheet and add further strength to these areas. 

Either side of the end dash panels I added lengths of 60 x 60 thou quarter-round Evergreen section to give a pleasing rounded appearance to the corners. These overhung the headstock pieces a fraction so some packing was added to even these out. Once parts were set in place everything has been tidied up around the edges. Behind the headstocks pieces of 40 x 40 thou strip fill the step openings leaving a clear area for the side panels to be added.

Up on the roof I decided to add a clerestory, of sorts... Not a proper fully-built job as you might expect on a full size tram but more of the bump-in-the-roof you might get on miniature railway stock. This needed to have the same subtle curve as the rest of the roof and the best piece for the job was the bit I had removed to narrow the roof down! As previously explained this was cut 2mm too short so I have had to make up the rest with 40 x 60 strip and Milliput will be deployed in due course. I think even if the cut strip was wider I would have faced it either side to neaten the edges so just as much filling either way... Once set the ends of the clerestory strip were filed down to gently curve to the roof edge.

Jumping ahead a little, I was able to balance the sides and roof into place with a figure on the balcony to prove there is room. In fact a small selection of figures have already volunteered for duty, I daren't tell them of the horrors some may face to clear the motor. Please excuse the gap at the top under the roof, that will not be there in reality!


With body construction tasks now largely complete, work began on some suitable control gear for the platform ends. Rather than lots of pictures of tiny pieces on the cutting mat I have created a montage...

Top Left: The control boxes started life as 5mm square Plastruct section, but as this was a bit intrusive I cut one side off to make it 5 x 4 mm. Top and bottom I added some 3.3mm x 60 thou Evergreen strip offcuts inside the section and a top from 30 thou styrene. Once set this was neatened off.

Top Right: The handles for both control boxes and brakes were shaped from 0.7mm brass wire. I filed the top of the horizontal section flat on the pieces destined for the control boxes and for both components bent this section to a slightly curved shape. For the handbrakes short sections of brass tube were cut to make a collar at the top and a base. The parts seen here are actually the extra set that were created quite by accident as parts were rejected!


Bottom: The control boxes were drilled 0.7mm top and bottom and the wire threaded through. The excess at the bottom forms a locating pin and holding point during painting. The handbrakes were carefully soldered together with the addition of a split pin under the top collar to help secure the part to the dash panel.

Once the soldered parts were cleaned up I drilled two holes in each platform, one central and one towards the right hand side. In order to take the now cut-down split pin a hole was drilled in the dash panel but from the outside due to restricted clearances. This will be plugged and filled from the outside in due course.


The stage has now been reached where the next step is likely to be Milliput in a multitude of places...

Colin

Sunday, 2 October 2022

October Spawned a Tramcar

Having decided that the outline drawing in my last post was pretty close to what I wanted to achieve on the Kato bogie chassis, last week I slowly started to gather the materials required to start work. Immediately I was taken back a good few years to the early days of my O9 modelling, finding odd bits here and there that would become something other than their manufacturers intended. One sign of real progress is that some of these parts were actually intended for O9 rather than other scales.

From the spares box came the good side from a pair of Avalon line coach sides that Peter Ledley (of Clee Valley Railway fame) had passed on to me. This was cut either side of the centre door, the solebars removed and the cut ends made good with styrene strip. A pair of Chivers O9 coach ends were cleaned up and spare seat backs from the same source cut down in height to 7.5mm to be used as seat supports.


The floor piece is from 40 thou styrene, 22 x 70 mm with a cut-out for the Kato chassis. Plank lines are scribed on what will become the balcony ends. Solebars were cut from 3.2mm Plastruct channel, actually the second attempt as the originals were 3.2mm deep 60 thou Evergreen strip, but looked too plain and would have been set quite far back behind the Avalon sides. They were re-cut as strip to go above the solebars between the seat ends.

The floor, ends and solebars were assembled, followed by adding the seat end pieces, re-purposed as seat fronts to hide the Kato chassis under the seat. I hesitated adding the pieces planned along the top of the floor between the seat fronts as I realised they might make adding the bulkheads between the balcony and saloon a little more difficult.


After cleaning up, the Avalon Line coach sides were modified by adding a central window divider in each of the windows, using a length of 60 x 40 thou Evergreen strip carefully cut to length and superglued in place. These dividers would align with the bulkhead/partition pieces, which would be scratchbuilt parts. The new dividers were marked out on 20 thou styrene, with 10 x 40 strip used to make the window frames, very much in the manner that the masters for the Avalon coach kit were made (maybe in this case with a little less care...). Once set overnight the windows and lower cutout were cut out, then the pieces cut from the sheet. At this stage the top edges of the 20 thou sheet had been marked out to use a Dundas VoR roof for the project, but as can be seen, the final profile of the 40 thou material backing the parts is rather different...


Which brings us to story of the roof. When I had drawn out my concept drawing I had planned to keep the overall width to that of a Chivers coach kit, which just suited the Dundas roof. When cutting the floor piece and all the other parts that would sit between the sides, I forgot to take into account that the Avalon Line sides are a good 0.5-0.75mm thicker, i.e. there should be a rebate in the floor... I was also starting to think a flatter roof profile would be bit more "tram like" and to cut a long story short, after rejecting an already-converted version as being too narrow, I pinched a new roof from a Dapol Railbus kit. It was cut to length, oddly the length between sets of ventilators was just right, and then narrowed. I miscalculated here taking 6mm out, then having to take a further 1mm from each side. Glued together with a strip of 40 x 156 thou Evergreen strip below the joint, it was set aside to dry.


Whilst that dried I fitted the bulkhead partitions into place on the floor unit, having carefully measured their location in relation to the sides. The lengths of 60 thou x 3.2mm strip were further cut down to fit in-between and add strength to the central section. In between the partitions and the seat fronts I added squares of 40 thou styrene that will eventually support the balcony seats, but also add extra support to the bulkheads.


Just visible in the shot above is the construction of the rear side of the bulkhead partitions, a 40 x 40 thou strip runs from the motor cut-out, through the window divide and right up to roof level, with panels of 40 thou sheet in either quarter above and below the windows. This was a neater way to get the strength required in these parts. As some of the lower pieces are visible through the side windows they have a planked effect scribed in to represent the seat backs.

More soon, this is progressing well... 

Colin

Tuesday, 27 September 2022

A Tramcar Doodle

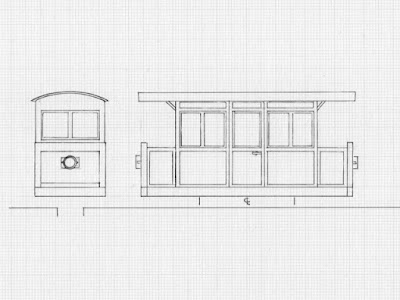
It seems like only yesterday, but turns out to be a number of months ago (four to be precise), I was looking at ideas to build an O9 railcar on a Kato bogie chassis. I had hinted at another design to come, which would essentially have been a pastiche version of my Dapol railbus conversions. That has not been drawn up, however with time on my hands I had another look over the various ideas and parts to hand and drew up something that ticks many boxes.


This is very much an evolution of the tramcar-like "Chivers Jubilee" design but actually incorporates the Avalon Line coach sides as well. The large windows would be split in two by the (scratch built) divider between balcony end and saloon. The ends are envisaged as the Chivers coach ends with the planking plated over, and the roof the Dundas VoR moulding. The chassis will be better hidden in this configuration and there is the potential to maybe have mesh panels in the end doors rather than solid, or even to leave them open if it looks OK and is strong enough.

A number of people had echoed my thoughts that the previous design was rather Volks-esqe, this continues that theme but is none the worse for it. I can envisage it jollying around sand dunes or in a private garden!

Colin


Tuesday, 31 May 2022

Railcar Doodles

It's been a bit of a quiet spell at the workbench of late, but this week I have at least been thinking about doing something, which is a start. I was given a Kato 11-105 bogie chassis for my birthday back in February and have been trying to find a use for it, maybe something a bit novel (for me anyway)... so I started to think about railcars.

Now there aren't many small 15" gauge railcars about, I did consider a 'caricature' version of the Ratty's 'Silver Jubilee' in the style of David Malton's 3D printed 009 models but even that would be pushing it. Then I saw photos on Facebook* that reminded me of a very obscure 15" gauge machine, the Minirail railcar that appeared at the Axe & Lyme railway and went on to Dudley Zoo. These online photos, and one rediscovered in a copy of 'Narrow Gauge Times' that I bought during lockdown, gave enough clues to dimensions, plus I relied on the prior knowledge that most Minirail items are 3ft wide.

As one of my friends said, it does rather look like two 1950s caravans back-to-back! I did put together a drawing but it isn't quite right around the cab side windows and maybe needs a little more overall in length.


There is a minor drawback to this scheme that will only make sense if you see a photo of the real thing (and I cannot share one here for copyright reasons). The Minirail railcar was actually a 4w vehicle, and the Kato chassis has bogies. The wheelbase on the real thing must have been 6-7ft which is a bit longer to scale than the Kato 4w chassis, so the bogie chassis does make a little sense.

But my main issue was that having got over my curiosity about it I wasn't really that bothered about building it. So I started to look for other ideas. I remembered that I had a pair of damaged Avalon line bogie coach sides that Peter Leadley kindly passed on a while ago, so I started to look at what might be feasible with them. One side is complete but the other is quite damaged, however a neat little railcar could result, maybe a battery unit to excuse the lack of engine bay. As a further alternative I part-drew a slightly longer version based on an A1 models chassis frame I have, with a short snout of a bonnet. I am actually less enamoured by that version if I am honest.


Even if the railcar version never gets built I can see a mini coach being built based on that drawing...

Colin

*the photos are in the Narrow Gauge & Miniature Railways of the British Isles group - you may need to be a member to see them.


Sunday, 4 April 2021

Diorama Developments - To The End...

Diorama developments must go in pairs, as I was building the bench for 'Humberston' this piece of Slaters 7mm scale fence was also in the works. A relic of my childhood "attempts" at O-16.5 modelling it was covered in a dubious coat of glossy brown enamel paint. A bath in Dettol soon sorted this out and with a little cleaning up the piece was useable.


I had used a piece of this fencing on 'Stuck in a Siding', a diorama that I built a few years ago depicting a derelict 15" gauge coach, very much inspired by the 'Abandoned Miniatures' page on Facebook. I also used this scene to experiment with making a puddle in the fashion of Gordon Gravett. The coach largely hid the fence from view in normal conditions so here the diorama is seen without it.


For this use I had added a woodgrain effect and distressed the planking a little to make it look a little less cared for. I did the same with the recovered section, as I wanted it to match... For in an audacious bit of diorama tinkering I have extended the originally 140mm long scene to match the 220mm of 'The Path To' and 'Humberston' (I guess that makes 220mm the new "standard" length!).

I managed to get the fence to join neatly enough to fill the gaps, touch in the paint finish and add diagonal joins in the cross-members. The actual join is nearly invisible. The junk pile has been moved and supplemented with a few extra pieces including an A1 Models bonnet front. I have managed to match the hanging basket liner ground cover from the original piece, as well as adding areas of Martin Welberg weed tufts and some longer Peco tufts. To give extra variety I added some rock outcrops at the back from home-made plaster castings and concrete area in the foreground, simply card covered with Green Scene concrete texture paint, and then weathered.


The plan had been to add the skip frame flat wagon seen in a previous posting, but late on in the process I had a rethink and decided to rebody it (again!). A few years ago I built a representation of the Sherwood Forest Railway' s skip framed open wagon on a much modified RCL skip frame hiding a Peco chassis (and undersized wheels) underneath. A bit on the featherweight side it has never really been used, and at the diorama viewing angle the undersize wheels were too apparent so I have transferred the body to the the more accurate chassis. The real wagon lacks the central bar along it's length so this was also removed. The Black Dog adaptor and flat wagon body have been transferred to the chassis prepared last year as a scenic item with broken axleboxes - waste not want not!


With the wagon in place on the diorama with the original carriage the revised scene is completed, new basswood strips were added front and back to hide the join in the MDF base and with this the opportunity taken to rename the diorama 'To the End'.


An investigation has been launched into the whereabouts of the missing full stop! It was there when I put the letters on... The overall result is (I feel), a much better balanced scene than the original.


I may yet add a figure to the scene, as with 'Humberston' this helps with scale, the perils of being a multi-scale modeller!

Colin