Railway modelling in 7mm scale on 9mm gauge track, representing 15" gauge miniature railways and 18" gauge industrial railways. (Plus anything else that I choose to include!)
Sunday, 11 June 2023
The Headshunt - Taking a Fence (in place of a wall)
Thursday, 5 January 2023
Tramcar Triumph
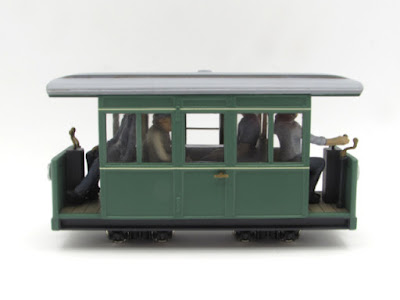
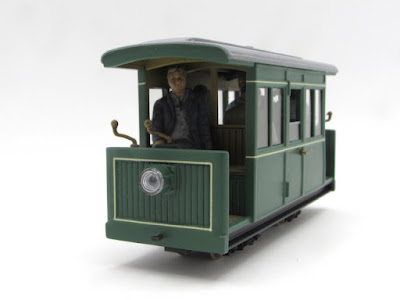
The O9 tramcar was varnished in a spare moment on Christmas Eve, using Halfords matt lacquer as an alternative to Dulcote or a Humbrol aerosol. This is the first time I have used this product and the verdict is that I am pretty impressed with it, having just a little sheen that is not inappropriate for coaching stock or locomotives.
With the paintwork completed and festivities out of the way I moved on to a list of tasks to further completion:
- Fitting the controllers and brake handles in place on each balcony
- Fitting 7mm NGA door handles on the centre doors
- Flush glazing the side windows using 20 thou styrene fixed in place with Kleer. The door drop-frames have a band of chrome trim along the top using a sliver of car body trim strip
- Weight (self-adhesive window lead) added in pockets between the body sides and seat supports
- Figures fixed in place in the centre compartment and balconies
There was some hesitancy over a suitable driver figure (or figures...) Five candidates were prepared for this task! Left to right, they are:
- Chinese Preiser copy in a slightly soapy plastic. Used in initial testing of the seating and generally good, but not 'hands on' enough for my liking as the main driver.
- Monty's Models industrial diesel driver, posed with this hand on the controls. Whitemetal, so to balance him out...
- S&D Models young man, relaxed pose for the back platform.
I then started to worry about the whitemetal figures adding weight in the wrong places, high centre of gravity etc on the Kato bogie chassis so looked for a plastic option again, leading to... - Chinese Preiser copy (old man with stick) in hard plastic, modified to seated position with hand on the controls and head-swapped. Enthused I also created...
- Chinese Preiser copy (young lady hand in hair), modified to seated position with her other hand on the controls.
Thursday, 10 November 2022
Tramcar Roof Refinements
Having added the nicely curved bulkhead top pieces to the body of the tram I realised that something similar but smaller was required under the roof, both to align with the end of the carriage sides and at the end of the overhang. More pieces of 40 thou styrene were marked out, using the template made from one of the old bulkheads for the top and an A1 Models etched cab front for the bottom. These pieces were then fixed in place, carefully measuring for the inner ones. I also added a strip of 30 x 60 thou styrene over the balcony openings to give some substance the imagined framework.
With the roof ends filled with Milliput and smoothed back once set, a strip of 15 x 20 thou Evergreen styrene was carefully glued into place (along the 15 thou side) following the curve of the centre section of the roof. Left overnight to set, the following day this was softened with solvent and gently curved around the roof edge profile. Left to set again this was trimmed to size and more Milliput added to fill the join between roof and extension. Smoothing off followed once the filler was set and a little shaping of the bottom corners finished off the job.
Thursday, 3 November 2022
Tramcar Tribulations
Saturday, 8 October 2022
Clerestories and Controllers - O9 Tramcar Progress
Up on the roof I decided to add a clerestory, of sorts... Not a proper fully-built job as you might expect on a full size tram but more of the bump-in-the-roof you might get on miniature railway stock. This needed to have the same subtle curve as the rest of the roof and the best piece for the job was the bit I had removed to narrow the roof down! As previously explained this was cut 2mm too short so I have had to make up the rest with 40 x 60 strip and Milliput will be deployed in due course. I think even if the cut strip was wider I would have faced it either side to neaten the edges so just as much filling either way... Once set the ends of the clerestory strip were filed down to gently curve to the roof edge.
Jumping ahead a little, I was able to balance the sides and roof into place with a figure on the balcony to prove there is room. In fact a small selection of figures have already volunteered for duty, I daren't tell them of the horrors some may face to clear the motor. Please excuse the gap at the top under the roof, that will not be there in reality!
With body construction tasks now largely complete, work began on some suitable control gear for the platform ends. Rather than lots of pictures of tiny pieces on the cutting mat I have created a montage...
Sunday, 2 October 2022
October Spawned a Tramcar
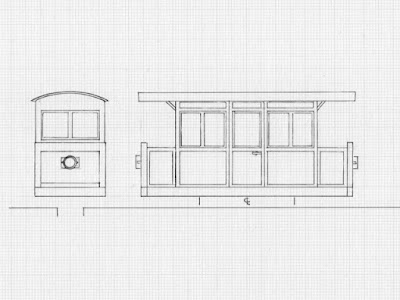
Having decided that the outline drawing in my last post was pretty close to what I wanted to achieve on the Kato bogie chassis, last week I slowly started to gather the materials required to start work. Immediately I was taken back a good few years to the early days of my O9 modelling, finding odd bits here and there that would become something other than their manufacturers intended. One sign of real progress is that some of these parts were actually intended for O9 rather than other scales.
From the spares box came the good side from a pair of Avalon line coach sides that Peter Ledley (of Clee Valley Railway fame) had passed on to me. This was cut either side of the centre door, the solebars removed and the cut ends made good with styrene strip. A pair of Chivers O9 coach ends were cleaned up and spare seat backs from the same source cut down in height to 7.5mm to be used as seat supports.
The floor piece is from 40 thou styrene, 22 x 70 mm with a cut-out for the Kato chassis. Plank lines are scribed on what will become the balcony ends. Solebars were cut from 3.2mm Plastruct channel, actually the second attempt as the originals were 3.2mm deep 60 thou Evergreen strip, but looked too plain and would have been set quite far back behind the Avalon sides. They were re-cut as strip to go above the solebars between the seat ends.
The floor, ends and solebars were assembled, followed by adding the seat end pieces, re-purposed as seat fronts to hide the Kato chassis under the seat. I hesitated adding the pieces planned along the top of the floor between the seat fronts as I realised they might make adding the bulkheads between the balcony and saloon a little more difficult.
Colin
Tuesday, 27 September 2022
A Tramcar Doodle
It seems like only yesterday, but turns out to be a number of months ago (four to be precise), I was looking at ideas to build an O9 railcar on a Kato bogie chassis. I had hinted at another design to come, which would essentially have been a pastiche version of my Dapol railbus conversions. That has not been drawn up, however with time on my hands I had another look over the various ideas and parts to hand and drew up something that ticks many boxes.


