Showing posts with label Beck Bridge. Show all posts

Saturday, 1 February 2025

Stirring the wagon pot

In the last 'odsock Corner update I explained how I had substituted the intended Black Dog Mining based wagon in the siding scene with my "damaged" Hudson skip-frame flat. Before I had decided on this switch I had actually altered the original model and I thought it worth recording the work here.

Inspired by the work of Steve's Narrow Gauge Adventure, the planks of the damaged flat wagon destined for the siding were actually replaced like-for-like with real wood in the form of weathered coffee-stirrers. Fixings were represented simply by pushing a compass point into the wood and then the tip of a mechanical pencil after weathering.


This gave a much better representation of weathered wood than I had managed with the original scribed and painted styrene, which to be honest I wasn't too happy with anyway...

Once I had opted not to use the wagon in the siding scene it gained some "repairs" made in the form of new planks from un-weathered coffee stirrers. In my mind I was perhaps formulating a plan that involved it retaining the Black Dog coupler blocks and being used with the Avalon Line loco (and other suitable stock).


That may not come to pass, in truth the stock that will run around the Pizza is yet to be finalised (if indeed it needs to be) and equally what couplings they will have. I've said it before but when I start wagon tinkering it isn't always a sign of a good thing... In this vein a few recent wagon kit builds have left the fleet in the last week or so as they didn't quite meet my current thinking but that was not a reflection on them as models, just my thinking...

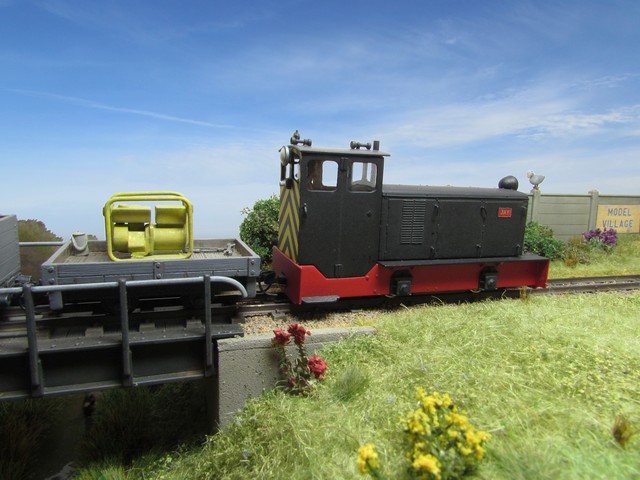
My cloud storage reminds me daily with an 'on this day' photo selection and ironically this week threw up several images of now-sold models. I'll leave you with this one from 2021, both the loco and diorama now have new homes, and I had space to build new things and a little money to re-invest.


Colin


Saturday, 18 April 2020

Getting Something Moving 1 - Background and Baseboard

Towards the end of December I posted a photo showing I had a baseboard ready to take forward as the next project, having rejected the idea of extending the Beck Bridge diorama into an active layout in the "picture frame" style. I haven't entirely abandoned the idea of something in this style, but I think it may be in 009 and might be a potential outcome of Humberston on my Mind as mentioned last week. The new board for 'Plan B' was examined in the second week of lockdown and it still couldn't grab me as the basis for anything, especially when I spotted that the backscene board was warping and splitting, despite bracing. Cutting it down to a previous shorter length did nothing to help my feelings about it and I resigned it to the corner of the workshop.

For some time I had been considering an O9 version of Julian Andrews 'United Brick and Clay', which I've been fascinated about since seeing it in the 'Modeller and Scale Model Trains years ago, and having now seen it many times in Howard Martin's ownership as 'Avalon Brickworks'


All the versions I've seen have always followed both the gauge and the 'handing' of the original, so in order to subvert the genre my version will be O9, and the opposite way around (partially a practical decision based on the availability of pointwork), I have had the basic plan drawn out (full size) to fit a 23.5" x 15.5" cork notice board for some time and having put 'Plan B' to rest the Thursday before Good Friday, and with a good part of a "stay at home" Easter weekend available to work in, I thought it a good opportunity to get the baseboard work started and hopefully the track laid and wired. Did I manage it? we shall see.....

I've had this cork notice board stashed away for over a decade, with the inkling that another corkboard layout might follow 'Shifting Sands' at some point. This board is of the older style, made from some kind of softboard rather than two layers of corrugated cardboard, I've found this is a mixed blessing... The top surface was missing the cork layer in a few spots, these were carefully filled and sanded.


When I built the board for 'Shifting Sands' I was without a workshop and only had hand tools, so used 21mm x 21mm pine right-angle as the supporting cross-members under the board. In hindsight this was too lightweight so this time I have used 12mm x 21mm pine section. In order to avoid having to notch the end of each cross-member I opted to pack under each timber. Needing material 4mm thick and having no strip in stock, I cut fine strips of some very nice plywood I had awaiting reuse. Underneath the board I marked where the strips would go and opted to seal the board surface with primer/undercoat to seal the surface. I left the areas for the strips paint-free to aid adhesion.


I then tested the cut strips of ply and pine for size, this was the result of working late afternoon/early evening on Good Friday and I felt I had made good progress.

Saturday morning saw the glue and clamps deployed to fix everything in place. The gaps in the ply strips are a rare bit of forward thinking on my part to allow wires to pass over the main support pieces. The extra piece of timber over the centre cross-member is there to make sure everything stayed nice and flat! Whilst the cross-member timbers were from a new piece of timber I had in stock, the shorter pieces either side were recovered from the 'Plan B' board.


With the sun shining the glue was soon drying nicely and after a cuppa the board was inverted and I gave the top surface a coat of "Chocolate Dream" emulsion to seal the cork and hide the filler. This is an odd colour, on our chimney breast it looks a lot browner than it does here, and I'm fairly sure the outer woodwork on 'Shifting Sands' is this colour too...


After lunch I spent some time at the workbench working out the wiring diagram, finding switches, pointwork and rail joiners, and pre-wiring components ready for track laying the next day. 

Colin

Friday, 10 April 2020

Humberston on my Mind

It's funny how both the backscene images used on the rebuild of 'Beck Bridge' were from the Humberston area. Just south of Cleethorpes this village has an interesting place in the history of narrow gauge railways, with lines in the past serving quarrying, a brickworks and of course the Lincolnshire Coast Light Railway, the pioneering green field narrow gauge preservation line that served a real transport function between the bottom of North Sea Lane and the Fitties holiday camps.

I never saw the railway at Humberston, first seeing the stock in storage at Burgh le Marsh as a child, but I later properly made it's acquaintance at Winthorpe near Skegness in 2013. Towards the end of February it seemed that there might be something happening model wise, with the arrival of a Bachmann ex-WD van in LCLR red and a Meridian Models Ashover coach kit. 


Now these won't fit on my 009 layout 'The Old Quarry Line', I can only just get the shorter WD open wagon around the corners! Several ideas are bouncing around for dioramas, I even made up a cardboard mock-up of the popular "cake box" (8" x 8" x 5") size to see what was feasible. Ironically I realised that I could have rebuilt 'Beck Bridge' from it's original cat food box form to this size quite easily had I though of it at the time...


One thing I have learnt from recent experience is that if I am going to build dioramas, they need to be capable of being displayed somewhere, preferably protected from dust. Could I get the atmosphere of the LCLR in one of my 7cm deep display case scenes? Well quite possibly - the yellow line is the outline, the Ruston should be a Simplex and please excuse the cardboard coach mock up! A simpler version without the van is also a possibility.


You might wonder why use the Meridian kit coach rather than the forthcoming Bachmann model. Well, firstly, it is forthcoming with no release date announced. Secondly, and more importantly, study of the LCLR coaches reveals they are very different from Ashover condition, and I suspect that Bachmann may not address these issues. The original sliding doors are gone, as are the droplights and original window frames, and there are differences in the panelling. Also the two LCLR vehicles differ from each other. Using the kit, altering the doorways and some subtle changes will make create a model much closer to the vehicle I have travelled on.


Of course if I pursue this path I'll have to built one of the LCLRs distinctive rebuilt Simplex locomotives as a static loco too, there are several to choose from, the best source material is on Dave Enefer's davesrailpics site (be prepared to lose a few hours in there...)

Colin

Monday, 6 April 2020

The Beck Bridge - New horizons

Working from home has the interesting side effect that being in the house at lunch time is rather boring, so trips down the garden to the workshop can provide a refreshing break. This has produced a few 15-20 minute bursts of activity, and the first benefit of this has been the project to add backscene boards to the Beck Bridge diorama. 

Being a retro-fit this has not been as simple as just fixing them in place. Wanting a curved corner piece added to the complication, and in the end I constructed an 'L' shaped unit in ply complete with the curved corner in place, built up from card formers and thin card, hiding a timber 'L' section to strengthen the join. Further complicating things was that the back piece would sit behind the existing surround, but the end sits on top of the existing surround (as I had no way of hiding it).


I carefully sanded the existing paint from the surrounds of the diorama at the back and sides, in order to get better glue adhesion for the back panel and to be able to fill joins etc at the edges. I also sanded off the coat of paint I had applied to the new sections as I realised I would need to add the timber strengtheners and would need to glue them securely to timber rather than paint.  

Having briefly considered trialling a commercial photo-backscene for this transformation I eventually opted against this as I would struggle to blend the beck into the scene. Therefore the sky is lining paper painted with appropriate emulsion paint. There are clouds but they don't show up too well. 


As can just be seen, at the right hand end I have introduced something that perhaps reflects what I'd really like to see at this moment in time, a glimpse of the sea... I've used a photo I took at Humberston Fitties several years ago looking North up the coast, adding a slight oil painting effect. The track doesn't continue onto the backscene but I've added a couple of paint effects to blend things together and hide the join. This is an incredibly subtle effect when seen in an overall view, but the impact in a low-level shot is much greater.


The beck decoupage has been replaced with a new print and the gap along the rear edge of the board previously painted black has been carefully filled in with scenic treatment including a new wooden fence behind the bushes. The new print is bigger than the old one, taking advantage of the increased height available. It does mean that the beck looks a bit wider in the background. All the backscene work was completed before the 'L' section unit was permanently fixed in place on the diorama.


On thing I hadn't factored in when adding the backscene across the right hand end was the slight limitation to the photography angles looking to the left. It is still feasible to soot this way but maybe not to get the bridge into shot!


The bridge can however be incorporated into long-shots down the scene - I was quite amazed how well this one turned out, a real train heading into the distance effect.


I'm really happy with how these changes have turned out, with hindsight a backscene should have been included from the beginning, but I wasn't thinking of that when I first carved up a cat food box...

Colin

Sunday, 15 March 2020

The Beck Bridge - Growth

No, I haven't added an extension, but I have been doing a little work on the Beck Bridge over the weekend, including moving the fence at the right hand end to a different angle, just in case I ever add a backscene with a curved corner... I've also picked up a couple of new scenic products at recent exhibitions and have been carrying out a few trials, some which have now manifested themselves as new additions to the diorama.


I've added new areas of brambles to the front of the scene, the idea being to make the scene look less 'square' and less flat. Having seen mention of using the "other" sort of Hanging Basket Liner in a magazine recently (the sort with a coconut mat effect), I acquired one and carried out a few tests, one of which has made it onto the scene at front left, whilst the larger area on the right has been created in situ.

The 'raw' coconut effect liner is seen on the left, I have started to peel the bulk of the material away from the adhesive coated backing part. I then teased/spread the fibres out a bit and sprayed with hairspray to hold them together. The piece on the right has then been sprayed with two shades of matt brown aerosol (Halfords dark brown and a lighter Humbrol shade).


The painting stage is entirely optional, I think going forward a mixture of painted and unpainted pieces might work (along with adding a second layer here and there to add more height).

The pieces on the diorama were then glued in position with PVA, this is one of my test pieces sprayed with more hairspray followed by foliage fibre (Woodlands Scenics) and then coated in hairspray again and various shades of foliage sprinkled on.


Whether created on the bench or in situ, I've used two shades of foliage fibre from Woodland Scenics and Hornby Skale Scenics, then two different types of foliage sprinkled on over more hairspray and then some coloured scatter added to give the effect of small wild flowers. I've also added short lengths of stalks reaching over the height of the foliage, achieved using Tasma Products 'field grass' cut into short lengths and secured with a small dab of PVA when the stalk was pushed into the main part of the undergrowth.


It is however always tricky to photograph scenic work...


Visible to the right, and also front centre, are some Martin Welberg weed tufts, which really add to the textures in view. They come as a big pack, it should last me a while!


When I moved the fence I opted to remove the seagull from it. The reason for this was two-fold, firstly when I took photos of my 009 Gmeinder on the diorama last week it was clearly in view looking huge, and it was also a little vulnerable when the diorama was boxed up. He has a new perch now, observing the goings on.


This shot actually shows the different textures in the brambles rather well, including the Tasma stalks and some Mini-nature leaves I added in small patches.

I'm still pondering adding a backscene, that also may be something "new2 for me...

Colin

Saturday, 11 January 2020

The Beck Bridge - Under Blue Skies

I couldn't resist having a little tinker with the photo of 'Pandora' on the 'Beck Bridge' diorama...


This shot of 'Jay' got similar treatment.


Both skies are genuine Lincolnshire coastal views, taken at Humberston on the Cleethorpes Coast Light Railway back in February last year. I may create a sky board of some sort to shoot against in due course but thought a bit of trickery was in order as an experiment.

Colin

Wednesday, 8 January 2020

The Beck Bridge - A New Horizon

Whilst going through various options to develop the 'Beck Bridge' recently I realised that for photography purposes it was bothering me that there was a whacking great gap in the backgound of pictures. From some angles the black edging along the back was showing through, as demonstrated in this natural light shot of 'Flower of the Forest'. This was difficult for me to disguise in editing.


I pondered over this and realised that I could add in a scenic piece to represent the beck flowing away from the scene. After some trials an image that I had downloaded in my research phase was flipped horizontally and given a painted effect. It worked from normal viewing angles but when I muttered something about making the trees on the print out look right, a friend suggested to me that I might try to use the 'Decoupage' technique used by card makers to get a 3D effect. I liked this idea as it could fill the "black edge" at the back of the board effectively without too much bodgery required. As a trial I printed my intended backscene out three times on thin card and carefully layered them using mounting board between the layers.


Satisfied with this I created a two-layer decoupage, in theory a back layer could be added if a fixed backscene was added (or as an extra stand-alone layer). Rather than print onto card I printed onto matt photo paper and then glued this to the card, the result is a slightly more intense colour compared with the mock-up.


The line of cut varies from the mock-up as I took the bottom piece across the pipe, which does give a nice effect. The edges of the trees and bushes were cut as carefully and randomly as I could without driving myself crazy. Once cut the cut edges and the back of each piece was treated with Button Polish (shellac) for strength and durability. Between the layers is a piece of mounting board also treated with Button Polish, the top of which and the upper edges of each piece being painted with a green-grey acrylic to help hem blend in to the printed images. In front of the image new growth in the form of Sea Foam bushes and some Peco long grass hide the joins effectively.

From the back it looks like this, the back piece is some 1/32nd ply cut to shape, Button Polished and then painted with matt black as per the rest of the surround. I've tried to be as neat as possible but it won;t usually be seen!


Under the bridge now looks like this, extra Peco long grasses were added towards the back of the water to hide the join and disguise a bit of the black surround taht insisted on showing through.


A slightly different angle from the first picture but this does illustrate that the new backscene piece and greenery are doing their job. The greenery alone could have helped but the backscene really helps to add depth.


I'm really happy with how these changes have turned out, certainly some of my more negative thoughts about the diorama have now gone, it will have to be stored out of sight rather than on display but for photography purposes I am certainly a lot happier to use it. I may still opt to add a couple of items at the right hand end to better fill the end in but that can wait for another day!

Colin

Tuesday, 31 December 2019

Now look what you've started!

... which is exactly what I said when the 'Beck Bridge' met the baseboard for the project that it's now abandoned extension plan kick-started...


I've filled in the joins in the corner of the backscene to allow a smooth transition between side and end boards. You might also notice a touch of Morecambe and Wise along the front edge where you now "can't see the join" after application of Milliput and some smoothing...

On that seasonal favourite I'll wish all readers of O9 Modeller a Happy New Year.

Colin
Saturday, 7 December 2019

There's always Plan B...

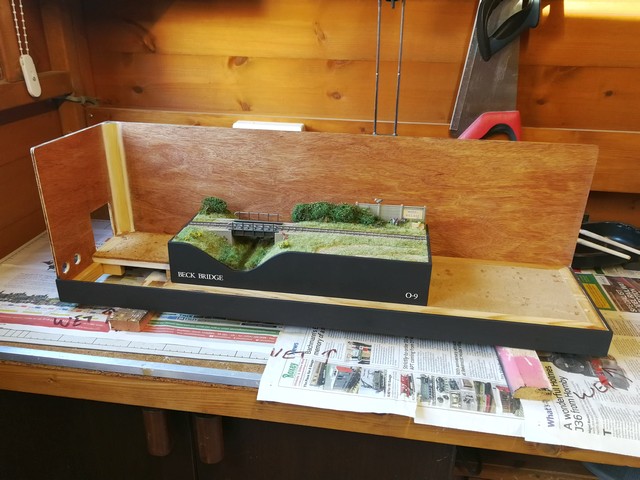
There is a piece of training we deliver at work where at one point we explain how the system warns you if you are about to take a "destructive action". Layout planning doesn't always do this for you but having spent a good few days doodling, brooding and examining, it became clear that extending 'Beck Bridge' might be a destructive action too far and that I would have to up the game for plan B. Whatever that was...

Plan B is envisaged to be based on the corkboard-esque board that was in service as the "new" test track, albeit then on the mk2 version. Whilst this worked satisfactorily, I was torn between leaving it in bare boards form, some low-level scenic work or something more layout-like with backscene boards etc added. 


It also became apparent during my recent coupler clinic that as a test track it took up too much desk space to be able to work on the item being tested. So I have replaced it with a smaller version, constructed from oddments during my initial workshop investigations into the 'Beck Bridge' rebuild.


An off-cut of ply 18.75" x 4.25" forms the top surface with framing from window beading strip that once graced a real 15" gauge carriage. A coat of varnish makes it all look a lot better than it really is and Peco track and MicroTrains uncouplers were recovered from the bigger version to create a two short sidings holding two wagons each, which is enough for testing purposes.

Which of course frees up the original board to potentially rebuild as plan B! There is an option to break out of the desk-sitter mould and extend the board by another 8" to the left if required and a potential extension could include a dropped area for a water feature, but probably not another bridge!* Track layout possibilities include recreating the mk1 version of the test track;


or adopting the basic idea from the 'Beck Bridge' extension; or even a new take on this plan that I drew up 15 years ago before going down the 'Shifting Sands' path....

Colin

*and yes, I have thought of recycling the bridge off the diorama...


Saturday, 30 November 2019

Hidden in Plain Sight

In my last posting about a potential plan to extend 'Beck Bridge' into a thin micro layout, I was torn between hiding a sector plate off-scene to close off the loop or making it a scenic feature. In the recesses of my mind another idea from Neil Rushby came back to me, from an article in the August 2008 Railway Modeller called 'A Scenic Sector Plate', about trying to hide a sector plate in plain sight.

The Ministry of Daft Ideas now seems to have developed a 3D visualisation department complete with a suite of items for planning purposes to see if this could be applied to the Beck Bridge rebuild.


This looks quite effectively hidden but not as cramped as when I mocked-up a hole-in-the-sky hidden version. Whilst the sector plate is aligned to the back road (which would be the "normal" position) the water tower hides the fact that the front line is disconnected. The structure alongside this is nominally styled after a phone box but could equally be a portaloo or even the TARDIS...

From the wider angle the result is also reasonable.


This is all working towards the formulation of my plans, there may be a totally separate 'Plan B' to also consider but that is currently an un-developed theory!

Colin

Sunday, 24 November 2019

Onwards from Beck Bridge

Since building the 'Beck Bridge' diorama it has spent most of it's time sat in a cardboard box either in the workshop or railway cupboard. The only times it has seen the light of day was for the 009 Society exhibition in Mansfield and for a daylight photo-shoot, producing shots such as this.

I've spent some time lately pondering what to do with it in the longer term as it doesn't really suit as a photographic set in the same way the 'The Headshunt' does. Now the Ministry of Daft Ideas came up with a few crazy ones including incorporating it into a continuous run. A sketch exists but I'll spare you that!

However, a post about "picture frame" scenes on the NGRM Online forum sparked an interesting thought, could 'Beck Bridge' be incorporated into a narrow, picture-frame style layout? Using a print out of the overall view I sketched a few additions, then scanned this in and composited the original picture back in...


The idea is to add to the right-hand end, doubling the length from 14 to 28 inches. This would be a fairly destructive act but I think achievable due to the way that the frame is constructed. Trackwork would have to be reworked to remove the KB scale dummy rail joiners that would stop smooth running and as part of this process I would actually lift some of the existing track and replace it with a point that feeds a short loop for a station.

I've sketched in a loco-length sector plate at the end of this hidden by the wing and most likely on a bolt-on board. A few commentators have suggested that this could be made fully scenic or be fully scenic and a turntable. I'm not fully sure about that element yet, I have a theory about making the scene seem longer by not visibly closing off the loop. I also like the idea of the loco vanishing for a few seconds and reappearing on the other line. Neil Rushby's 'Isle of Avalon Tramway' was in my mind, where a traverser was hidden in an overall roof and engine shed to great effect (seen here in new ownership). I didn't sketch in a roof but it is a possibility....


To the left-hand end a cassette fiddle yard would be added as a separate board.  Short trains such as my Exmoor tank and a couple of coaches could be operated effectively on this set-up. We shall see what develops as there are a couple of alternatives to consider as well...

Colin

Sunday, 14 July 2019

Dioramas on Display

Yesterday I displayed my two larger O9 dioramas at the 009 Society members day in Mansfield alongside 'The Old Quarry Line'. Here everything is set up and ready for action, the layout sat on it's box and one of the dioramas on the cardboard box I had created to carry 'Beck Bridge' in.


Days before the show I assessed the lighting options for the layout, having purchased two Ikea Jansjö lights that I had planned to clip to the box itself. Realising more height was required I fashioned an upright from a spare piece of timber and I opted to paint this in a black finish. Time was running short and I actually hung the timber from the washing line with a piece of wire and sprayed it with a Halfords matt aerosol...

A bonus was being able to mount the second light to illuminate the dioramas on the upright. 'Beck Bridge' was home to my pacific  and a Chivers coach...


Whilst 'The Headshunt' hosted the Exmoor tank and the recent works coach.


Interest in the layout and the dioramas exceeded my expectations and I was on the receiving end of many compliments and dodging out of the way of cameras (no-one wants a checked shirt backdrop to their picture!).

With everything packed away at home, the next day I ventured coastwards to see a pair of real Exmoor locomotives, but I'll leave that for another time...

Colin

Sunday, 23 June 2019

Two Little Ducks...

After the interlude getting 'Shifting Sands' into action for Burton, and a few follow-up jobs, the Beck Bridge has now stirred back into action....

There are a few new additions, some you can see here, others you will discover by reading on!


Most obviously there is now some life to the scene, the video camera wielding enthusiast is a Phoenix/S&D casting. This is actually the second of these I've owned, I think I've got the finish a lot better this time around. I've added a bag at his feet from the Prieser 1/48th airmen set. It is actually attached to him as he is removable. This is in theory to allow him to be moved about, but practically he is just too tall for the box...


Now he is supposed to be waiting to video a passing train, but it does appear that whilst waiting he's pointing the camera at this seagull.... This is a Duncan Models casting with scratchbuilt feet. Just visible is the pile of fresh sleepers I created to fill the gap in the scenery that I had been contemplating how to treat.


And here's the addition you didn't spot, swimming happily along the beck... these are Duncan Models ducks, they have a standing companion who is hiding on Shifting Sands!


In the process of adding the ducks I opted to add another layer of varnish to the beck, which hasn't gone swimmingly (ouch) so close inspection is not advised!

Hopefully I can get the edges of the board touched in and lettered before infiltrating the 009 Society Mansfield members day with some O9 (13th July at Portland College, if you are passing).

Colin