Showing posts with label TARDIS. Show all posts

Wednesday, 1 November 2023

Doctor Who - 60th Anniversary Diorama

My Doctor Who mini-diorama to celebrate the 60th anniversary of the show is now complete and ready for display. Final preparation involved drilling two holes to accommodate the pins in the Tenth Doctor's feet to allow him to stand looking pensively into the distance.


The TARDIS itself is not fixed in place (otherwise it would struggle to take off…). To help locate it place I set a magnet into the ground and superglued some offcuts of paperclip underneath the floor to match.


Whilst the magnet locates the TARDIS it doesn't hold it too firmly, you can tip the diorama to about 45 degrees before gravity takes over!


The completed scene is now ready to take it's place in my display cabinet and I am considering options for the next project...

Colin


Saturday, 21 October 2023

The Colour of the TARDIS

When we last saw my conversion of the Peco Police Phone Box to represent the tenth Doctor's TARDIS it was ready for scrubbing up for the paintshop. Cleaned up it was sprayed with grey primer and I checked for any blemishes that required attention. I then checked photos of the TV prop and something became very obvious that had completely passed me by...

The Peco roof has (quite correctly for a Metropolitan Police Phone Box) three "tiers" to the structure. The 2005 TV prop has only two, in fact the majority of the TV props only have two... I couldn't ignore this and resorted to reconstructing the roof by slicing off the top tier and opening out the resultant giant hole in the second tier to inset the top tier into. It was rather messy (and still is on the inside) but Milliput soon smoothed it out. After a re-prime of the roof I applied a black-grey wash over the whole structure as a base for painting.

Painting proper could now commence, at the beginning of the project I had searched for an appropriate blue paint, eventually choosing Citadel 'Stegadon Scale Green' as the best potential match. Despite the name, it is blue, and actually closely resembles BR Rail Blue! I applied three coats, the first straight from the tub but applied in a dry-brushing motion to leave a little of the accumulated dark grey in the recesses. The second coat was lightened with a drop of grey and again applied in a dry-brushing style to not 100% cover the first. The last coat was lighter still and less heavily applied. This process built up a nice 'patina' on the panelling. I then painted the floor grey, washed over with black-grey, and the boxes for the lettering in matt black.


The above photo shows the transfers in place for the 'Police Box' lettering. In order to prepare the matt surface for these I applied three coats of 'Kleer' to gloss the surface. After applying the decals another coat of 'Kleer' sealed them in place, before a weathering wash was applied over the whole panel to tone down the black and white, both colours I tend to avoid. The Peco decal for the sign on the door was a little undersized for the TV prop and this was substituted with a version found online printed onto matt photo paper and applied after carefully peeling away the back layers of the paper,

The window frames were picked out with a fine brush in the blue paint. One feature of the 2005 TV prop was that the windows appeared white behind the glass. I eventually resorted to spraying the backs with white primer, but not fully coating, to give a translucent effect. The white was a blessing as I wanted to add an interior printed on matt photo paper, in a similar manner to the TV prop. Again this uses an image downloaded from the web, printed with multiple version of the door sign.


Once the components had been matt varnished and the windows fixed in place, the interior print was cut to size and folded to shape. Some thin strips of basswood were applied at either end and the centre in order to balance out the effect of the window mouldings that sit approx 1mm behind the sides. You can just see the top of the centre piece at the rear.


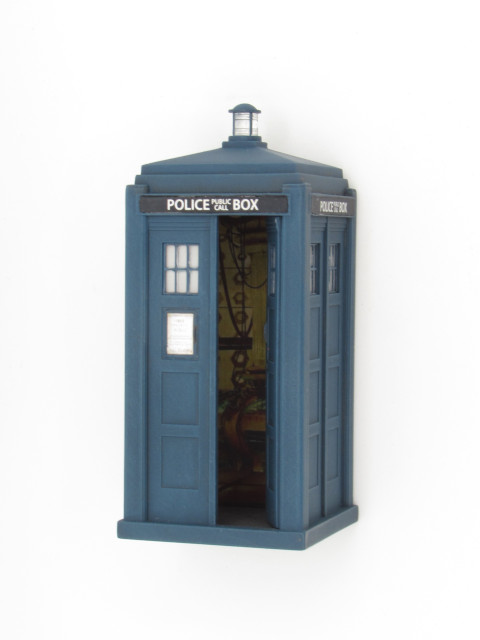
With the interior print in place I could then add the door, gluing it in place using the supports onto the wall rather than along the hinge line. The roof, to which I had previously added the lantern, was then added the next day. From this angle it just looks like a Police Box, although strictly speaking the door on the real thing opens outwards...


But if you turn it around you can clearly see it is bigger on the inside! It is actually quite difficult to see the interior without shining a light in, but at least I know it is there.


So we have a TARDIS, we have a Doctor, the next post will look at the creation of a diorama base to bring the elements together.

Colin


Sunday, 15 October 2023

Painting the Doctor

When we last saw our two Doctors they had just received a coat of grey primer and frankly were difficult to photograph as you could not see much of the detail. My usual method of figure painting these days is to then go over with a wash of black-grey, allowing it to sit in some of the detail and provide a basis for some shadows in the paintwork to follow.


At this stage in the procedure I realised that the inside of the tenth Doctor's long coat was going to be a real challenge to paint without getting paint where it wasn't required! The solution was eventually to paint another wash in a light brown, which as we shall see turned out rather well. From behind the hair texture I added using Milliput is more apparent now that the dark wash has been applied.


Painting of both figures followed my usual process of skin colour first, then shirt, jackets and trousers, working out to the coats. The tenth Doctor is modelled in his blue suit phase, as the earlier brown suit would give less contrast to the jacket. When painting I built up colour using an almost dry-brushing technique, the intention being to leave some darker areas to represent creases in the material. I did add some false shadows around the suit which are more apparent in the photographs than reality. The shoe laces were a necessity on the red shoes and my tiniest brush just about managed it before giving up the ghost.


By contrast the first Doctor was a little easier to paint the details on (you cannot see his shoelaces...) His hair actually caused the biggest issue as it should be all grey but that looks wrong and texture-less, so he has to have some darker bits. As he is not the chosen figure for the mini-diorama this is no real concern but is certainly something to think about for future figures. Both figures were completed a few weeks ago with a coat of Humbrol matt varnish from an aerosol, but in the best traditions of time travel are only now being revealed!


Painting TARDIS is progressing well, here's a sneak preview - note how despite it not being a model of a TARDIS Peco have provided some "round things" inside to keep the Doctor happy... 


More soon, including work on the diorama base.

Colin


Sunday, 1 October 2023

Doctorin' The TARDIS

In my last post I explained the basis behind my planned Doctor Who mini-diorama and how I planned to use the Peco 7mm scale Police Box kit to represent the TARDIS. Wishing to create something as close to a TV prop as I could from the kit I first had to identify which era I wanted to represent. My heart wanted to go for the late 1980s, a 'Remembrance of the Daleks' scene would be nice but I had doubts I could conjure up suitable figures. In the end I settled for the 2005 TARDIS as I had a better chance of success with the figures. 

Looking at the kit parts the first big difference was in the size and recessed depth of the 'Police Public Call Box' panel, the kit has this narrow and deeply recessed, whereas the TV prop has a wider, almost flush panel. I therefore filled the kit panels with 20 thou styrene infills to bring them almost flush. The other major surgery at this stage was to carefully cut out the right-hand door to allow it to be modelled open, adding 10 thou styrene strips around the edges of the removed piece to bring it back up to size.


Milliput was then added to the infilled lettering panels and around the edges of the door piece, and once dry smoothed back flush. An Olfa-style cutter was then used to scribe new surrounds for the panels, the same height as before but almost the full width of the panel. The new strips around the door were then carefully sanded down in size to fit the opening.


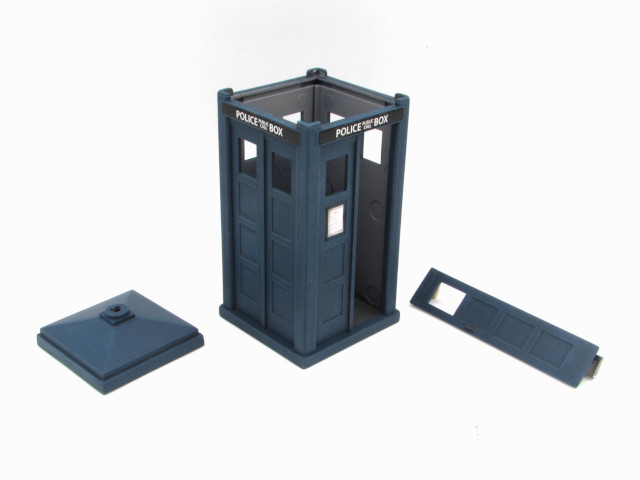
Assembly could now begin, ignoring the instructions supplied to build roof-down with the windows stuck in place before assembly! As my door was to be part-open I needed a floor, added using 40 thou styrene 29 x 29 mm, located in a convenient groove in the base of the sides. Each side was added in turn ensuring 90 degree corners using a square. A length of Plastruct hex rod was added along the hinge edge of the door to act as a re-enforcement for the join. 


With the walls assembled some filling was required along the joins. Unfortunately in the process of this act I did loose some of the moulded detail, however examination of the TV prop reveals that it is not there anyway, phew! The roof is placed on loose in this picture and will remain so during painting. I have added the little cap piece to the roof light, still on it's sprue, and also added some extra hidden pieces behind the door, to butt up to the wall and ensure the inwardly-open door cannot budge.


Everything was now ready for a final scrub up and then off to the paintshop. Even without the modifications I've made I would not have retained the the blue plastic colour, it is an odd shade and actually quite tricky to deal with during the build. 

More on the painting in the next post, however what I didn't realise at this time was that I had missed something which is now rather too obvious (and it isn't the windows and panels being too small, I can live with that)...

Colin


Friday, 29 September 2023

An Adventure in Space and Time

When Peco released their 7mm scale kit for a Police Box I resisted temptation for some time, after all the real thing would not fit into an of my planned layouts or dioramas. I finally gave in when I was asked what I wanted for my birthday this year, after all, 2023 is the 60th anniversary of a certain TV Sci-Fi series...

So a Doctor Who mini-diorama is on the cards, and the first thing to do is some research, on pondering where to start I was advised by one of my daughters to start with my mug...

So with a fresh cuppa to hand I descended into the rabbit hole of TARDIS designs over 60 years to discover which version would be feasible from the kit, finding plenty of information at https://thedoctorwhosite.co.uk/tardis/exterior/ to inform my choice. In true "wibbly-wobbly timey-whimey" fashion this project is being presented on the blog in a logical order rather than that in which it actually happened. I therefore actually pretty much knew which version I had to choose before I chose it! 

A few changes would be required, but that is to be as expected as Peco are very clear their kit is for Police Box rather than an alien vessel... In the next post I will explain the changes and enhancements that I chose to make and a customised build sequence to aid painting.

Colin