Showing posts with label Peco. Show all posts

Thursday, 30 November 2023

Teenage Kicks

Another adventure in time, but on this occasion a trip revisiting my own past. Late 1991/early 1992 I built my first model bus kit, a Tower Models Leyland National. Finished in my own ivory/red/grey livery it was the first of many, forming the initial backbone of a contemporary model fleet and membership of the Model Bus Federation. Those days are long gone but when Peco re-released the kit a few years ago my interest grew and I bought the kit in the Bure Valley Model Shop on our Norfolk holiday in 2019. 

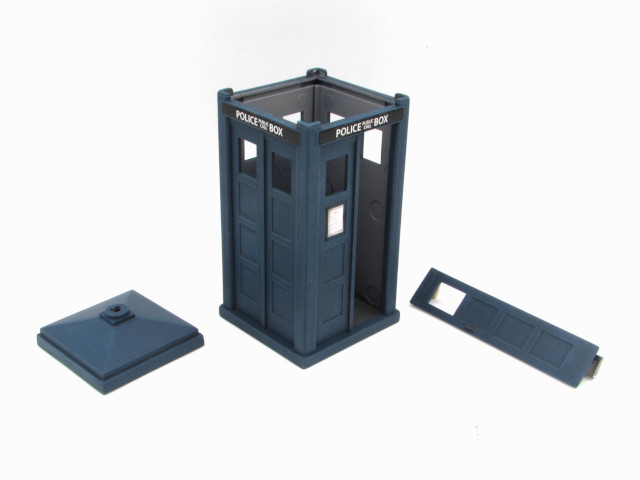
As I am still between railway projects I thought it would make an interesting follow-up to the Peco Police Box build. It hasn't all been plain sailing but that is largely "me" issues rather than anything to do with the kit. In many ways the kit is quite basic but with a few adjustments it can be improved to a satisfactory standard. The main changes I have made have been to the front end, wheels and to detail the interior.


Past experience had taught me to ignore the instructions, which say to build from the floor up, and to build from the roof down with the interior units fitted from below after painting. This allows much better joining of the ends to the roof. Front end improvements have involved taking a 1mm strip from above the bumper, opening out the windscreen at either side (which will require a new screen to replace that supplied) and rounding the corners of the destination and cove panels with tiny fillets of Milliput to better represent the prototype. I have also chosen to build the model as a 'B Series' example with no roof pod and the 9 small vents on the front and nearside, all formed from tiny strips of 5 thou styrene.


On the offside I have added the fuel filler in a recess midway along the side and the footstep cutout below the emergency door. On both sides I scribed in the flap in the lower fairing behind the rear wheelarch. The wheels caused some head scratching as the kit originals that sufficed in my teenage years no longer made the mark, luckily I had a set of ABS Models Leyland wheels to hand that had lived under a modified Dinky "Yellow Pages" Atlantean (another type that formed the backbone of my model fleet). They aren't perfect but will do until/if I can source anything more accurate. I've added a very slight steer to the front axle for realism.


The interior has seen the most work. As supplied this is quite basic and many of the seats featured blowouts in the moulding. I have added a step in the doorway, correctly raised drivers seat and scratchbuilt cab detail, a nearside luggage rack, offside longditudinal seat, handrails on all standard seat backs from staples and styrene strip and modesty screens in front of the raised seating area. Several online photos were used to get these details looking correct. There are also two glass screens to add behind the driver and in front of the luggage rack, made from clear 40 thou styrene to be added after painting. Just visible in this shot are the mud flaps I have added under the floor from 20 thou styrene.

I am happy with how this project has progressed after several frustrations, the next step will be to paint everything, which may take a little longer!

Colin


Saturday, 21 October 2023

The Colour of the TARDIS

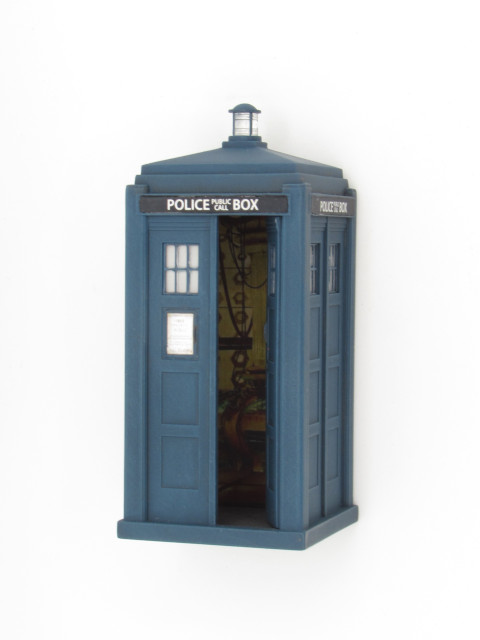
When we last saw my conversion of the Peco Police Phone Box to represent the tenth Doctor's TARDIS it was ready for scrubbing up for the paintshop. Cleaned up it was sprayed with grey primer and I checked for any blemishes that required attention. I then checked photos of the TV prop and something became very obvious that had completely passed me by...

The Peco roof has (quite correctly for a Metropolitan Police Phone Box) three "tiers" to the structure. The 2005 TV prop has only two, in fact the majority of the TV props only have two... I couldn't ignore this and resorted to reconstructing the roof by slicing off the top tier and opening out the resultant giant hole in the second tier to inset the top tier into. It was rather messy (and still is on the inside) but Milliput soon smoothed it out. After a re-prime of the roof I applied a black-grey wash over the whole structure as a base for painting.

Painting proper could now commence, at the beginning of the project I had searched for an appropriate blue paint, eventually choosing Citadel 'Stegadon Scale Green' as the best potential match. Despite the name, it is blue, and actually closely resembles BR Rail Blue! I applied three coats, the first straight from the tub but applied in a dry-brushing motion to leave a little of the accumulated dark grey in the recesses. The second coat was lightened with a drop of grey and again applied in a dry-brushing style to not 100% cover the first. The last coat was lighter still and less heavily applied. This process built up a nice 'patina' on the panelling. I then painted the floor grey, washed over with black-grey, and the boxes for the lettering in matt black.


The above photo shows the transfers in place for the 'Police Box' lettering. In order to prepare the matt surface for these I applied three coats of 'Kleer' to gloss the surface. After applying the decals another coat of 'Kleer' sealed them in place, before a weathering wash was applied over the whole panel to tone down the black and white, both colours I tend to avoid. The Peco decal for the sign on the door was a little undersized for the TV prop and this was substituted with a version found online printed onto matt photo paper and applied after carefully peeling away the back layers of the paper,

The window frames were picked out with a fine brush in the blue paint. One feature of the 2005 TV prop was that the windows appeared white behind the glass. I eventually resorted to spraying the backs with white primer, but not fully coating, to give a translucent effect. The white was a blessing as I wanted to add an interior printed on matt photo paper, in a similar manner to the TV prop. Again this uses an image downloaded from the web, printed with multiple version of the door sign.


Once the components had been matt varnished and the windows fixed in place, the interior print was cut to size and folded to shape. Some thin strips of basswood were applied at either end and the centre in order to balance out the effect of the window mouldings that sit approx 1mm behind the sides. You can just see the top of the centre piece at the rear.


With the interior print in place I could then add the door, gluing it in place using the supports onto the wall rather than along the hinge line. The roof, to which I had previously added the lantern, was then added the next day. From this angle it just looks like a Police Box, although strictly speaking the door on the real thing opens outwards...


But if you turn it around you can clearly see it is bigger on the inside! It is actually quite difficult to see the interior without shining a light in, but at least I know it is there.


So we have a TARDIS, we have a Doctor, the next post will look at the creation of a diorama base to bring the elements together.

Colin


Sunday, 1 October 2023

Doctorin' The TARDIS

In my last post I explained the basis behind my planned Doctor Who mini-diorama and how I planned to use the Peco 7mm scale Police Box kit to represent the TARDIS. Wishing to create something as close to a TV prop as I could from the kit I first had to identify which era I wanted to represent. My heart wanted to go for the late 1980s, a 'Remembrance of the Daleks' scene would be nice but I had doubts I could conjure up suitable figures. In the end I settled for the 2005 TARDIS as I had a better chance of success with the figures. 

Looking at the kit parts the first big difference was in the size and recessed depth of the 'Police Public Call Box' panel, the kit has this narrow and deeply recessed, whereas the TV prop has a wider, almost flush panel. I therefore filled the kit panels with 20 thou styrene infills to bring them almost flush. The other major surgery at this stage was to carefully cut out the right-hand door to allow it to be modelled open, adding 10 thou styrene strips around the edges of the removed piece to bring it back up to size.


Milliput was then added to the infilled lettering panels and around the edges of the door piece, and once dry smoothed back flush. An Olfa-style cutter was then used to scribe new surrounds for the panels, the same height as before but almost the full width of the panel. The new strips around the door were then carefully sanded down in size to fit the opening.


Assembly could now begin, ignoring the instructions supplied to build roof-down with the windows stuck in place before assembly! As my door was to be part-open I needed a floor, added using 40 thou styrene 29 x 29 mm, located in a convenient groove in the base of the sides. Each side was added in turn ensuring 90 degree corners using a square. A length of Plastruct hex rod was added along the hinge edge of the door to act as a re-enforcement for the join. 


With the walls assembled some filling was required along the joins. Unfortunately in the process of this act I did loose some of the moulded detail, however examination of the TV prop reveals that it is not there anyway, phew! The roof is placed on loose in this picture and will remain so during painting. I have added the little cap piece to the roof light, still on it's sprue, and also added some extra hidden pieces behind the door, to butt up to the wall and ensure the inwardly-open door cannot budge.


Everything was now ready for a final scrub up and then off to the paintshop. Even without the modifications I've made I would not have retained the the blue plastic colour, it is an odd shade and actually quite tricky to deal with during the build. 

More on the painting in the next post, however what I didn't realise at this time was that I had missed something which is now rather too obvious (and it isn't the windows and panels being too small, I can live with that)...

Colin


Friday, 29 September 2023

An Adventure in Space and Time

When Peco released their 7mm scale kit for a Police Box I resisted temptation for some time, after all the real thing would not fit into an of my planned layouts or dioramas. I finally gave in when I was asked what I wanted for my birthday this year, after all, 2023 is the 60th anniversary of a certain TV Sci-Fi series...

So a Doctor Who mini-diorama is on the cards, and the first thing to do is some research, on pondering where to start I was advised by one of my daughters to start with my mug...

So with a fresh cuppa to hand I descended into the rabbit hole of TARDIS designs over 60 years to discover which version would be feasible from the kit, finding plenty of information at https://thedoctorwhosite.co.uk/tardis/exterior/ to inform my choice. In true "wibbly-wobbly timey-whimey" fashion this project is being presented on the blog in a logical order rather than that in which it actually happened. I therefore actually pretty much knew which version I had to choose before I chose it! 

A few changes would be required, but that is to be as expected as Peco are very clear their kit is for Police Box rather than an alien vessel... In the next post I will explain the changes and enhancements that I chose to make and a customised build sequence to aid painting.

Colin


Saturday, 29 April 2017

Peco Skips as RTR O9?


Having been seduced by the Peco 009 'Rugga' V-Skips as a fine example of UK-made ready-to-run model railway equipment, my mind has started to wonder if they could form the basis of O9 models. This may seem a wild idea but there are two factors to consider:

  • Real skip wagons came in a variety of sizes.
  • The necessities of RTR 009 manufacture mean that the models are closer to 5mm+ scale than 4mm.
So some research started, firstly by posing a wagon with a 7mm scale figure to see how it might look:

It doesn't look too ridiculous so I carried out some further research. Two sources were consulted:
  1. The 2016 NGRS reprint of the Robert Huddson 1915 Edition 'Light Railway Material', p49.
    This contains dimensions of a 20" gauge 13.5 cubic feet 'double side tip wagon'
  2. 'The Blakesley Miniature Railway', Dr Bob Tebb, Silver Link 2009, p94
    This describes skips made by Busch of Bauten, Saxony, which may have been the type supplied to Blakesley Hall.
From that information I compiled the following table of dimensions at 1/43rd scale:


Peco (mm) Hudson (mm) Hudson 1/43 Blakesley (mm) Blakesley 1/43
Wheel Diameter 6.0 225 5.2 300 7.0
Height from Rails 18.5 1000 23.3
0.0
Width over all 25.0 1250 29.1 1160 27.0
Length Over all 31.0 1500 34.9 1530 35.6

As can be seen, the Peco skip is a little smaller than these examples but not beyond the realms of possibility. However, if you re-calculate the dimensions to 1/48th scale....


Peco (mm) Hudson (mm) Hudson 1/48 Blakesley (mm) Blakesley 1/48
Wheel Diameter 6.0 225 4.7 300 6.3
Height from Rails 18.5 1000 20.8
0.0
Width over all 25.0 1250 26.0 1160 24.2
Length Over all 31.0 1500 31.3 1530 31.9

That brings the dimensions even closer and makes the Peco V-Skip a realistic prospect for O9 (or indeed On18) use. Just be mindful that is is a lot smaller than most other commercially available O9 wagons and locomotives (which may be larger than scale). I posed my wagon with SMR no.3, which is a reasonable 15" gauge pleasure line sized machine and it doesn't look too bad, but a shorter loco such as a scale length Lister would look even better....


Food for thought?

Colin

Monday, 7 December 2015

More Chivers go Slimmer

Whilst I haven't had a lot of time at the workbench of late, I have had a tinker with the parts from a Chivers steel-side open. This is another from the same batch of secondhand wagons as the two-plank and once stripped of old paint it was obvious that it was a little lop-sided. It was certainly well glued together (perhaps too well) and I had to be brutal to get it apart, I nearly regretted starting....

With the ends cut down and a new floor, this is the result:


I had envisaged this as a bogie wagon and opened out the headstock for a bogie mounted coupler. However as it reminded me of the drop-side wagons at the Kirklees Light Railway, the decision was made for it to be a 4-wheeler. Having completed basic assembly I filled the headstock back in to create a space suited to a MicroTrains coupler and then added some corner strapping to finish off the ends.


Underneath a previously split-in-two Peco chassis forms the basis of the running gear with Plastruct 3mm channel as the solebars. All of the N gauge spring and axlebox detail was removed from the chassis mouldings and as an experiment I used 51L Highland Railway axleboxes in their place.  A few strokes of a file removed the top section of each box to allow them to sit neatly in position. Visually this trick works very well. 


A coat of primer covers up many sins and allows all the filling and sanding to be hidden. The home-brewed sections of strapping are nowhere near as neat as the fine Chivers mouldings but hopefully once painted they won't look too bad.


This wagon is now in the paintshop getting a splash of colour.

Colin

Sunday, 27 September 2015

Of Lamp Posts and Phone Boxes

Just a quick update of progress in preparing 'Shifting Sands' for the Sheffield Model Railway Society's Annual Show on October 10th. As previous posts have shown, my long-awaited aim to have lamp posts on the layout has been achieved, and they were 'planted' yesterday.


The posts have been located using some lengths of the same 3/32nd tubing that forms the centre section of the pole.  Lengths of this tubing were cut to match the distance from scenic surface to the underside of the baseboard and Araldited into a pre-drilled hole. Underneath the board, once the posts were in position, enough of the 1/16th tube that runs the full height of the light was showing to add the inner working of a chocolate block electrical connector to clamp the post in position, allowing removal if required.

Another scenic addition that has been made has only been planned for a short time, from the day after Peco announced their 7mm scale plastic kit for a classic red telephone box. This has been built as per instructions (and when they say paint before assembly, you really do need to paint the inside back wall first!), sprayed with red oxide primer and finished in Vallejo red acrylic, varnished with Testors Dullcote and lightly weathered.


The phone box has taken the place of the bench that previously stood here, with a little adjustment required to slabs and some extra grass added to hide the surgery. The previous inhabitant of the bench, assumed to be the long-suffering partner of the photographer lining up his shot, has taken up residence outside the rock emporium where she continues to read her magazine!


With the layout outside for photography I couldn't resist having a play and created this image, although all attempts to digitally add the sea in the background have so far failed!


Colin