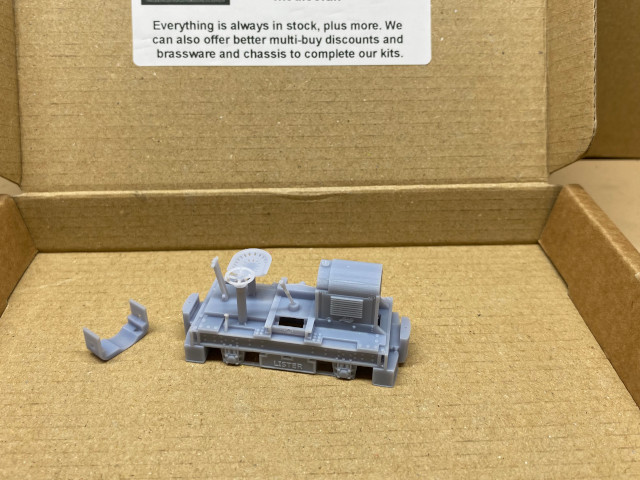
The driver of the Lister was not alone in his journey through the paintshop. For company he had the passenger and baggage for the 4w coach for 'odsock Corner. He's a 3D printed figure from 3D Printing for Charity (Facebook) raising money for the Lincs and Notts Air Ambulance.
Railway modelling in 7mm scale on 9mm gauge track, representing 15" gauge miniature railways and 18" gauge industrial railways. (Plus anything else that I choose to include!)
Thursday, 26 February 2026
Sitting Comfortably?
Saturday, 8 March 2025
Caravan and Cake
Monday, 26 February 2024
Finishing Touches for Number 6
Saturday, 17 February 2024
Simplex Number 6
The blue is Citadel Lothern blue as used on my 009 LCLR coach and loco, applied in three coats with the paint thinned as required to help alleviate brush marks. The red and black from Vallejo, the latter reduced in blackness with a spot of WW1 beige. The whistle was picked out in Vallejo brass whilst the printed oval plates on the cab sides and rear, which had troubled me at first, were painted black with white boltheads to complement the numbering, taken from a Replica Railways 4mm scale 'Rail Express Systems' rub-down sheet. Number 6 reflects the running number of 'Druid' at the ALR, despite this being a freelance interpretation.
Saturday, 20 January 2024
Future Echoes
It's been a quiet few weeks since I posted at Christmas, and it does seem a bit late to be wishing readers a Happy New Year!
I have spent a little time recently considering "what next?" and "what's achievable?" There are various thoughts at play and despite the appeal of something that the Shifting Sands stock can run on, another part of me wants to push in a different direction. I've always struggled with non-miniature railway O9, but I may now have a helping hand... my dad wasn’t sure what else to buy me for Christmas and I was out of ideas, so this was a complete surprise on Christmas day. I thought “that's too light to be a mug” when I was passed the almost square box...
Sunday, 16 October 2022
'The White Rose' is Revealed
A vintage photo of a 15" gauge Bo-Bo diesel 'The White Rose', mid to late 20th century, location unknown...
Wednesday, 31 August 2022
Pushing the Bo-Bo towards the paintshop
In my last post I left the MicroTrains coupler hanging below the bufferbeam of the A1 Models 'Royal Anchor' look-alike, looking for a way to make this look more realistic. My initial thought was to use an extension plate to the centre of the buffer beam, based on the arrangement of ex-Fairbourne 'Rachel' (left below). However in practice this did not look so good with the chunkiness of the MT coupler box. What was desirable was something more like ex-Fairbourne 'Katie' in Haigh Hall/Cleethorpes condition (right) where the angle-sections remained from former Fairbourne arrangement of "cow catcher" either side of the coupler.
After some thought I cheated and made up 5 thou styrene pre-drilled overlays and superglued them in place. Job done! I also added tiny bits of Plastruct hex rod to the brass angles to emphasise what might have been bolted in the holes. By the time this photo was taken I had blackened some of the exposed brass areas ready for the painting stage
After a wash down I then applied a light coat of primer to the body. As I suspected it might this revealed a few areas that need attention before moving on. Also, a little nagging doubt started to form, was I really happy with those curved lines over the windscreens? I started to delve deeper into 'Royal Anchor', because whilst I wasn't actually modelling her, most of the inspiration was coming from that direction. It started with looking at liveries, from the original two-tone grey with red trim (very 50s!); R&ER dark blue; and the various schemes work at Carnforth, such as two-tone green. What was clear is that the line on the drawings that I had scribed into the body was just the paint line of the R&ER livery and was not there in reality other than perhaps being the point the curvature started.
As I was not really happy with the way the lines had turned out this prompted me to fill the "furrowed brow" and once smoothed out re-apply the primer. I now have the freedom of choice between a curved paint join or straight across as per the Carnforth repaints. I then masked up the bufferbeam areas and sprayed them with red primer to give a base to the bufferbeam red in due course. This is a bit rough around the edges but will be lost in the final paint job.
As per my usual rule I don't generally take photos of paintshop progress, so you may have to wait for the next update!Colin
Saturday, 27 August 2022
A firmly 'Anchored' chassis frame
Sunday, 21 August 2022
A new spin on 'Royal Anchor'...
The biggest change is the new bufferbeams. John admitted that he had totally forgotten to add these to the design. Brass etch waste 3.5mm deep was Araldited to the bottom of the cab fronts and once set I scored a line along the bodysides at a corresponding height to represent the rest of the underframe. This line was deepened and neatened using an Olfa-style cutter. Two vertical panel lines were also added to the bodysides, all corresponding with 'Royal Anchor' despite this not being a model of that machine. Milliput was used to fill the corners behind the new buffer beams, being brass these exposed corners are now very robust.
Using a template (actually an old A1 Models cab etch) a line was scored above the windscreens, which will eventually be the colour join between cab front and roof colours. Again this follows 'Royal Anchor', but helps break up the large area above the windscreens, which was in danger of looking like a slimline Metro-Cammell DMU! Above this line I have smoothed back the join between front and roof to a more rounded profile.
There are still a few details to add, such as door hinges and some roof detail, but at present I am concentrating on getting a chassis under there, which isn't going to be the Bachmann one the manufacturer envisaged...
Colin
Sunday, 9 May 2021
Big 'Keef
I thought I would show the stages of finishing the print to a ready-to-paint state. Firstly the raw print was bathed in white spirit to degrease, then washed, dried, and the surface sanded with 400 grit. Then washed and dried again.
(Note: All sanding used home made sanding sticks made using wet and dry stuck to lolly sticks/coffee stirrers and was carried out wet.)
Red plastic primer was sprayed onto the model - this tends to highlight the surface and the print looks really rough and gritty.
In all I think about 3+ hours of work went into finishing this 3D print to this state, broken up over several evenings and waiting for paint to thoroughly dry before sanding. I ask myself if I could have built it in less time from scratch, and no, I couldn't.... at this stage I think that it may stay in grey primer, it isn't really the locomotive I need at the moment, but at least it is making me think about what is...
Tuesday, 22 December 2020
Alan Keef K12 in O9 - Everythings Gone Green...
The green is Halfords 'Meadow Green', but you might have guessed that! Black and red areas were brush painted, red first over red oxide primer and then the green and red were masked off for the black to be painted.