Saturday, 15 March 2025

Take Three

Having managed a very minor refresh on my recent scratchbuilt i/c loco, I was enthused to carry out some rebuild work on another older O9 loco and after some thought the Shifting Sands workhorse, No.3, has emerged from the workshops resplendent in yellow livery for the first time in about 20 years.


I outlined No.3's history (Come in number 3) at the time of her last overhaul 12 years ago (The New Look No 3). When I first completed her in 2004 she was painted yellow and I always felt that at some stage I would restore that colour scheme, despite all the subsequent changes over the years. Back in January I dismantled the locomotive back to component parts and gave everything a bath in Dettol to begin the paint stripping process. 


After nearly 48 hours in the Dettol bath, the majority of the paint was gone. As the 2012 paint job was applied over the 2005 one, from outside in there was a layer of Dullcote, Citadel acrylic, primer, Railmatch varnish, Halfords topcoat and primer - it is hardly a surprise it took so long! One victim at this stage was the Black Dog casting used as a handbrake lever in the cab, an old break that had been reinforced with brass wire. I could have fixed this but...


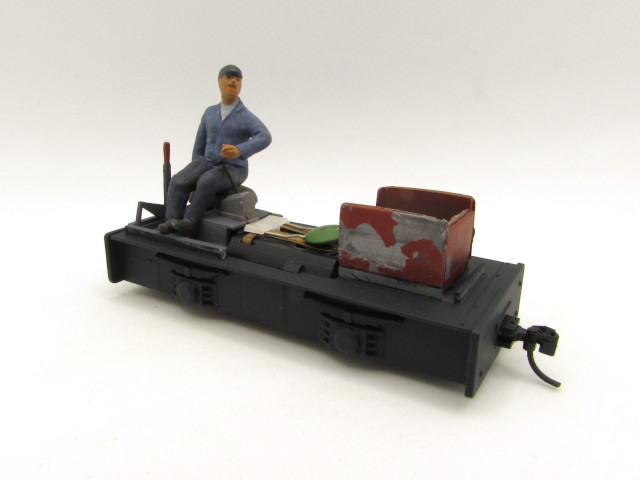
...my intention was to enclose the cab and you wouldn't really see it, therefore it was removed, fixed, and used where it could be seen in the newer locomotive. The whole of the door-opening cab side was removed from the cab and replaced with a new fabrication. This did not follow the door position of the 2005 cab side but looked "right". At this stage I also shortened the main frames as the long front overhang always had the effect of making the bonnet look thinner than it already was. The cab and bonnet were moved forward and adjustments made within the cab. Where necessary all joints in materials were re-filled and sanding ready for a fresh coat of primer.


A coat of grey primer was followed by masking up for a coat of white primer in the areas to be painted yellow. The yellow was sprayed with Halfords 'Broom Yellow' and touched in with Vallejo Flat Yellow where necessary. The underframe was sprayed matt black and then over-painted with Vallejo Black Grey, the same colour being used on the various grilles on the bonnet. The cab interior is a lighter grey and a new brake lever has been added, created from an Airfix/Dapol mineral wagon handbrake lever.

Painting was concluded with a coat of Humbrol acrylic matt varnish from an aerosol, after which the task of adding the smaller detail parts was carried out, including an open sliding window on the cab side, a nod to the original 2004 model. The exhaust, headlights and air horns retain their original finish and the number plates were cleaned up prior to refitting with matt varnish. Lead window strip weights, removed prior to paint stripping, were reinstated to both body and underframe, where the primer from the previous rebuild was still visible as seen above.

I'm really happy that I have made this much progress in just two months. There is a little weathering to do to complete the model, this will largely be around the underframe area and the plan is to be as subtle as possible, although a workhorse it is still a miniature railway locomotive rather than an uncared for industrial machine. 

Colin

Saturday, 8 March 2025

Caravan and Cake

I recently had one of those annual occurrences that involves cake and a few beers, and in amongst the presents were a couple of O9 models to build. On the left is a FK3D print of the Motor Rail/Simplex 'Caravan' which is designed to fit the Kato "core" in the same way as their Lister model, which will go a long way to overcome the issues I resolved on the 'Druid' print.


On the right is a self-directed present, a Unit Models 1-plank wagon cast resin kit. Years ago I built a Unit models 2-plank wagon kit but it didn't lead to any more purchases, this one was prompted by seeing Stephen Clulow's 'Apadobe Mine' at the 7mm NGA even to Mickleover in February (or January 32nd if you prefer...) It was a pleasure to meet Stephen for the first time and see the layout in operation, you can read more about his models on his blog Steve's Narrow Gauge Railway Adventure.


Stephen operated using a mixture of Black Dog Mining and Unit Models wagons and this prompted me to have a look again at the kits at the Doncaster exhibition the following week. Having purchased a 3D print Heywood-style wagon at Mickleover I now have a few "out of the box" projects to be getting on with in the coming months.

As for the special day, we had a trip on the Sherwood Forest Railway and Bob Colley treated me to the birthday headboard for the run!


In the next couple of weeks there should be developments to report on both 'odsock Corner and a project that I have been keeping under wraps...

Colin
 

Saturday, 1 March 2025

Through the Gateway

Heading through the gateway featured last week finds further scenic finishing in place. In the area between the tracks and trees I added brambles using both coir hanging basket liner and a small offcut of rubberised horsehair as the basis. Both were teased to shape and sprayed with Humbrol matt brown before being glued in place with PVA, sprinkling some fine turf ground foam over any exposed glue.  Once dry hairspray was used to fix Woodland Scenics foliage mat in place with a sprinkling of loose material to complete.


The triangle to the right of the felled log will soon be host to a little extra junk and more growth around it. Across the line I added more hanging basket liner based undergrowth/brambles to the area around the location of the third tree. I had originally intended to add higher hedgerows here using rubberised horsehair but found that it looked out of balance visually and put the pieces to one side for another day. 


When adding further material to the bramble patches, over-spray of the hairspray into the static grass caught some of the loose foliage material and gave a pleasing effect of growth within the grass. Having used similar techniques within hanging basket liner grass before I had intended to experiment on the static grass anyway, so rather than put it off for another day, I opted to add some growth around the tree stump.


Darker green material was used on the longer grass around the stump itself, whilst in front some lighter green and yellow material from Green Scene gives us the look of daisies in the grass. I find that adding effects like this can really enhance the grass areas so I went on to add more in several places around the layout.

More soon...

Colin

Saturday, 22 February 2025

Saturday Snapshot V - Growth

Although there are still some areas to revisit and enhance, I'm pleased to report that 'odsock Corner has finally reached the stage where all the scenic ground cover is in place and there are no (unintentional) patches of bare earth. The previously turf-only narrow strip along the back edge of the layout can be glimpsed here through the gateway sporting a mixture of wild grass and brambles. 


A recent purchase of Green Scene 4mm straw grass, mixed with other longer grasses I already had to hand, has allowed me to create a pleasing colour and texture different to the other grassed areas on the layout. The brambles added along this edge and in the centre of the layout, use coir hanging basket liner material as a base and Woodland Scenics foliage material, with some added effects. Foliage creeps over the wall to effectively disguise the point it cuts off at the baseboard edge.

Colin


Saturday, 15 February 2025

That tree in the corner...

In best railway tradition, this post is running late, at least a fortnight and possibly a month! It has got close to being published a couple of times but I really wanted to get the heading photo right and for various reasons it has taken a few attempts. 

We last featured this tree back in December in Twigging On when it looked suitably wintery and bare. it has now progressed scenically by about six months to be in full bloom. This is a task that was taken steadily and whilst usually a workshop task, the cold weather actually saw it completed in the house with a lot of cleaning up after each session.


Over the course of about a week the tree was fully foliaged using Woodland Scenics material, matt medium and hairspray, getting to the halfway point on the Sunday evening and completed on the weeknights.

The base layers of teased-out foliage material were secured to the branches using matt medium, working around the tree from the lower levels upwards. After the matt medium was dry on a level,  hairspray was used to secure additional material over the first layer to build up the effect of bushiness. 


Being indoors allowed the matt medium to dry fairly quickly so I could go away, do something else and return to take the next steps, then repeat... Working up the tree this way makes for pleasant, short working sessions before the task becomes too repetitive or the mind wanders... Once each layer was complete more hairspray secured the foliage in place and some lose material from the packet was sieved over to tree to further add to the layered effect.


Although nominally complete in the picture above a few extra layers of foliage were added to the top of the tree before I was satisfied enough to call the process to a halt, with the final result as shown in the heading photo.

Those paying attention and taking notes may notice from the heading photo that despite my careful planning to get items in place below the trees, there has been a re-arrangement of the various elements, hopefully giving a more coherent look. The broken Hudson wagon frame has been turned around and propped up on offcuts of timber, with the intention of having the other wheelset in front of it once modified and weathered. The cement bags have been placed on the floor near the slabs and just in case you needed to know they were cement bags, the top one has a clue added... 


A few extra items of junk are being produced to add a little more to this scene, hopefully to break up the linear feel everything has to the present time.

More soon...

Colin


Saturday, 8 February 2025

It was 20 years ago today...

Well, yesterday (ahem), that I took the first under-construction photographs of what was to become 'Cumbria'. I may not have realised it at the time but this model was pivotal in my O9 modelling journey, being a step away from the heavy kit-bashing that had gone before and my first model closely following a prototype, in this case the Ravenglass steam tram 'Flower of the Forest'. My styrene techniques had been honed on a couple of experimental models in the month previously and would develop further as the months went on.


In a turn-around that I'd struggle to achieve these days, three weeks later the construction and detail work was complete and the paintshop was on speed-dial. After spending thirteen years as 'Cumbria' a partial repaint and rebranding undertaken by James Hilton saw 'Flower of the Forest' finally emerge from the works as a reminder of many journeys behind the prototype at Cleethorpes. 


As the coming months may offer up several 20th anniversaries I am considering how to best present these on the blog, especially as the recreated Fotopic site pages of the era are already hosted on the site, for example this page for the 'Cumbria' build. I expect I will highlight the milestone events such as this and maybe casually mention the others now and then... (OK, enough with the Beatles references!)

Colin

Saturday, 1 February 2025

Stirring the wagon pot

In the last 'odsock Corner update I explained how I had substituted the intended Black Dog Mining based wagon in the siding scene with my "damaged" Hudson skip-frame flat. Before I had decided on this switch I had actually altered the original model and I thought it worth recording the work here.

Inspired by the work of Steve's Narrow Gauge Adventure, the planks of the damaged flat wagon destined for the siding were actually replaced like-for-like with real wood in the form of weathered coffee-stirrers. Fixings were represented simply by pushing a compass point into the wood and then the tip of a mechanical pencil after weathering.


This gave a much better representation of weathered wood than I had managed with the original scribed and painted styrene, which to be honest I wasn't too happy with anyway...

Once I had opted not to use the wagon in the siding scene it gained some "repairs" made in the form of new planks from un-weathered coffee stirrers. In my mind I was perhaps formulating a plan that involved it retaining the Black Dog coupler blocks and being used with the Avalon Line loco (and other suitable stock).


That may not come to pass, in truth the stock that will run around the Pizza is yet to be finalised (if indeed it needs to be) and equally what couplings they will have. I've said it before but when I start wagon tinkering it isn't always a sign of a good thing... In this vein a few recent wagon kit builds have left the fleet in the last week or so as they didn't quite meet my current thinking but that was not a reflection on them as models, just my thinking...

My cloud storage reminds me daily with an 'on this day' photo selection and ironically this week threw up several images of now-sold models. I'll leave you with this one from 2021, both the loco and diorama now have new homes, and I had space to build new things and a little money to re-invest.


Colin