Saturday, 3 August 2024

Saturday Snapshot

 A very brief post this week, and a glimpse toward the future. When taking the pictures of the walls and gates last week I posed them, the office and tree in place on 'odsock Corner to see how it all looked... 


When the time comes the tree's position will be adjusted slightly and other smaller pieces of greenery will join it hanging over and around the wall. 

More soon...

Colin

Saturday, 27 July 2024

The Saga of the Wall

We last saw the wall about 5 weeks ago in it's basic plywood form, with the stated intention to loosely follow the Belton House example. Once the donated garden wall bond brick had arrived I set-to with that aim, brick for the walls and stone gate posts. But it didn't look right, far too grand for a smaller estate, a fact compounded by a drive past a few local properties and a glance at their walling. I now faced a dilemma - was there enough brick material to replace my home-scribed styrene gatepost material?

The answer... just! I actually opted to remove the extra layer of the gatepost on the front (roadside) edge and that led to the fun of splicing in the new sections by carefully cutting around the edges of the bricks. This is actually reasonably easy on 7mm scale bricks and any gaps were filled in with Milliput during the tidying up stages.


The Milliput was also used to change some of the bricks where the corner joins created some tine slithers of brick, extending them back into the adjacent brick. Combined with the subtle re-carving of vertical joins most of the joins now look credible if not 100% accurate.  Also of note is the slightly tumble-down finish to the left hand end, where the office building will sit. We have to imagine that the wall was shortened at some stage. The capping stones are made from mounting board, cut as individual pieces and treated with button polish (shellac). This produces a softer finish than making them out of styrene.


In contrast, the gates are styrene. These are actually the Mk3 versions, the originals used two layers of embossed sheet back-to-back with 60 x 125 thou framing, but in the light of the following morning were too chunky. Mk2 used one layer of embossed styrene with the plank lines additionally scribed on the rear, with 40 x 100 thou framing. Once the hinges (Grandt Line mouldings) were in place I realised it all now looked too thin so rather than start again, I fretted out the planking, cleaned up the frame and added a new layer on the outside. 


When I first placed the walls and gates on the layout (before making the gates) I realised that I had actually made the gateway a little too narrow and there was a likelihood that some items of stock may hit something. The shorter wall was shortened some more and the longer wall moved back a few millimetres. This then dictated the gate size. With the gates made I placed everything in location to check the clearances again. The gates hang on small hinges made from 0.5mm brass wire and whilst in theory they could be made poseable, I think they will be firmly fixed in the open position.


From the rear the detail on the gates can be seen, although there is a high chance that most of this will not be visible once there is some vegetation in place. Also visible in this view is the custom join made where the wall changes angle, again something that may well vanish into the undergrowth!

Painting has already started with a coat of primer applied - I have had a little practice on the base of the office building but this will be the first large area of brickwork I have painted in a while...

 Colin

Friday, 19 July 2024

A Cozy Office - Completed

I'm not sure how a month has gone by since anything was reported from the world of 'odsock Corner, things are progressing quite slowly due to a combination of factors but are at least progressing... we'll return to what has become the saga of the wall and gates in due course, but for now the little office is complete.


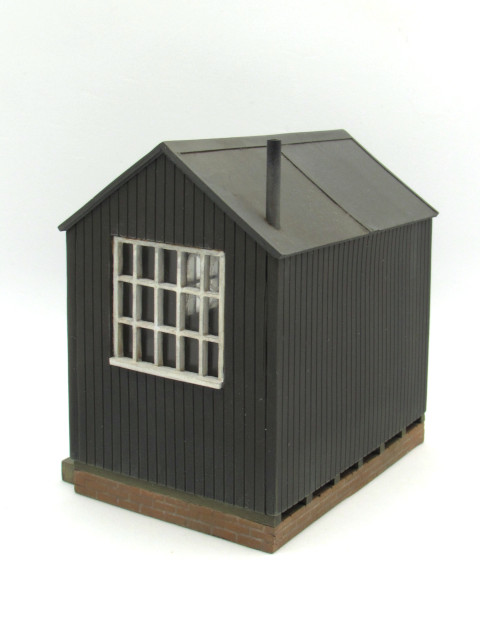
Wanting to totally contrast with the example on Shifting Sands this one is painted in a dark colour with red brick base. The base and the main part of the building were painted as separate units and only brought together at the varnishing stage. Even with this split I had to carry out a fair bit of masking of the wooden cross-pieces under the floor and brickwork to achieve a neat finish.

The main part of the structure saw masking to allow the window frames to be sprayed with white primer, after which the masking was reversed and the walls painted in Vallejo Dark Olive Drab. A wash-over in a darker shade enhanced the plank lines, then dry brushed with lighter shades to enhance the plank edges. Window frames were treated to a top coat of off-white and a lot of weathering to reduce their brightness. In contrast the roof is largely washes of greys over the original primer.


The interior details were painted up and added into the hut, the desk squeezing in along one end wall. The chair was located in place into two pre-drilled holes with two short pieces of 0.5mm brass wire in the rear legs, cut down from their longer length as used to hold the object whilst painting. The stove was positioned as closely as possible under the chimney on the roof using a length of brass wire as a guide.


The Titfield Thunderbolt poster was added to the wall as a little extra detail, coming from a sheet free with a magazine years ago. It covers a couple of air holes in the casting and a mark I made on the wall fitting the seat... 
 

At this stage I realised that there was perhaps a little too much detail painting on the interior as you cannot really see them with the roof in place! I have made passive provision for lighting via a hole in the base and floor around the door frame area to thread a wire through, although I have no plans to add this at this stage.

Colin

Sunday, 16 June 2024

Birdhouses and Brick Walls

The office building for 'Odsock Corner was last seen a a month or so ago. I'd like to say that there has been progress since then but in reality there has been very little. However, I have added one little feature which takes two forms of inspiration. Firstly a few weeks ago at the Immingham exhibition I was observing the 7mm layout 'Invermire' and spotted that the signal box featured a bird nesting box, something you rarely see modelled.


This coincided with my youngest daughter bringing home bird box designs for a school project, so the end result was the construction of a box for the gable end of the office building. Front and back are 20 thou black styrene, the sides are 40 x 100 Evergreen strip and two offcuts of 20 thou for the roof. The 0.7mm brass wire perch actually runs all the way though and doubles up as a mounting point and something to secure during painting.


The office and all it's accessories then had a scrub down to prepare for primer and painting, and attention turned to creating the basic structure of the brick 'estate wall' that forms part of the scenic divide between the sides of the pizza. I had envisaged this being foam core with embossed styrene brickwork and planned to (perhaps) draw some inspiration from this wall and gateway at Belton House, Lincs.

However whilst mocking up the wall on the baseboard I happened to use some strips of 5mm ply that had originally been cut for the baseboard edging before I chose to substitute stripwood. At 36mm high these were great for a wall about 5 feet tall. So after a bit of cutting I had pieces the right size, with some 3mm ply used to add depth to the gateposts and as an additional support pillar where the angle of the wall changed (this pillar may change in development). The gaps at the top of the gateposts were filled with more ply by gluing in oversize pieces and trimming them down once set!


Now comes the thing that has caused the most angst... the brick bond. By rights the wall should be garden wall bond, three rows of stretchers, then a row of headers, repeat... Whilst South Eastern Finecast do make this in embossed styrene, my stocks are offcuts of Slaters plain bond (all stretchers) and Flemish bond (alternating stretchers and headers in each row), and SEF plain bond. The Slaters Flemish bond is a very off-square sheet and I think I had the best bits for the wall on 'The Headshunt'. 

I am trying to keep costs to a minimum and the postage on single sheets of styrene is almost as much as the sheet. Luckily it appears that through the power of the internet a kind hearted 7mm narrow gauge modeller may have some offcuts for me... 

Colin

Saturday, 8 June 2024

'Odsock Corner, Introducing an O9 Pizza

I first introduced my O9 pizza layout project a few months ago and it finally has a name, 'Odsock Corner.  For anyone thinking of looking it up on a map, they may be disappointed, it's that spot in the house where the unpaired socks go awaiting rediscovery of their pal... The last time we saw the baseboard was as a mock-up, although the hut is well on the way to being constructed as seen  recently.

With the plan finalised and track tested, I took my plunge-cutter to the edge of the board where I had built in provision for a dropped baseboard edge, cutting into both the edge and the board surface. Underneath a support holds everything in place. This will later be filled in and landscaped.

The track was then painted. I had removed all traces of old paint from the rails before laying to ensure I was starting from a clean sheet. A waft of grey primer was applied first, then Humbrol 64 spray. Rail heads were cleaned and at a later stage the sleepers were dry brushed with varying grey shades and the rails washed over with red/brown to give a hint of rust.


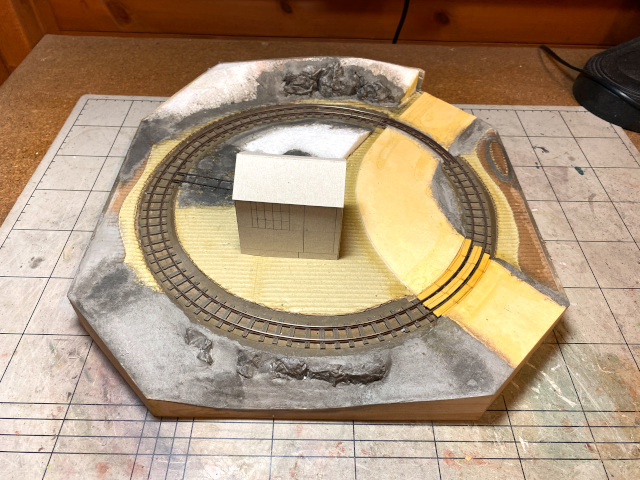
My intention was then to add a layer of thin corrugated card around the trackbed and then ballast, in a similar fashion to how I have treated other layouts. However, I got a bit carried away and eventually opted to get a large degree of the basic landform in place before the ballasting was started. Along the back edge of the scene, up against the higher side, polystyrene was used to build up the land, and where sloped of the land was too steep, some home made rock castings were used to mask the steeper edge.
 

More rock castings were added around the front of the scene to break up what will otherwise be a complex series of slopes. In this view they are only placed loose and a few changes were made before gluing in place. These casting were made some time ago from plaster of Paris in baking foil moulds, literally using up spare material from a craft the kids were doing! They are not perfect but are adaptable to remove any unwanted features. A fillet of polystyrene was added in the gap between the baseboard surface and the edge of the board.


The rock castings were tinted with Citadel 'Nuln Oil' and I then got a little carried away with the modelling clay, filling in gaps around the polystyrene, the front edge, and around the roadway I created from mounting card, which has various ruts and potholes, especially towards the back of the board. The two crossing differ, the one near the front has planks made from basswood (the central strip is currently laid in loose), whereas the rear one has guide rails and will get an infill once ballasting is carried out.

I had wondered how much I would be able to fit in the area behind the hut, given that the tree takes up a chunk of it. Another hut was envisaged at one time but there isn't room, however I have been able to add in a siding at right-angles to the main line to allow a wagon to moved over using a portable turntable or even man-handled. This line uses another offcut from a previous project, in a cut-out in the cardboard, blended in with modelling clay, still drying when the photograph was taken!

More soon...

Colin


Monday, 13 May 2024

A Cosy Office

Over the last week or so the workbench has been host to the Port Wynnstay office building for the O9 pizza layout. This is a simple resin kit that goes together easily although I did have to flatten the sides and ends before assembly as they had warped in storage. This was achieved by submerging them in a Pyrex dish of boiling water and then removing them with tongs and laying on a glass worktop protector weighted down with weights from old OO gauge Lima diesels. 

I assembled the walls and floor of the kit using a combination of superglue and epoxy resin (but not at the same time) - the superglue to hold parts quickly as there were still some slight curves in the parts and the epoxy to strengthen from the inside and to fix the final wall in place.


For the roof I built an inner roof from mounting card and fixed the kit parts to this, making a removeable unit to allow access to the interior. As can be guessed from the angle between the two parts, the main section of the building is not yet fixed to the foundations in order to make painting a little easier when the time comes.

The chimney in the roof is a length of copper tube let into a hole drilled in the roof. I have filled around this but when painted I will add some flashing from Creme Egg wrapper. The chimney gives a clue to what might be inside and anyone peering through the windows will hopefully not be (too) disappointed by what is within... 


The version of this building on 'Shifting Sands' has an interior with a desk and modern chairs, this version is a little more old fashioned. The desk is a Highland Castings example, however it had drawers at either side so I shortened the top and made a new side from styrene. The chair is from a 7mm scale coach seat moulding, with the base and headrest cut away and narrowed. Legs nearly troubled me but in the end the legs from the card table in the Prieser Luftwaffe ground crew set were used, slightly shortened and with some styrene and wire additions. 


Finally the stove again raids the ground crew set and started life as a radio or speaker. I have made it deeper with 80 thou styrene and sat it on a scratchbuilt base. The light grey legs are snippets of Dapol railbus step mouldings. Some Evergreen tube completes the illusion, you'll not be able to see it too closely once complete but at least it is there, and I'm left wondering where I should have drawn the line!

Colin

Sunday, 28 April 2024

Back to the 422 Wagons

Whilst work progresses on the pizza layout, I have finally got the two 422 Modelmaking wagons painted and attached to their Peco chassis. 

Painting followed my usual path of a spray of grey primer followed by painting the interiors in a bare wood colour. A black-grey wash and brown wash followed to highlight the plank and grain lines. Dry-brushing then followed, lighter colours in the interior and a semblance of paint on the outside. Ironwork was picked out in black-grey and some some light dry-brushing highlighted edges and gunmetal was dry-brushed onto the bolt heads etc. Everything was sealed in place with a spray of  Humbrol acrylic matt varnish.


The one-plank wagon has a brown (ish) tinge outside and is weathered with weathering powders to look as if it has carried a sand load recently, including runs outside the body where the top has been lifted off Heywood-style.

The drop-side has a grey tinge to the exterior although one plank has no paint at all. The interior load weathering is more of a brown tinge and again this has been extended to the exterior where the load has spilled during unloading.

Jumping back a stage, prior to fitting the chassis I decided to add a little extra weight to the wagons alongside the Peco weight. I used self-adhesive lead window strip in the under-side voids that would surround the Peco weight to use the space effectively, as demonstrated below.

I then placed the Peco weights into the spaces, mixed up some epoxy and filled the two smaller holes, sitting the Peco chassis into the weight and securing chassis to weight and wagon all in one go. 

Couplings are still required, I need to find a spare evening to tackle some Greenwich assembly...

Colin