Monday, 17 July 2023

Cleethorpes Coast at 75

The Cleethorpes Coast Light Railway celebrated 75 years of miniature railways at the south end of the resort over the weekend of July 15th and 16th. Although the 1948 railway was on a different alignment it is regarded as the first incarnation of the present railway for continuity purposes. It is quite a story of private and public ownership, steam, electric and gas-hydraulic propulsion over the years.

To tell this story a new exhibition has opened at Lakeside station telling the story in words, pictures, video and exhibits. A very familiar feature is this mock ticket hut that was constructed for the 'Rails to the Sands' exhibition back in 2010 to the design of Tim Dunn, although yet to feature on his 'Architecture the Railways Built" TV show! You could walk through it in it's previous location, but it now has a very effective background picture depicting the electric age at Cleethorpes in the mid-20th century. This should prove a good 'photo op' for families and children.

Two miniature steam locomotives feature in the display, and will remain on site for the summer season. The first is the locomotive that started it all - the GNR Atlantic that ran in 1948. Remarkably cine film footage of the original line has emerged and is on show, revealing it was painted red (!) Now re-gauged from 9 1/2" to 10 1/4" gauge it is restored in GNR colours.


The first locomotive built specifically for Cleethorpes was the Dove Pacific 'Cleethorpes Flyer'. Certainly not a fine scale machine in engineering or appearance it was based on an LNER Peppercorn outline, but was transformed in later years to depict a British Railways 'Britannia' class locomotive 'Rob Roy' and is usually based at the Eastleigh Lakeside Railway. It has been reunited with an original nameplate for display.


In 1954 the Cleethorpes Miniature Railway was electrified with the arrival of three accumulator powered locomotives with a modern outline. All are now scrapped, but a fourth identical machine was sold to Kerrs Miniature Railway in Arbroath and survived for a longer time before it too was scrapped. Imagine the surprise when the CCLR's owners discovered the cab end on an auction site! John Kerr is co-owner of the CCLR so this is a nice bit of history linking both lines.


On display outside was a 15" gauge visitor depicting an earlier era of seaside miniature railway history was Bassett Lowke 15 'Prince Edward of Wales' visiting from the Rhyl Miniature Railway. It shouldn't be forgotten that rival Lincolnshire resort Skegness boasted a railway operated by a sister locomotive in the early part of last century. It had been planned to run this machine however there were various concerns regarding flange clearances and haulage power so it joined the display of locomotives at Lakeside including CCLR past ('Flower of the Forest') and future in the form of the RVM blue diesel.


Another visitor was running on the main line, in the form of Exmoor Steam Railway built 'Monty' from the Evesham Vale Light Railway. I was familiar with this from a previous life as 'Markeaton Lady' and we will take a closer look at this delightful machine in a future post. As always with these events I tried a few favourite locations for lineside pictures and a few new angles too...


To celebrate the anniversary the CCLR shops are stocked with new designs of postcards, fridge magnets and other merchandise, whilst the Signal Box Inn had a specially brewed CCLR Golden Ale on tap.

Update: I have now uploaded a larger selection of images at higher resolution to Flickr: Cleethorpes Coast Light Railway Gala 2023

Colin


Sunday, 11 June 2023

The Headshunt - Taking a Fence (in place of a wall)

As I demonstrated last time the use of a small mirror appeared to resolve my issues with how best to photographically deal with the apparent 'gap' at the left hand end of 'The Headshunt' when pointing the camera in that direction. However the existing wall that represented a bricked-up gateway and pillar was not the best thing to reflect as it just looked odd. Having considered a timber building of some sort, I eventually realised that I was over-complicating things and instead settled on a low-key replacement in the form of two scratchbuilt fence panels made from bass wood. 


Although this looks like a post, rail and board fence it is in fact a cheat, the horizontal members are actually one sheet with cut-outs around the posts and the boards are scribed sheet rather than individual. This double layer of opposing grains made the piece quite strong. Nail marks were made across the planks using a track pin in a pin vice. I deliberately chose a pattern of fence that had a gap in the boarding where the upright stood. The reason for this choice becomes clear with a mirror, camera and slight touch-up 'in post'...


Not the clearest of pictures but it shows the effect well, the gap by the post makes the gap where the mirror sits blend right in!

Colin 

Saturday, 20 May 2023

The Headshunt - They do it with mirrors

When we last saw the 'The Headshunt' a couple of weeks ago I was trying to see how the visual gap on the left could be filled for photography using an item of rolling stock. I had a further thought this week as to how the gap at the left-hand end could be "filled" for photography, so I ran an experiment, the Keef was hanging around as it is still for sale (hint)...


Whilst using a small mirror actually does fill the visual gap, it is clear that the reflection really makes little sense due to the doubled-up gatepost. What could work better is a sectional timber building, disguising the mirror with an upright. It is certainly something to consider, especially as it could be combined with the previous idea of an end-of carriage section to visually enclose the scene. 

Just for the record, this is the unedited version of the picture above.


Colin


Wednesday, 10 May 2023

Getting Something Moving - Or Not

As I'm having a bit of a sort out and re-ordering of projects, one of the many issues was ‘Getting Something Moving’ and somehow making it work for me. 

Well the title of the project is now somewhat ironic because nothing is moving. It has been in existence now for three years, I suppose that when I started building in that lockdown Easter it was what I wanted to do but now looking at it with hindsight I'm not so sure... I've tinkered with it a few times since then but it still doesn’t gel. As seen recently I've spent some time playing with different track plans that will fit on the board and spent some time trying to work out if the current track plan could actually be made to work for me without having to do anything too destructive, but the more I looked at it the more the amount of work it needed to achieve what would work felt a little bit overwhelming due to time constraints.  

Well I say current, however despite surviving three Easters since construction started, just one Coronation later...


I had always said that I'll keep the track down on the board until I'd definitely made my mind up whether to retain the track plan, it looks like now I'm at that point! Everything has been recovered from the board and we shall see what develops next. I freely admit I struggle to work with 09 concepts that aren't 15 inch gauge railways as I know them which are as generally speaking passenger carrying pleasure railways. Anything slightly industrial or agricultural to me doesn't sit right. Others (Bill Flude and Graham Watling in particular) manage it far more eloquently than I do.

Colin

Sunday, 23 April 2023

'The Headshunt' - Taking a Trick-Shot

As alluded to in my previous post I have been considering the design of a new diorama to fit in a small photographic lightbox. Although I like that design, over the weekend I had a little play to see if there is an alternative, involving the recently refreshed 'The Headshunt'. 

When taking the most recent pictures of 'The Headshunt' I had been working in the shed with a basic LED strip light, but for the background I had used a large matt white plastic photographic sheet that my wife had picked up very cheaply. In the past I had always photographed this diorama on my desk using my standard desk lamp and whatever was to hand as the background, so the thought occurred to me that the sheet might be useable in the same way. The experimentation began... this is the set-up used, with a bonus glimpse of the new storage box being used as a height booster.


A pretty standard 3/4 shot. This is very satisfactory but I must trim the longer grass strands!


The awkward reverse-shot. Pleasingly the new grey edging is almost invisible in this and the next shot compared to the old black strip. My thoughts were turning to ways to reduce the white space, wondering if standing a carriage there might be the answer. 


Looking down the line. An anecdote from the rebuilding process is that I managed to snap the point lever during the work, hearing it ping across the shed never to be seen again. A new lever was found and colour matched to the original base.


The next day I thought I would try out the carriage trick for a shot pointing to the left, I think this works rather well and I'm baffled why I have never thought of it before!


This led to a further thought (dangerous, I know...) of a 'prop' of a half-coach that could be placed at the far left, and in combination with a couple of figures posed in conversation could "fill the gap" in photographs without having to have the coach right up against the subject matter. 

Overall I am very happy with the outcome, although I may try using a bit of one of the free Railway Modeller backscene pieces as a further trial in due course.

Wednesday, 19 April 2023

Developing a Diorama

As I have mentioned when describing recent changes to my diorama The Headshunt I have been trying to create a new photographic diorama that can be used within a small (12" x 12") lightbox. There have been a couple of false starts to say the least, however the work carried out on the older diorama has created a renewed interest in getting the job done...

I had conducted a little experiment with one of my 70mm deep scenes, just to see how it would work on camera, and in all honesty with a bit more depth it could work. However what this shot does highlight is how any such scene needs to have a fairly solid back piece (wall/fence/hedge) to really work, and the problem of how to treat the area where the track goes off the edge of the scene.


So the thought came to me that if there could be a building over the track at one end, and maybe a gate at the other, with wall or similar in between, an enclosed photo 'set' could be created. The idea in my mind was that it was some sort of workshop overhauling miniature railway stock, recalling photos of Fairbourne Railway locomotives outside Trevor Guest's workshop at Wollaston. 

Having located some of these in John Milner's 'Rails Through the Sands' I briefly fell into a rabbit hole of research, as I tried to find out a little more as there were two distinct buildings pictured. Luckily an article by John Tennant in 'The Narrow Gauge' no. 238 (Summer 2016) identified that there were two buildings in use, the 'bottom shed' and newer 'top shed'. They can both be seen in RAF aerial imagery from 1961 hosted by Historic England - Guest's yard is in the triangle of roads towards the top-left of the image. I adapted what I now know as the 'top shed' as the basis of this sketch.
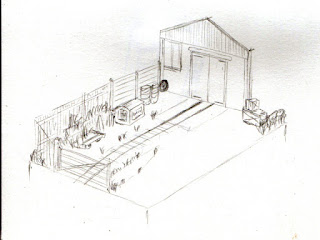
The sketch reveals a host of background junk, and how by leaving the front third of each side clear, maximum camera angles are available in a small space of 8" x 6". In order to try out the idea I built a quick mock-up in the medium of cereal box and double-sided tape and placed it in the light box to try a few photo angles.

Generally speaking the concept worked, and a few trial shots resulted from different angles with a couple of locos used for the test shots. The grey and white makes balancing the images rather fun but that would not be an issue with a fully-developed scene. There is also the possibility of adding a temporary backscene piece behind the wall rather than relying on the lightbox.

There was a slight concern though, one that is not so apparent in the picture above... Although the lightbox kicks out an impressive amount of light, the further forward an item is the more the foreground starts to get into shadow. So when I used a slightly larger loco in the box, the front end isn't quite as well lit as the rear. I had encountered a similar issue on a couple of occasions that I had used 'The Headshunt' in the box end-on (not the greatest of ideas!).

So I had an idea, what if it cut the back two corners of a scene at 45 degrees? Prototype number two was therefore assembled from leftover cereal packet card.


This way the scene can be pushed further backwards into the light box and the front of a longer loco should be better lit. A Slaters gate makes a special guest (no pun intended) appearance here, as I only have the one of these it would have to be removeable to go at the end where it needed to be in the background.

The result is that there does appear to be an improvement in the lighting of long-loco shots. In this view the section of wall in the centre is up against the back of the light box.

The downside to this idea is that it does away with the workshop building, but it then occurred to me that there is actually a possibility of doing the 45 degree cut at just one end and having the best of both ideas...

Colin

Friday, 14 April 2023

A bit of work down 'The Headshunt'

Those with long memories may recall that last summer I had intended to give my larger O9 diorama 'The Headshunt' a scenic makeover, but in the end carried out a similar exercise on my 009 layout 'The Old Quarry Line'. Fast forward to March this year, and frustrated with my lack of success with a new photographic diorama to fit in a small lightbox, I decided to revisit my planned work on 'The Headshunt'. Firstly, a reminder of how it looked...
 

As well as needing some new scenic work, the other thing that was really troubling me was the heavy black surround in 5mm ply. This particularly looked awful at the left hand end where it crossed the track and platform. So I carefully (with a mallet and heavy-duty scraper!) removed it. Nothing fell apart so the front strip had similar treatment, leaving everything a little vulnerable until they were replaced. The replacements are from 3mm ply, gently rounded on the front upper edges to reduce their impact, and are also about 1mm lower. Painted grey rather than black they no longer dominate the diorama.


The two holes in the new front trim are an indication of another long-envisaged aspect of the rebuild project, as they are securing holes for a ply/hardboard cover to protect the scene in storage. 

Within the scene itself the new areas of foliage can be seen left and right. As with work on 'Beck Bridge' and 'The Old Quarry Line' these use teased-out coir hanging basket liner, sprayed in two shades of brown, and various foliage mats, stems and other items to create a varied effect. I have also added Martin Welberg tufts and some MiniNature flowers in moderation.


The pile junk behind the headshunt has grown a little, as all piles of junk do... The wagon is a KB Scale Hudson frame with Black Dog adaptor piece, with wooden deck. This was completed some time ago and saved for a use such as this. Adding this led to a rearrangement of the oil drums, which sounds easy but they were very well stuck down! The green one was moved elsewhere and the red/yellow one moved into it's place, it just looked better that way... The more subtle addition is a cab frontspiece on the right, part of an old A1 Models etch carefully painted and weathered.


Overall I am very happy with these long-awaited changes, one advantage of the delay has certainly been the use of the grey surround in place of black, in part inspired by seeing James Hilton's work recently. Working on 'The Headshunt' has certainly kept things going on the modelling front for the last few weeks too. Thoughts have now returned to the new photographic scene but nothing concrete has happened... yet.

Colin