Saturday, 31 August 2024

An Oasis of Calm...*

As you may have guessed from the lack of real updates over the last few weeks, the summer period has far too many distractions to allow any modelling to take place. The latest is some 1:1 gardening/minor civil engineering occupying a fair chunk of the bank holiday weekend. If only I could get the grass to be as efficient as hanging basket liner!

The next task in line should be ballasting 'odsock Hall and I must not put it off too much longer as September will probably provide the ideal conditions in the workshop. In the meantime, here's a delve into the archives to a gloomy morning in Somerthorpe as the locomotives are prepared for the day...


Colin

*not affiliated to any 90's indie-rock group


Saturday, 24 August 2024

North Bay - A Poseidon Adventure

A weeks holiday in the Scarborough area inevitably ended up at the North Bay Railway on the Friday morning, after a very pleasant hour or so exploring Peasholme Park for the first time. Being a 'changeover' day at many of the areas holiday parks Friday is the quietest day for the railway with a single train in service. On this occasion 1933 'Poseidon' was on duty in pseudo-British Railways express passenger blue, a far cry from the tatty LNER green I first saw her in at Cleethorpes many years ago.


The area around Peasholme station has benefitted from removal of many of the trees that have grown up over the last 90 years and had in some cases become dangerous. There is space to develop but it is awkwardly located within the locomotive turning loop. As the NBR cannot extend in length all expansion is sideward, adding attractions to increase visitor stay. The latest example of this is a 7 1/4" gauge coin-in-the-slot tram running alongside the main line for about 40m (you can just see the buffer stop at the far end).


At Scalby Mills a new station building is under construction under the canopy occupying space that is under-utilised with the second platform now closed. It is based around a portable building and you may wonder how this got there, I had visions of a giant crane swinging it in... the more mundane answer is that is was brought to site in sections by rail, being loaded from a lorry about halfway along the line to avoid the tunnel. Cladding work is ongoing and it provides a much better space for retail and catering than the previous kiosk by the turntable.


Turning the locomotive at Scalby Mills always draws a crowd but my favourite shot is to wait for the loco to leave the turntable and take a portrait as the driver leaves to reset it to the incoming line. The sky in this shot may look photoshopped but it is the real thing!


After a walk around the rocks under the Scalby Mills pub, we returned to Peasholme for lunch, admiring what may be one of the best views on any miniature or heritage railway...


Colin
 

Saturday, 17 August 2024

Saturday Snapshot II - Gateway

Whilst posing the newly completed wall on 'odsock Corner the other day, I decided to pose the railcar in the gateway to see how it would look once the layout made a little more progress.

Drivers will have to be ultra cautious here with restricted clearances and sight lines... it's a good job it will only be crossing a trackway at this point!

Colin

Saturday, 10 August 2024

A Weathered Old Wall

I have now completed painting the wall and gates. I had envisaged doing a step-by-step set of photos for this but in reality I didn't get a chance to take the photos as I got carried away and just kept going... I'll do my best to explain the process I adopted for the brickwork but as an artistic process, I may have forgotten some of the stages!

Firstly, the finished result:


In essence, the process involved:

  • Grey Primer,
  • A wash of black-grey to darken the base colour,
  • Mortar colours - sand/beige mixes applied diluted and in different layers to create variety of colour and density over the surface,
  • Brick colours - Army Painter 'tanned flesh' and Vallejo 'flat earth' plus some other shades, mixed and applied in a dry-brushed fashion to pick out the brick faces
  • Additional colouring to the bricks using pencil crayons
  • Washes of brown and black-grey to tone down the colours, the darker colour being applied more heavily in the mortar lines at the base of the wall.
The stages using the brick colours and pencil crayons were repeated a few times as the washes tended to dull the additional colours from the crayons and a few corrections had to be made. Despite sanding down the brick faces prior to painting the mortar lines were still quite deep (and wide) and the pencil crayons actually helped pick out the edges of the bricks in places. The final dry-brush was a light green-grey on the lower brick courses to represent where greenery/grass had stained the brickwork. It rises on the rear of the wall as the landform of the layout rises behind the wall. 

The gates were painted in the same olive brown as the office building with similar weathering. The hinges were masked up and picked out in black-grey on both the gates and the walls. 


In place on the layout there is now some infill between the road and the walls, to raise the land a little and give a slightly deeper slot to site the wall in. Around the rear can be seen the slight correction that I had to make - I had over-estimated the height and extent of the raised landform and created a much too large expanse of darkened brickwork and mortar. I re-dry-brushed the bricks in this area and the effect of the darkened mortar is quite pleasing. There will be a lot of vegetation hiding all this in due course, I probably could have left it as it was...


The capping stones were painted in the same sand/beige colours as the mortar, having carefully masked off the brickwork first. The usual washes of brown and black-grey followed, then dry-brushing with the original colours. Everything was matt varnished to complete, which knocked back any shine from the pencil crayons. 

The picture above shows the various attempts at tree location - the one bottom right is the one that works best, bringing the tree closer to the wall and office but not overhanging too far.


Whilst I hadn't planned to complete these items before doing any more actual scenic work, having them available will allow for progress to now focus on the fun, messy bits...

Colin


Saturday, 3 August 2024

Saturday Snapshot

 A very brief post this week, and a glimpse toward the future. When taking the pictures of the walls and gates last week I posed them, the office and tree in place on 'odsock Corner to see how it all looked... 


When the time comes the tree's position will be adjusted slightly and other smaller pieces of greenery will join it hanging over and around the wall. 

More soon...

Colin

Saturday, 27 July 2024

The Saga of the Wall

We last saw the wall about 5 weeks ago in it's basic plywood form, with the stated intention to loosely follow the Belton House example. Once the donated garden wall bond brick had arrived I set-to with that aim, brick for the walls and stone gate posts. But it didn't look right, far too grand for a smaller estate, a fact compounded by a drive past a few local properties and a glance at their walling. I now faced a dilemma - was there enough brick material to replace my home-scribed styrene gatepost material?

The answer... just! I actually opted to remove the extra layer of the gatepost on the front (roadside) edge and that led to the fun of splicing in the new sections by carefully cutting around the edges of the bricks. This is actually reasonably easy on 7mm scale bricks and any gaps were filled in with Milliput during the tidying up stages.


The Milliput was also used to change some of the bricks where the corner joins created some tine slithers of brick, extending them back into the adjacent brick. Combined with the subtle re-carving of vertical joins most of the joins now look credible if not 100% accurate.  Also of note is the slightly tumble-down finish to the left hand end, where the office building will sit. We have to imagine that the wall was shortened at some stage. The capping stones are made from mounting board, cut as individual pieces and treated with button polish (shellac). This produces a softer finish than making them out of styrene.


In contrast, the gates are styrene. These are actually the Mk3 versions, the originals used two layers of embossed sheet back-to-back with 60 x 125 thou framing, but in the light of the following morning were too chunky. Mk2 used one layer of embossed styrene with the plank lines additionally scribed on the rear, with 40 x 100 thou framing. Once the hinges (Grandt Line mouldings) were in place I realised it all now looked too thin so rather than start again, I fretted out the planking, cleaned up the frame and added a new layer on the outside. 


When I first placed the walls and gates on the layout (before making the gates) I realised that I had actually made the gateway a little too narrow and there was a likelihood that some items of stock may hit something. The shorter wall was shortened some more and the longer wall moved back a few millimetres. This then dictated the gate size. With the gates made I placed everything in location to check the clearances again. The gates hang on small hinges made from 0.5mm brass wire and whilst in theory they could be made poseable, I think they will be firmly fixed in the open position.


From the rear the detail on the gates can be seen, although there is a high chance that most of this will not be visible once there is some vegetation in place. Also visible in this view is the custom join made where the wall changes angle, again something that may well vanish into the undergrowth!

Painting has already started with a coat of primer applied - I have had a little practice on the base of the office building but this will be the first large area of brickwork I have painted in a while...

 Colin

Friday, 19 July 2024

A Cozy Office - Completed

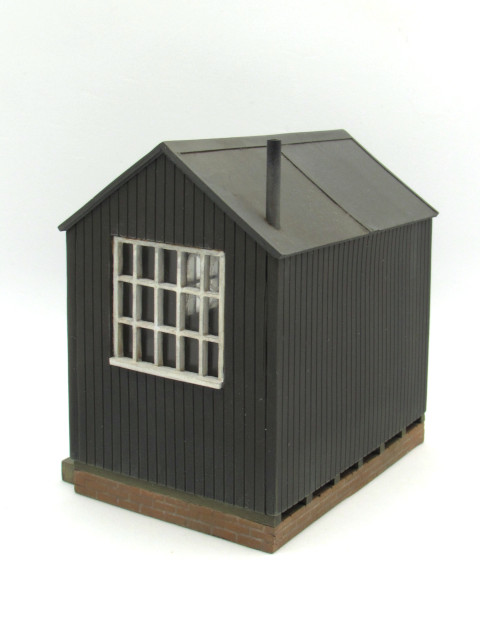
I'm not sure how a month has gone by since anything was reported from the world of 'odsock Corner, things are progressing quite slowly due to a combination of factors but are at least progressing... we'll return to what has become the saga of the wall and gates in due course, but for now the little office is complete.


Wanting to totally contrast with the example on Shifting Sands this one is painted in a dark colour with red brick base. The base and the main part of the building were painted as separate units and only brought together at the varnishing stage. Even with this split I had to carry out a fair bit of masking of the wooden cross-pieces under the floor and brickwork to achieve a neat finish.

The main part of the structure saw masking to allow the window frames to be sprayed with white primer, after which the masking was reversed and the walls painted in Vallejo Dark Olive Drab. A wash-over in a darker shade enhanced the plank lines, then dry brushed with lighter shades to enhance the plank edges. Window frames were treated to a top coat of off-white and a lot of weathering to reduce their brightness. In contrast the roof is largely washes of greys over the original primer.


The interior details were painted up and added into the hut, the desk squeezing in along one end wall. The chair was located in place into two pre-drilled holes with two short pieces of 0.5mm brass wire in the rear legs, cut down from their longer length as used to hold the object whilst painting. The stove was positioned as closely as possible under the chimney on the roof using a length of brass wire as a guide.


The Titfield Thunderbolt poster was added to the wall as a little extra detail, coming from a sheet free with a magazine years ago. It covers a couple of air holes in the casting and a mark I made on the wall fitting the seat... 
 

At this stage I realised that there was perhaps a little too much detail painting on the interior as you cannot really see them with the roof in place! I have made passive provision for lighting via a hole in the base and floor around the door frame area to thread a wire through, although I have no plans to add this at this stage.

Colin