Sunday 23 December 2012

The New-Look No.3

As previously discussed, the Somerthorpe Miniature Railway workshop crew's winter project has been a rebuild and repaint of diesel No.3.  Here she is after the attention of the paintshop staff:


The main colour is Games Workshop/Citadel 'Regal Blue'. I had contemplated keeping the chassis in dark grey as before but eventually chose dirty black with red headstocks for visibility.  All painting was achieved with acrylics (other than some red enamel used as an undercoat) and the varnish is Citadel 'Purity Seal', which despite some of my recent issues went on fine....


The new driver (just) fits in the cab, I had to remove part of the false ceiling to get his head in!  The old detailing bits, lights, exhaust etc have been re-used without change, however the numberplates are new, being old Jackson-Evans etches.


Around the other side the cab window has lost it's dividers and is now a single piece.  The van is a recent quickie build using a spare Black Dog Mining under frame and some Parkside Dundas 4mm scale van doors. The pointed roof is just to be different!  It isn't really an SMR vehicle and makes no.3 look quite industrial, but that is not intentional.....

Well, that's about where the workbench breaks up for Christmas, any ideas of a holiday project are just that, ideas, as there seems to be an endless list of other activities to be involved in!  So to all readers of O9 Modeller, have a great Christmas and a prosperous New Year.  I'm not yet sure what 2013 brings, but I can sense change in the air.....

Colin

Thursday 29 November 2012

Movember meets Mini-Mo

As promised, here's the driver for SMR no. 3, with his topical Movember 'tash keeping his upper lip warm:


He's a mix of Preiser parts, mostly from the Luftwaffe ground crew set, but with one arm from another figure.  The basic limb set-up dates back a couple of years but all the detail and finishing is new. He was painted in record time, completed in one session rather than the spread over several days approach I usually take with multiple figures in paint.

In fact, his Mo almost looks better in pictures than mine!


Colin

Sunday 25 November 2012

Come in number 3....

....your time for overhaul is here!

You have to feel a little sorry for nameless SMR no. 3, clearly the workhorse of the fleet with a somewhat up and down existence, as the pictures below will show.  The Kato chassis underneath is often borrowed to try under new build locos, and quite frankly the cracks were starting to show, especially one in the main frames. A long overdue overhaul was in order, but first, a history lesson from the 'Shifting Sands' archives.

No. 3 (because it was the third O9 loco I built), came into my hands from Clive Mortimer, a well known scratchbuilder of 4mm scale diesels, many of the rarer designs that the ready-to-run manufacturers are only just starting to see the benefit of.  Clive had visions of the 'Great Ouse Valley Railway', a Romney style outfit in the east of England.  This loco, and several coaches, were the only manifestations of it in O9, but he later restarted work in 12mm scale on OO gauge track.  One day his vision may come to fruition!

No. 3 arrived without any form of chassis, and I quickly put together a frame to fit around a Roco HOe mechanism.  I had to add bonnet side extensions to cover the motor:


Painted bright yellow, the loco gained the nickname 'Yellow Perril', hardly original but it suited!  There then followed my period of O9 indecision, where I almost gave up, started making static models and dioramas, then changed my mind.... By this point, I had altered the side frames to show the Roco ones underneath, but the chassis moved on to another loco (as seen here), and a dummy chassis featuring 4mm scale wagon axleboxes was built.  A bit Lister-like if anything:


After I had restarted work and was planning what became 'Shifting Sands', the loco had fallen into disuse and was eventually given an rebuild that featured many new parts.  The chassis frame was from Knightwing components (and had been built on-spec for another project), whilst the cab sides were a pair built initially for 'Jay' but replaced on the final model.  At this stage only the bonnet front and top, cab front and rear are the original parts, the rest was new build and replica:


With the varnish yellowing the coat of blue paint worn after the rebuild, and the cracked frame to repair, it was clear that the overhaul would need a repaint to go with it.  What was unexpected was that the cab would be modified again to an open doorway, inspired by 'Redgauntlet' at New Romney (which I suspect inspired Clive in the first place).  So here we are, awaiting the paint shop, where the colour will again be blue but the shade darker, pretty much the colour she arrived in:


Opening the cab up meant a new interior and new driver, as the old one had been compromised to fit over the Kato chassis.  I'll get a picture of the new recruit (the usual Preiser airman mash-up) posted soon, but needless to say, with it being Movember, he has a 'tash!

Colin

Sunday 11 November 2012

A Movember Plea....

I don't normally write about non-railway things here, but for a change I thought I would....

A group of Gents in my workplace are supporting 'Movember' this year in support of one of our colleagues and men's health issues in general. Now I'm normally a clean shaven sort of chap so this is something of a novelty for me, especially as my plans for a pair of Bradley Wiggin's tribute sideburns were vetoed over the summer.  So here we are, eight days of continuous growth (I had to start properly on the 3rd due to a family photoshoot booked some time ago):


Not to be left out, the little chaps in the railway cupboard have got involved.  Following a suggestion by a Mo-Bro at work that "before you paint that train, put a moustache on it", the chief engineer, himself a moustache grower, put together a headboard for the A1 Models O-16.5 loco....


Thanks,

Colin

Sunday 14 October 2012

Distractions?

Whilst there have been a few O9 based projects on the O9 Modeller workbench recently, they haven't really been anything two blog about.  There have however been a few other projects in other scales and gauges.  This 4mm scale Parksde Dundas 'Vanwide' has been completed over the last few weeks, whilst it was built several years ago, it has remained unpainted ever since.  It missed out on being completed with several others early in 2010 due to missing axleboxes, however that issue is now resolved and the paint job completed.  The painting is largely washes of Games Workshop 'Citadel' paints over a red oxide base. Hopefully it will match up with it's sisters when it arrives at it's new home.


In fact, the 4mm scale project jumped the queue for the paintshop.  Back in August I had completed an A1 Models etched brass kit for an O-16.5 loco, one of their basic kits designed to fit around a Bachmann 'Underground Ernie' mechanism.  I'm not too experienced with brass so this was something of a test piece.  The body went together well, but I then decided to build a complete chassis unit in brass that could accommodate either the intended chassis or a Tenshodo 'Spud'.  This was really pushing at my brass working skills and I almost gave in, but in the end I persevered and the end result is satisfying.  Adding some bits and pieces from Black Dog Mining  and a scratchbuilt cab interior has completed the look of the loco.


The reason it hasn't got any further is simply one of colour - I can't decide what the final livery should be, but don't worry, experiments are in progress.... Having built this kit (and it's home brewed add-ons), I feel confident to tackle some O9 brass from Minimum Gauge Models, and you won't have to wait too long to see the first results.


As to what I plan to do with an O-16.5 loco... I haven't quite figured that bit out yet!

Colin

Sunday 7 October 2012

The ones that got away... No.6 'Big' Coaches

A long time ago, well, January 2005, my O9 modelling was in something of a state of turmoil.  Having found that my earlier models were perhaps too small to represent modern 15" gauge stock (and the more important issue of getting decent figures small enough to sit in them) I was searching for a way of creating larger models that were still 'miniature' in style but definitely more 'Minimum gauge' in size.  Everything before this point had been pretty much kit-bashed from Keil Kraft, Dapol and Tower Models kits, but this would be something new, all-scratchbuilt for the first time.


Compared to what went before, this was big!  It scaled out somewhere just over 20ft long, I did fret about this for some time, asking for some real dimensions via the 'UKminiaturerailways' Yahoo group got an informative answer from Michael Crofts, owner and operator of the Perrygrove Railway:

"Your coach length is fine.  Perrygrove coaches are based on standard steel stock so they are 6m long, near enough 20'. "

As can be seen in the picture, I was also building a diesel loco of matching proportions.  This eventually was completed and sold.  What happened next was that with growing confidence I started to build a replica of the Ravenglass & Eskdale tram loco 'Flower of the Forest' and the rest, as they say, is history.  When the final design for 'Shifting Sands' started to come together it became apparent that this coach was too big for the curved concept and it was  sadly scrapped.

Moving forward to May 2008, another 16 seat coach emerged from my workbench, but this time with a purpose.  Miniature railway enthusiast and engineer Craig Gluyas was drawing up several design proposals for real 15" gauge stock and sent me the CAD for a 16 seat coach design, featuring end 2-seat compartments.  In a rash of enthusiasm I built a version in O9, the excuse being that it could be shown to potential customers.


Again, this was not completed as planned and suffered from some warping in storage, so it had to go, although an attempt was made to rebuild it into something for 'Shifting Sands' first.  The bogies, which at some point after the photograph gained some axlebox covers, did survive and in much modified form have been used recently as cosmetic sideframes on MicroTrains bogies as a new set to go under the 'Shifting Sands' mess van.  It was during this process that I remembered these two coaches, prompting this ramble....

Colin

Tuesday 25 September 2012

The day we went to Derby

Back in January 2009 we took 'Shifting Sands' to the 7mm NGA members day in Derby.  This friendly 1-day event gave me the opportunity to take some photos of the layout at a show, not something that I usually manage to do.  Looking through various pictures of the layout to illustrate a forthcoming article for an Association publication, I almost used a couple of shots from the day. Sadly they didn't make the final cut as they didn't fit the theme of the piece they were to accompany.  A shame really, especially as I had spent a little time in Photoshop on one of them....

Overall view of the layout at the Derby 7mm NGA event.
'Jay' ready to depart from the station.
'Pandora', 'Thunderbolt' and two 4w coaches outside the sheds.
'Thunderbolt' and Photoshop.
Colin

Saturday 25 August 2012

Bits and Pieces

A mixture of recent workbench happenings...


The various bits to fill the Sherwood Forest-style open wagon have now been added to the wagon.  The tool box is a Black Dog/Sidelines resin casting (depending on which scale you use it in!), as are the re-railing ramps. The spanner carelessly left on top of the box, and the hammer are Duncan Models castings.  The jerry can is a Cararama moulding from the garage set used as an interior to a building on the never-completed Misterton Fen Tramway.  The wagon load is now, well, loaded, I've used 'tacky wax' to fix things in place:


Turning to the out-of-use bogies, I spent some time treating and painting the Parkside wheels to make them look less model-like.  Rather than paint them all over I opted to blacken the axles using gun blue, then spent some time flicking rust colour paints at them using a toothbrush (as per a recent article in 'British Railway Modelling').  Whilst this didn't perhaps give the build up of colour I had hoped for, the effect is actually there, just very subtle.  A spray over with the Citadel 'Purity Spray' killed any shine and I actually think they do look like used, but not abandoned too long, bogies:


Just to prove that you do see this sort of thing lying around, I took this picture of a Severn-Lamb bogie frame in the engineering yard at Lightwater Valley last week (with permission):


Finally, a quick update on 'Kestrel' as the painting process draws to a close and the glazier is on stand-by....


I've added a little dry-brushing in places to overcome the slightly less than satisfactory after-effects of the varnish spray.  I think I'll get away with it....


Sunday 12 August 2012

Bogies!


A few weeks ago I was passed a quantity of Avalon Line coach bogies from a member of the NGRM Online forum and wondering what to do with them, I decided to have a play and see if I could produce 'spare' bogies that could sit in/outside a workshop or in a miniature railway yard.  Ironically these bogies are actually to my design, although I had only intended them as a demonstration piece they were deemed good enough to cast.  They aren't perfect by any means, but they do the job...

I created two bogies with wheels and two without, where I cut out each axlebox out with a razor saw and files, which was, er, fun....  Despite the apparent expense, I've used Parkside wheels as the metal axles look a lot more like the real thing than ones with 'PECO N' written on them.  No actual cost as they were in the spares box.  Two of the bogies were given a representation of a brake cylinder.  Each bogie has a locating pin on top made from Knightwing or Dapol oddments.


Work on 'Kestrel' was hit by a slight painting setback yesterday, when my comments I made elsewhere about using Citadel aerosol varnish came back to haunt me (basically I sprayed in too humid an atmosphere and got little white marks on parts of the paintwork).  Whilst that is well on the way to being resolved, coupled with a down-heartening soldering session yesterday became a bit of a grim day.

So this morning I decided on a 'quick win' to boost morale.  The bogie frames and some parts destined as a load for the SFR Hudson framed wagon were primed a few days ago so I decided to have a quick session with the acrylics and add some colour to them:


The eagle eyed may notice that I have moved the brake cylinders, this was based on a little personal observation at the Sherwood Forest Railway.  These have been given a coat of Citadel varnish with no ill effect, it was much warmer in the workshop which seems to have done the trick.... They need some light weathering before use but are well on the way.  Of course what I haven't remembered to do is prepare and paint the wheelsets!

Colin


Saturday 28 July 2012

Gilding the Kestrel

A quick progress report on the new 4w diesel as I have finally got around to adding the various metal detailing parts to the model.  These are a mixture of commercial parts and fabricated items.


The grilles are A1 Models etchings, the radiator grille is cut from a BR class 37 frost grille, whilst the side grilles from one of their assorted packs, I've no idea what they were originally intended for! The headlights are A1 Models turnings, sealed beam headlights intended for BR diesels in 4mm scale.  The exhaust is fabricated from two sections of brass tube whilst the cab door handles are bent up from wire.


The air horns are further A1 parts, these are turned with a recess to take a split pin to attach them to the model with.  I solder everything up to produce parts that can be painted away from the model. Most of the brass parts have been treated with Birchwood Casey 'Gun Blue' to aid paint adhesion and avoid any future paint chips going through to bare brass.

There are few tidying up jobs to do before painting but we are almost there...

Saturday 21 July 2012

The Kestrel Has Landed

I'm not always sure where the inspiration for new models comes from.  If I'm building a model of something that closely resembles a prototype, of course the inspiration comes from photographs, drawings and my own observation.  However, for freelance builds the inspiration is more likely to come from a kit left-over, or in this case, several kit left-overs!

I had been toying with the idea of another 4w diesel loco for some time, and searching through the bits boxes revealed half an Airfix Drewery bonnet top and some Black Dog Mining axleboxes that looked promising.  However, they were eclipsed by some Dapol (Airfix) Railbus underframe parts and Knightwing shunter bonnet top sections.  Add in Dapol Drewery cab sides with added styrene sliding doors, lots of styrene sheet and section and a good headwind (OK, a Sunday afternoon), the result was this:


It is what I like to call a 'Super-Jay', as it is the size of the Kirklees Light Railway's 'Jay', but with a larger cab.  A set of A1 Models nameplates are to hand for 'Kestrel' so a bird name seems appropriate.

A little further work added a cab roof, coupler pockets and some extra features under the chassisframe tro hide the ends of the Kato chassis (the loco is a good centimetre longer than the chassis):


I've also added some extra details to the bonnet, still to come are etched grilles (also A1 Models) and a host of other metal features - lights, exhaust, door handles etc.


Rumour has it that the Somerthorpe Miniature Railway workshop crew are considering an orange paint scheme inspired by the Bure Valley Railway's no. 4:


We shall see what the management think!

Colin

Thursday 19 July 2012

Hudson Hacking - Part 2

The workbench has been a relatively quiet place of late, however, a few projects are starting to come to fruition and some progress made.  The Hudson wagon chassis destined to become a model based on the Sherwood Forest Railway's open wagon has been completed, since it last appeared as a chassis only, it has progressed through this:


to this:


and completed with weathering:


On it's right is a wagon assembled from various Black Dog Mining parts, a 5ft chassis formerly under one of my scratchbuilt bodies, the cut-down chequerplate top previously on the Hudson frame and a coupler unit from the spares box.  The coupler has been modified to fit in the slot for my usual MicroTrains coupler, this wagon is perhaps intended for static display, however a swift coupler change can be facilitated if required!

The eagle eyes may notice something in the background... more on that another time.

Colin

Tuesday 15 May 2012

Building an Avalon Line Enclosed Coach Kit - 3 (Acrylic Afternoons)

It's been a while since I reported on my Avalon Line coach build, to be perfectly honest it was primed using a Halfords grey primer then sat for some time awaiting a flash of inspiration.  That came from the Sherwood Forest Railway's new enclosed stock painted in dark blue.  Although I considered using a Halfords aerosol to paint the main body colour, I decided to try something I wouldn't usually do - paint a complete coach body using brushed-on acrylics.

I chose the colour 'Regal Blue' from the Games Workshop Citadel range of paints.  Four coats of this applied with a flat brush built up sufficient colour depth, with little sign of brush marks.  The solebar and roof were painted using Vallejo black (suitable toned down) and Humbrol grey respectively.


Following a coat or two of Johnsons 'Kleer' over the areas in question, lining came from Fox transfers (Royal Mail TPO lining!) and the crests an old set by SMS, I think they are Caledonian Railway examples.  Inside the interior walls are the original grey primer and the seats and floor suitable shades from the Citadel 'Foundation' range.

Following a spray with Citadel 'Purity Seal' varnish, windows were individually cut from 20thou clear styrene to fit within each window opening to give a flush glazed effect.  Each pane was touched in around the cut edges using a permanent marker pen to reduce refraction within the glazing material.


The finishing touch for the body were door handles from the 7mm Narrow Gauge Association, secured in place from behind using Araldite.  Bogies were refitted and the official photographer summoned to record the completion of the build.  I am happy that the full-acrylic paint job stands up against sprayed models with little evidence of brush marks in the underlying paint finish.


Of course, there is something missing, passengers!  For some time I had in mind using this coach for an experiment in colour and shade. I had read a theory that passengers in coaches could be painted a dark colour and simply be 'shapes' behind the windows.  Just look at the next full size bus or train to pass you at a distance and give this theory some thought....

The figures involved are a set I purchased from Aidan Campbell at a show some years ago, they were an experiment by him in resin casting, from the conversation we had I'm not sure if it is one he repeated.  All were legless below the knee.  I had previously started to paint these but I had fallen out with them as some of them looked rather odd.  Using some cheap Chinese Prieser copies I gave two of the figures new heads, and then got carried away and added the lower parts of their legs, using further oddments, and some genuine Prieser parts to complete this process.  Milliput covered the joins and hid a few bodges.


The figures were sprayed with grey primer, then given a coat of flesh colour on their faces, arms hands etc.  Once this was dry, a wash of black was applied over the entire figure, seeping into the creases and shadows.  This darkened the grey areas and avoided a solid mass of colour.


The real test is what they looked like through the coach windows...


I'll leave readers to judge for themselves on the effectiveness of this treatment.  I have the coach in my display cabinet for daily inspection, I do wonder if the upper body clothing could do with a dry brush of light colours, but we shall see, at the moment I feel that it works, certainly for fully enclosed stock.

Sunday 13 May 2012

'Rails to the Sands' - the Sequel


Today saw my first trip to the Cleethorpes Coast Light Railway for several months, in fact the last time I was there I was the first person to remove and exhibit from the old 'Rails to the Sands' exhibition in the craft units when 'Shifting Sands' returned home. I was intrigued to see what the re-use of much of the display material in Griffin Hall at Lakeside station would look like.  I had many personal connections to the original exhibition having painted sections of the structures and other smaller tasks....

'Mighty Atom', Bassett-Lowke no. 11 of 1908 is a display centrepiece.  This loco ran at Southport and Great Yarmouth so has genuine seaside links, alongside it's place in the Sutton Coldfield collection.
The ticket office transported from over the road, I'm told a TV is due to go in the opening very soon. The lifering that was cosmetically back-dated using 'mod-roc' on our old kitchen table looks a little tired, I do have the paint somewhere if anyone wants to touch in the chips....
'Blacolvesley' (L), Bassett-Lowke, 1909, veteran of Saltburn and Seaburn as well as Blakesley Hall, and currently out of traffic 'Sutton Belle' (R). 
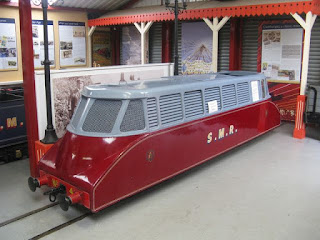
SMR no.4, the canopy over the doorway has recycled from the old display in the craft units with some adjustment. 
The Triang-Minic locomotive.  When the original display was set up my modelling skills were put to use cleaning up and spray painting the reproduction arrows it carries.
Whilst there is no doubt more to do to enhance the exhibition, the inclusion of the 'Rails to the Sands' material has enhanced the offer in Griffin Hall no end.  In fact, the only thing missing appear to be my sandcastles...

Of course the longest-term resident in Griffin Hall is the SMR 'Loco Coal' wagon, inspiration for one of my recent models.  I now have a good, clear picture of it (I should have moved the bin...):


My model is definately an 'inspired by' one, having now seen several details in close-up a lot has become clearer, for example the how the end door hinges actually form the door retaining system:


Outside 'Mountaineer' and the GCR 'ROD' O4 were in operation, however I was keen to see the latest arrival at the CCLR, the rather interesting remains of the Les Anderson (of Minirail fame) RapidoRail articulated railcar set, a long-term restoration job no doubt!

RapidoRail railcar ex-Flamingoland, Dudley Zoo, Rhyl and long-term storage.