Tuesday 30 April 2019

The Beck Bridge - Covering Ground

I managed to sneak out to the workshop one evening during last week and get the basic ground cover in place over the whole diorama, as with the ballast this has a major effect on the visual aspect.


This ground cover uses my technique of a mix of emulsion paint/PVA/filler in a fetching shade of brown, painted on and whilst still wet a mix of very fine sand (as used on 'Shifting Sands') and Woodlands Scenics 'fine turf' scattered over from a fine sieve. This is tamped down in place, some sticks, some doesn't, which I feel adds greatly to the realism of the finish. You might spot that there are a few obvious joins with the material put down whilst treating the waterside areas, but they will be lost under the next layer of treatment.

In the front right corner I added some ballast into the ground cover, this area will be developed as a footpath which has seen occasional vehicle use.


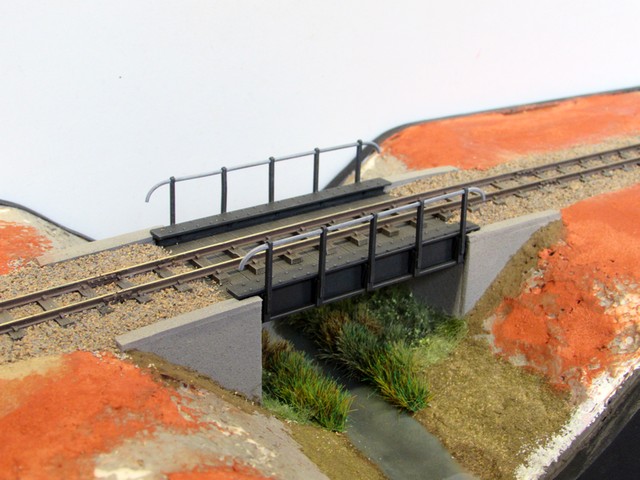
A couple of hours over the weekend saw the edges of the Beck spring into life, I do sometimes feel that my lawn grows this fast...


As with the stretch under the bridge, Peco 10mm tuft strips in two colours have been mixed together, with the odd interception from the brown tufts. There are basically two strips of the tufts on either side but with a bit of variation so they don't look too straight and orderly! With the glue still drying on the tufts I added areas of hanging basket liner grass behind them and then left those areas to dry before pulling back the backing and gave them a trim. Some Woodland Scenics foliage was added directly behind the tall grass and then some MiniNature leaves on top of this. Some areas also benefited from some hairspray and scatter treatment, notably alongside the abutments. Most of the hanging basket liner grass here needs a little more attention, but that can wait until areas alongside are treated.

Having focused attention in the beck itself, you will be forgiven if you haven't noticed that I have added some of the Javis Autumn rough terrain matt alongside the edges of the ballast as on the recent smaller diorama.

Colin

Saturday 27 April 2019

The Beck Bridge - Difference in a Day

Easter Sunday morning saw a major step forward in the Beck Bridge project. I'd like to say it was a carefully planned and choreographed event, but in the end I'm just glad that I manged to get everything in place in the right order! The aim was to get the track in place, but obviously that needs the bridge to be glued in place, which in turn needed the scenery underneath to be infilled, which needed the water to be satisfactory. You get the idea...


The evening before I had glued some sections of hanging basket liner grass in place along the abutments under the bridge and pulled this back to give some basic ground coverage. First job on Easter morning was to give this a trim, after that I could start to use the Peco Scene 10mm tufts and strips I had purchased for the purpose of creating long grass by the water. Using short lengths of two strips ('water meadow' and 'marshland') mixed with 'patch' tufts, I was able to get a good mix of colours along the waters edge. I also added in some Silfor tufts within the hanging basket liner area to get more colour variation.

The photo also highlights the modifications made to the Peco track prior to laying, adding in KB scale dummy rail joiners around fake joints in the rail, and painting and weathering. I sprayed everything with Halfords matt brown aerosol, then cleaned the rail heads, then sprayed towards the tops of the sleepers with Humbrol 29 spray (called dark brown but not that dark). Rail heads were cleaned again before the paint dried. Once glued in place with PVA I weathered the sleepers to represent worn timber and added a wash of Humbrol 160 red/brown over the rail sides.


Easter weekend being something of a warm one it was then too hot in the workshop to do any more, but the next morning I was able to add ballast to the track, a blend of Woodland Scenics fine buff and grey material. This was laid on dry, wetted with water and then fixed with Johnson's 'Kleer'. It is amazing how doing this suddenly brought the two halves of the scene together as one, I suppose it has hidden the last obvious join?


The bridge deck is un-ballasted, based on the treatment of the bridges on the now closed Markeaton Park railway in Derby. Getting the ballast to taper down took some care but I made sure there were a few stray lumps to make it look realistic!

Colin

Monday 22 April 2019

The Beck Bridge - Terraform

After assembling the new diorama structure I filled a few gaps with filler and gave everything a coat of oil-based gloss varnish as a sealer. Once this was dry the side pieces were flatted back and then given two coats of matt black paint (this time water based). A third coat will be added right at the end of the build to make sure everything looks fresh.


Once the paint was dry the cat food box section was permanently glued in place and some flexible filler added around some of the edges where there was a bigger than expected gap. At the 'flat' end I then made every effort for it to be far from flat, infilling with a layer of 5,5mm foam core board, then balsa wood for the trackbed and more cat food box cardboard as the basis of the landscaping, carefully overlapping into the polystyrene of the original area..


Once the glue was dry on the cardboard I added DAS modelling clay to blend together the pieces and smooth the changes in levels. This included reworking over the polystyrene at the left hand end to ensure that there was an edge to ballast up against at a later stage.


Track at this point is being tried for size, it is Peco 009 'crazy' track but with almost all the sleepers separated, ends straightened and re-spaced. Further detailing will be applied at the next stage before final fitting.

Colin

Friday 19 April 2019

The Beck Bridge - Supersize Me

With the cat food box sliced horizontally in Tectonic Shift, measurements were taken to allow the construction of a sturdy base for a larger diorama. As outlined in The Saga Continues, this takes the form of a plywood and timber structure very similar to that on 'The Headshunt'.


And underneath:


The length of the diorama is 14 inches, the same as 'The Headshunt', as that has proved to be a workable size for photography and storage. All materials are recycled, the plywood used as the edging coming from an old wardrobe, I've hidden the veneer on the inside as it is the only downside to using the material as it splinters when cut. the other side, used outwards, cleans up very nicely for painting. With the existing diorama and bridge in place an impression of how it will develop can be gained.


The remains of the cat food box are a very tight fit, having foreseen this two pencil-sized holes have been provided to allow it to be pushed out!


In due course the cat food box will be glued in place, but not before the outer frame has been painted.

Colin


Sunday 14 April 2019

The Beck Bridge - Tectonic Shift

A month or so ago I officially put the 'Beck Bridge' project on hold as I was not satisfied with the way the second version was developing. I was also struggling with getting a satisfactory water effect in the beck itself using a combination of PVA and Kleer floor polish. 

In reality despite being "on hold" the project has actually progressed through experimentation. After some thought I decided to return to the original cat food box version, which at the time looked like this:  


I gradually re-worked various areas, such as refining the alignment of the abutments and cladding them in 'concrete' - as with the mk2 version this is fab foam, sprayed with a Plasticote "Suede" aerosol and then misted with grey primer to get a satisfactory concrete effect. With ground cover in place under the bridge I then tackled the water. This time I covered the carefully painted base with a single layer of PVA, followed by a change in tactic, going to the time honoured method of multiple coats of oil-based gloss varnish. These were patiently applied one a day over the course of a week where not a lot of other modelling time was available. It looks a lot glossier in reality than the photo below shows.


Of course this doesn't resolve any of the original issues with the cat food box in terms of size and usability, so some further thinking was required. The obvious idea was to extend the scene and it soon became apparent that the best way to achieve this was to build a new, bigger, base and incorporate the existing scene into it. The depth of the box would need to be reduced and I was able to take advantage of the bottom fill being layers of corrugated card taped (rather than glued) together. Having measured carefully I cut through the outer box and separated it between two of the layers. To my amazement it didn't fall apart!


You've had a sneak preview of the new base unit in my last post, but we'll look at it in more detail next time.

Colin


Saturday 13 April 2019

The (Upcycle) Saga Continues...

Long ago in a galaxy far away...


The rescued timber has been cut into triangles to add strength to the corners of this new structure. I've even managed to incorporate some of the plywood that formed the board surface of the original 'Upcycle' so its pedigree is impeccable!


More soon...

Colin

Tuesday 9 April 2019

Finishing Touches for a Micro-Diorama

Having successfully added various grass textures to the micro diorama I decided to add more plant life in the form of a couple of Gaugemaster/Noch laser cut flowers - the purple one to the right and red one back left. The red one fell apart so ended up glued to the post upright as support! The yellow flower in the foreground is a Mininature product. I also added a couple of Silfor tufts into the grass to add more variety to both colour and texture, you should be able to locate them...


As predicted the thin basswood came out and was cut into 8mm strips to add around the edge. Not visible in the pictures I have added the scale and year to the end pieces using dry print lettering as I have on previous micro dioramas. These strips were set in place one-by-one using PVA held with elastic bands until set as the thin material tends to curl under the dampness of the PVA. Once set the next strip is added and so on. The corners were sanded smooth and rounded off and a coat of matt varnish added to protect the lettering and seal the timber.


The scene is now in place in the display cabinet and it's first visitor is 'Flower of the Forest', it is the ideal size for smaller O9 locomotives.

What's next? You'll have to wait and see, but you might have seen some of it before...

Colin