As I have mentioned when describing recent changes to my diorama The Headshunt I have been trying to create a new photographic diorama that can be used within a small (12" x 12") lightbox. There have been a couple of false starts to say the least, however the work carried out on the older diorama has created a renewed interest in getting the job done...
I had conducted a little experiment with one of my 70mm deep scenes, just to see how it would work on camera, and in all honesty with a bit more depth it could work. However what this shot does highlight is how any such scene needs to have a fairly solid back piece (wall/fence/hedge) to really work, and the problem of how to treat the area where the track goes off the edge of the scene.
So the thought came to me that if there could be a building over the track at one end, and maybe a gate at the other, with wall or similar in between, an enclosed photo 'set' could be created. The idea in my mind was that it was some sort of workshop overhauling miniature railway stock, recalling photos of Fairbourne Railway locomotives outside Trevor Guest's workshop at Wollaston.
Having located some of these in John Milner's 'Rails Through the Sands' I briefly fell into a rabbit hole of research, as I tried to find out a little more as there were two distinct buildings pictured. Luckily an article by John Tennant in 'The Narrow Gauge' no. 238 (Summer 2016) identified that there were two buildings in use, the 'bottom shed' and newer 'top shed'. They can both be seen in RAF aerial imagery from 1961 hosted by
Historic England - Guest's yard is in the triangle of roads towards the top-left of the image. I adapted what I now know as the 'top shed' as the basis of this sketch.
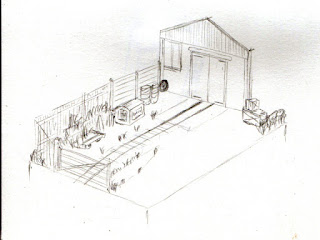
The sketch reveals a host of background junk, and how by leaving the front third of each side clear, maximum camera angles are available in a small space of 8" x 6". In order to try out the idea I built a quick mock-up in the medium of cereal box and double-sided tape and placed it in the light box to try a few photo angles.

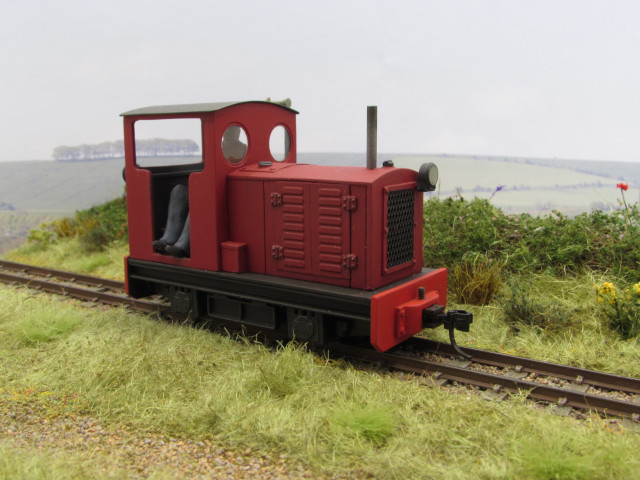
Generally speaking the concept worked, and a few trial shots resulted from different angles with a couple of locos used for the test shots. The grey and white makes balancing the images rather fun but that would not be an issue with a fully-developed scene. There is also the possibility of adding a temporary backscene piece behind the wall rather than relying on the lightbox.

There was a slight concern though, one that is not so apparent in the picture above... Although the lightbox kicks out an impressive amount of light, the further forward an item is the more the foreground starts to get into shadow. So when I used a slightly larger loco in the box, the front end isn't quite as well lit as the rear. I had encountered a similar issue on a couple of occasions that I had used 'The Headshunt' in the box end-on (not the greatest of ideas!).
So I had an idea, what if it cut the back two corners of a scene at 45 degrees? Prototype number two was therefore assembled from leftover cereal packet card.
This way the scene can be pushed further backwards into the light box and the front of a longer loco should be better lit. A Slaters gate makes a special guest (no pun intended) appearance here, as I only have the one of these it would have to be removeable to go at the end where it needed to be in the background.
The result is that there does appear to be an improvement in the lighting of long-loco shots. In this view the section of wall in the centre is up against the back of the light box.
The downside to this idea is that it does away with the workshop building, but it then occurred to me that there is actually a possibility of doing the 45 degree cut at just one end and having the best of both ideas...
Colin