Friday 29 September 2023

An Adventure in Space and Time

When Peco released their 7mm scale kit for a Police Box I resisted temptation for some time, after all the real thing would not fit into an of my planned layouts or dioramas. I finally gave in when I was asked what I wanted for my birthday this year, after all, 2023 is the 60th anniversary of a certain TV Sci-Fi series...

So a Doctor Who mini-diorama is on the cards, and the first thing to do is some research, on pondering where to start I was advised by one of my daughters to start with my mug...

So with a fresh cuppa to hand I descended into the rabbit hole of TARDIS designs over 60 years to discover which version would be feasible from the kit, finding plenty of information at https://thedoctorwhosite.co.uk/tardis/exterior/ to inform my choice. In true "wibbly-wobbly timey-whimey" fashion this project is being presented on the blog in a logical order rather than that in which it actually happened. I therefore actually pretty much knew which version I had to choose before I chose it! 

A few changes would be required, but that is to be as expected as Peco are very clear their kit is for Police Box rather than an alien vessel... In the next post I will explain the changes and enhancements that I chose to make and a customised build sequence to aid painting.

Colin


Saturday 23 September 2023

Lightbox Diorama Photography

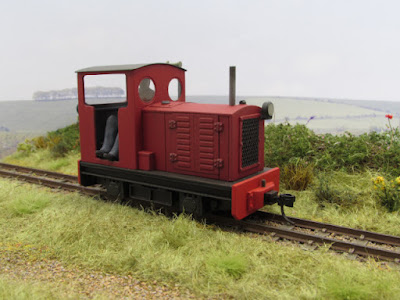
With the lightbox photographic diorama now complete I have taken a few photographs to test its use. As with the previous trials these have used a small extract of the free backscene given away last year with the Railway Modeller. Unlike the last time I have cut a fair amount away from the bottom to give a better horizon line. The hazing effect is purely from the lighting and the matt finish of the paper.

Having reviewed this and other photos I opted to take a further centimetre from the bottom of the backscene to lower it further, and this little adjustment actually made a visual difference to the next images. This is actually the first view I have taken of the railcar and the recently completed trailer.

3/4 images are possible in both directions, the backscene nicely fills the gap to the side where the back of the diorama runs out, the effect just being that the land behind drops away, perhaps for a footpath crossing. The pathway nicely breaks up the foreground of the view.

Side-on views are perhaps the easiest to disguise the size of the diorama, I'm considering alterative pieces of backscene to vary the view from time to time, I might even get away with a seascape...

One of the aims of this simple scheme was to be scale indifferent, and to allow either O9 or 009 stock to be photographed. With hindsight for this view the backscene should have been replaced with plain sky as the Lincolnshire Coast Light Railway had a much flatter horizon!

Work is underway on the next diorama, which is going to be something a little different.

Colin


Thursday 14 September 2023

In Amongst the Undergrowth

Progress on the mini photo diorama has reached the point where I can say that it is complete - for now... when we saw it last I had just added the foliage material to the bramble/undergrowth patches and promised more scenic features to come. They did, as we shall see, but not until after I had taken a couple of test photos which led to me reconsidering two of my areas of undergrowth. I realised that the two patches in the front sections were never really going to be seen in photos and actually had the potential to be in the way causing out-of-focus blur in the foreground of images. Plain grass has now filled these areas.


Once the various smaller scenic effects were added to the undergrowth. It becomes tricky to see them in helicopter shots, so this next picture should give a better idea of the effect. I have used a combination of Peco grass tufts, Martin Welberg weed tufts, MiniNature flowers and some small leftovers of sea moss branches combined to fill in around the brambles/undergrowth areas.


Despite probably never being seen on camera, I added some extra texture around the areas where the newly added grass joined the old, an exercise in newspaper masks, hairspray and scatter material. This blends the joins (not that they are really visible) and just makes the plain grass areas have a little more interest to them. The reverse-shot shows the treatment along the edge of the grass.


You may have spotted that I have not gone to any effort to create a nice looking surround to this scene, just spraying the edge of the cat food box in grey primer when the track was painted. I really ought to at least gibe this a coat of something suitable, but I will probably refrain from any timber trim etc as this is really only a photographic tool rather than a display piece.

The next job will be to actually take some photographs...

Colin


Saturday 9 September 2023

Not on the High Street

I have made some scenic progress on the cat food box photographic diorama since those last experimental photos. This started with a ground cover mix made from tester pot paints, PVA and grey tile grout. The tester pots and PVA were both Wilko own-label products and sadly the opportunity to replace like-for-like is now likely to be limited. I had not been in a branch for ages but actually went in the day before they passed into administration and a couple of 1/2 price tester pots did end up in my basket... Whilst the ground cover mix was wet Woodland Scenics fine turf was sprinkled over and left to dry.

Hanging basket liner grass was then added as the start of the green scenery. There are more details on my technique in the Hanging Basket Liner Grass Step-by-Step.
 

With the grass trimmed I added some dead grass around the ballast edges using a Jarvis grass matt. Next came the basis of my brambles and undergrowth, made from the coir mat hanging basket liner, ripped apart, scrunched up, fixed with hairspray and then painted with brown aerosols (Halfords and Humbrol). They look a little ridiculous here, rather like over-scale birds nests, but as the one bottom-right shows, they will be vastly improved with trimming and adding foliage material (in this case recycled from a previous project).


After gluing the nests in place with PVA and leaving overnight to dry, I then added teased-out foliage mat material, Woodland Scenics and Hornby Skale Scenics, secured in place with hairspray and left to dry. Attention could then turn to adding further natural detail - more on that in due course.


Both hanging basket liners are Wilkos products, one discontinued for some time. It is great to model with high-street purchases, and worrying when a potential line of supply might go forever. Round here, with the warehouse up the road, everyone knows someone who has worked for Wilkinson's at some point, so my thoughts are with the staff at this difficult time...

Colin


Friday 1 September 2023

On the Horizon

I've been carrying out a few further experiments with the under-development photo diorama. When we last saw it I had used the free Railway Modeller backscene and commented that it needed less foreground. With hindsight it needed less 'busy-ness' and a lower horizon too. I quickly printed off a view I had taken at Humberston last year and tried that as a background instead. 


It didn't really work, a cornfield is not really going to blend onto any of the foreground I provide and the gap where the track falls off the end is far too obvious. Something bushier is no doubt required...

I did try it with no foreground and just sky, which does rather make it look as if the railcar has reached the edge of a precipice! A fence or gate would help but may be a little restrictive in practice.


Despite the experimentation the scene is slowly progressing, ballast is now laid and I've dry-brushed the sleepers with a light wood/grey colour to make them look like weathered wood.

Colin