Part of shiftingsands.fotopic.revisited
Based on material posted to www.shiftingsands.fotopic.net and updated through to 11th January 2008
Regular readers of this site will be familiar with my first O-9 loco, a combination of Dapol railbus and Drewery shunter kit parts on a Bachmann US chassis. This was always a little on the small side compared to my later locos and had recently been sidelined as it needed a very different touch on the controller than the other power units.
In the summer of 2007 I rebuilt the loco on an Atlas chassis and incorporated an underframe below the existing body, adding about 3.5mm to the height of the loco. The new underframe is seen here at an early stage:

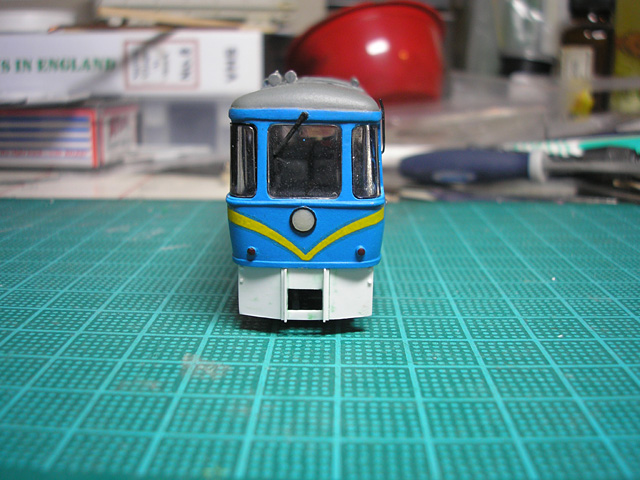
A head on view, the new buffer beams
are attached to the loco frame, rather than the bogies as before:
A side on view of the rebuilt loco,
which was actually further modified before painting:


I'm often asked how I built the
model, and as I didn't take step by step photos at that time, I have
taken the opportunity to do so whilst building a second loco to the
same design, but incorporating the revised underframe style. This
actually sits on the original Bachmann power unit! Rather than have a
class of two, this second model is destined to become a version of
the same loco in an earlier time-frame to the SMR example.
Sides, ends and roof reassembled from
Dapol components with a little bit of scratchbuilding:


With one end attached to each side, a
dry run of assembly was made:


The bodyshell assembled and filled:


The next stage was to add the
underframe shape and sort out chassis fixing:

A quick comparison with the original to
check all is well:


Door, roof and front end detail is
added:


The bufferbeams have an overlay of 10
thou plasticard bent to shape. The lights on the cab ends are Peco
track pins and a turned 4mm scale wagon buffer head:


The other end of the loco. Roof detail
is largely from the scrap box:


The shell is seen in primer, at the gap
finding and filling stage:

The underframe and roof were masked off
and the dark green sprayed from an acrylic car aerosol:

Buffer beams and roof were hand painted
using enamel paints:


'Whisker' transfers are from the
original kit, lettering from an old SMS sheet:


Completed, varnished and glazed, with
couplers and all details added:

A comparison with the original at
Shifting Sands shed:


The various detail differences can be
explained by the models being at least 20 years apart in their
timeframes!


The story behind what is now the
SMR's 'Intrepid' is that it was built for the Crimdon Dene Miniature
Railway in the North East, where it will feature in 1970s form on
Andrew Blackwell's project. In the 1980s the loco moved to the
Somerthorpe Miniature Railway as represented by Shifting Sands, and
where it will be seen in 1990s form...
An 'archive' view of the loco on
arrival at Shifting Sands from the CDMR:


Postscript:
At Christmas 2010, after a long period of model-making inactivity due to work on the house both taking up my time and the workbench being physically used as storage space, I managed to find some modelling time over a few days to undertake a 'seasonal project'. After much deliberation I decided that I would build myself another Dapol Railbus/Drewery locomotive in O9. This would allow me to place my original loco of this type on static display in it's 'as built' condition (i.e. without the solebar and with the couplers mounted to the bogies). I was also concerned that the paint finish has yellowed somewhat and I wanted to avoid having to repaint it, as it was my first O9 loco.So work progressed on 'Intrepid' Mk2 following the build above very closely. Chassis is a Bachmann F unit with the bogies modified using Evergreen 2mm channel section:

On this occasion I photographed the
glazing for the build, using some of the Dapol parts. I find it
easiest to separately fit all three front windows as the conversion
requires the middle window to sit differently to the kit as
designed, it has to be manipulated to flatten out the angle across
it. The top edge has to be removed from the mouldings to sit within
the lowered bodyshell:

Using a permanent pen I blacken the
edges of the corner windows to reduce the prismatic effect they have,
and carry out a similar exercise on the middle window, but only on
the edges of the back part, not the window itself. The effect,
combined with a coating of Kleer inside and out, is quite dramatic:

As a comparison, here she is completed with the
earlier incarnation (left):

O9 Modeller would like to thank Mick Thornton for his help in creating this page.
No comments:
Post a Comment