Digging through the archives I have discovered that my first experiments in using hanging basket liner (HBL) as grass were 15 years ago in 2004, almost to the month. I'll never say that I was the first person to discover this material for scenic use, but I do get the feeling that I might have been one of the first...
It started here, a simple test piece that was actually more an experiment in burying N gauge track for O9 use. I happened upon the 'moss look' HBL in Wilkinson's and immediately saw the potential, and at a reasonable price.

A word about products - the liners seen here were purchased a number of years ago. I cannot advise on where to get them currently, these things go in and out of fashion. I am aware that other stores sell products in darker greens and other shades, and the the current 'trend' is for Coconut matting, ugh... The real attraction in these particular products was that they were just the right colour as they came...
This sequence of photos taken during the construction of 'The Beck Bridge' show the method I have used for several years to create grassland using moss effect HBL as a basis.
1) Squares of grass are cut from the liner, here I am using two shades to get some variety. I am not going to attempt to cover the whole diorama in one go, there is a reason I take it a step at a time which I will explain later on...

2) The liner is double-sided and one side usually has a slightly thicker layer than the other, either side of a paper carrier. I usually use the thicker side first, and I encourage the fibres to stick up by lightly brushing with a wire brush.

3) Neat PVA is applied over the basic ground cover, taking care to get right into the edges of the area.

4) The squares of liner are pressed into the PVA - making sure they are carefully lined up on the edges to leave very few gaps. The pieces overlap the edge of the glued area - it doesn't have to be exact.

At this point, leave the PVA to dry. 2-3 hours is usually my minimum time but one very hot day I managed to move to the next stage after just 1 hour...
5) This is the tense moment where the backing and top layer are pulled away from the ground. I start at one corner of the square and pull carefully making sure I have hold of the backing. The advantage of the smaller squares is that it makes this stage much easier.

If disaster does occur at this stage, don't panic. This system is very flexible and you can always come back and add more material later on. The worse case scenario is that some of the underlying ground cover is pulled up, but it is easily fixed.
6) The wire brush is used to encourage the fibres to stand up and at the same time remove some of the excess material from the ground. At this stage the two different colours of liner start to merge together a little better.

7) Industrial scale lawn-mowing takes place using an old set of hair clippers, allowing great control over the length of the grass and the ability to achieve neat edges. After this a mini-vacuum is used to remove excess material from the board. Before obtaining the clippers I used nail scissors for this stage, and indeed still do for final trimming in some places.

8) As the material is double-sided the same pieces can then be re-used on the next area of grassland, seen here after brushing with the wire brush and then glued down as before.

It is sometimes possible to get a third use from each piece using the leftovers from the first side that were not used the first time around, especially if this was the thicker side. This can be uses to re-patch areas that have failed or where less grass is desired. The area in the foreground is being patched together using such pieces.
9) After creating the basic hanging basket liner layer it is possible to add other layers of material on top, using items such as foliage mats or the very simple but effective method of spraying hairspray onto the liner through improvised newspaper masks (to limit the spray area) and sprinkling fine ground foam over through a sieve to add texture, as seen here.

10) A mixture of techniques can be used to enhance the grass, here the underlying ground texture includes ballast to create a trackway, along with small areas of Javis scenic mat representing dead grass, hairsprayed scatter and also scatter pressed into patches of diluted PVA to represent moss.
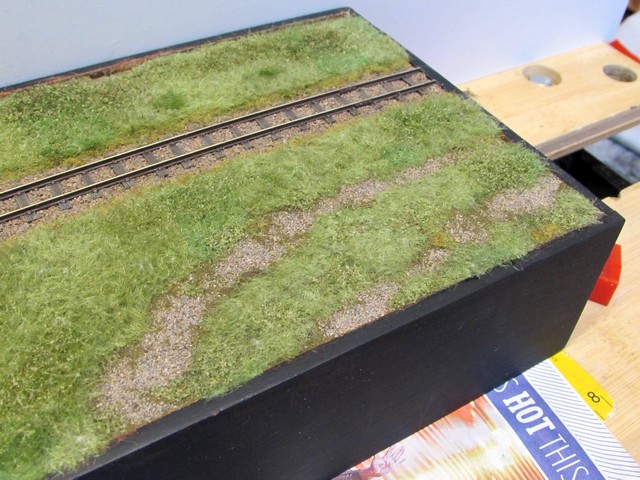
This is only the start of the scenery, there is so much more that can be added, including laser cut flowers from Gaugemaster/Noch, flowers from MiniNature, bushes from rubberised horsehair or sea moss, the list goes on!
Colin
No comments:
Post a Comment