Showing posts with label Dapol. Show all posts

Thursday, 10 November 2022

Tramcar Roof Refinements

Having added the nicely curved bulkhead top pieces to the body of the tram I realised that something similar but smaller was required under the roof, both to align with the end of the carriage sides and at the end of the overhang. More pieces of 40 thou styrene were marked out, using the template made from one of the old bulkheads for the top and an A1 Models etched cab front for the bottom. These pieces were then fixed in place, carefully measuring for the inner ones. I also added a strip of 30 x 60 thou styrene over the balcony openings to give some substance the imagined framework.


With the roof in place the effect looking upwards is that there is a frame under the roof holding it all up... However the ends of the roof needed some attention to give the impression that the roof is formed from a thinner material than the edge of the Dapol moulding.

With the roof ends filled with Milliput and smoothed back once set, a strip of 15 x 20 thou Evergreen styrene was carefully glued into place (along the 15 thou side) following the curve of the centre section of the roof. Left overnight to set, the following day this was softened with solvent and gently curved around the roof edge profile. Left to set again this was trimmed to size and more Milliput added to fill the join between roof and extension. Smoothing off followed once the filler was set and a little shaping of the bottom corners finished off the job. 


With the roof pieces in place the next job was to add the headlights to the front dash. These are Details West mouldings (LT 1015) designed for an HO scale EMD machine but work just as well in O9. Being clear plastic they don't photograph well... They have separate lenses that will be fitted after painting, one thing I had not realised is that there is no back to the headlight moulding hole so I have subsequently added Araldite as a filler so that the plank effect does not show through.

The holes for the door handles were drilled into the side using a 0.7mm bit and opened out a touch with a cutting broach, to suit 7mm NGA door handles, to be fixed after painting. With all parts in place we might be ready for a good scrub down and a trip the paint shop

Colin


Saturday, 8 October 2022

Clerestories and Controllers - O9 Tramcar Progress

We last saw the O9 tramcar build with the bulkhead panels in place on the floor and some seat supports in place on the platform ends. The seats are now in place either side, made from Slaters planked styrene backed with 20 thou sheet and add further strength to these areas. 

Either side of the end dash panels I added lengths of 60 x 60 thou quarter-round Evergreen section to give a pleasing rounded appearance to the corners. These overhung the headstock pieces a fraction so some packing was added to even these out. Once parts were set in place everything has been tidied up around the edges. Behind the headstocks pieces of 40 x 40 thou strip fill the step openings leaving a clear area for the side panels to be added.

Up on the roof I decided to add a clerestory, of sorts... Not a proper fully-built job as you might expect on a full size tram but more of the bump-in-the-roof you might get on miniature railway stock. This needed to have the same subtle curve as the rest of the roof and the best piece for the job was the bit I had removed to narrow the roof down! As previously explained this was cut 2mm too short so I have had to make up the rest with 40 x 60 strip and Milliput will be deployed in due course. I think even if the cut strip was wider I would have faced it either side to neaten the edges so just as much filling either way... Once set the ends of the clerestory strip were filed down to gently curve to the roof edge.

Jumping ahead a little, I was able to balance the sides and roof into place with a figure on the balcony to prove there is room. In fact a small selection of figures have already volunteered for duty, I daren't tell them of the horrors some may face to clear the motor. Please excuse the gap at the top under the roof, that will not be there in reality!


With body construction tasks now largely complete, work began on some suitable control gear for the platform ends. Rather than lots of pictures of tiny pieces on the cutting mat I have created a montage...

Top Left: The control boxes started life as 5mm square Plastruct section, but as this was a bit intrusive I cut one side off to make it 5 x 4 mm. Top and bottom I added some 3.3mm x 60 thou Evergreen strip offcuts inside the section and a top from 30 thou styrene. Once set this was neatened off.

Top Right: The handles for both control boxes and brakes were shaped from 0.7mm brass wire. I filed the top of the horizontal section flat on the pieces destined for the control boxes and for both components bent this section to a slightly curved shape. For the handbrakes short sections of brass tube were cut to make a collar at the top and a base. The parts seen here are actually the extra set that were created quite by accident as parts were rejected!


Bottom: The control boxes were drilled 0.7mm top and bottom and the wire threaded through. The excess at the bottom forms a locating pin and holding point during painting. The handbrakes were carefully soldered together with the addition of a split pin under the top collar to help secure the part to the dash panel.

Once the soldered parts were cleaned up I drilled two holes in each platform, one central and one towards the right hand side. In order to take the now cut-down split pin a hole was drilled in the dash panel but from the outside due to restricted clearances. This will be plugged and filled from the outside in due course.


The stage has now been reached where the next step is likely to be Milliput in a multitude of places...

Colin

Sunday, 2 October 2022

October Spawned a Tramcar

Having decided that the outline drawing in my last post was pretty close to what I wanted to achieve on the Kato bogie chassis, last week I slowly started to gather the materials required to start work. Immediately I was taken back a good few years to the early days of my O9 modelling, finding odd bits here and there that would become something other than their manufacturers intended. One sign of real progress is that some of these parts were actually intended for O9 rather than other scales.

From the spares box came the good side from a pair of Avalon line coach sides that Peter Ledley (of Clee Valley Railway fame) had passed on to me. This was cut either side of the centre door, the solebars removed and the cut ends made good with styrene strip. A pair of Chivers O9 coach ends were cleaned up and spare seat backs from the same source cut down in height to 7.5mm to be used as seat supports.


The floor piece is from 40 thou styrene, 22 x 70 mm with a cut-out for the Kato chassis. Plank lines are scribed on what will become the balcony ends. Solebars were cut from 3.2mm Plastruct channel, actually the second attempt as the originals were 3.2mm deep 60 thou Evergreen strip, but looked too plain and would have been set quite far back behind the Avalon sides. They were re-cut as strip to go above the solebars between the seat ends.

The floor, ends and solebars were assembled, followed by adding the seat end pieces, re-purposed as seat fronts to hide the Kato chassis under the seat. I hesitated adding the pieces planned along the top of the floor between the seat fronts as I realised they might make adding the bulkheads between the balcony and saloon a little more difficult.


After cleaning up, the Avalon Line coach sides were modified by adding a central window divider in each of the windows, using a length of 60 x 40 thou Evergreen strip carefully cut to length and superglued in place. These dividers would align with the bulkhead/partition pieces, which would be scratchbuilt parts. The new dividers were marked out on 20 thou styrene, with 10 x 40 strip used to make the window frames, very much in the manner that the masters for the Avalon coach kit were made (maybe in this case with a little less care...). Once set overnight the windows and lower cutout were cut out, then the pieces cut from the sheet. At this stage the top edges of the 20 thou sheet had been marked out to use a Dundas VoR roof for the project, but as can be seen, the final profile of the 40 thou material backing the parts is rather different...


Which brings us to story of the roof. When I had drawn out my concept drawing I had planned to keep the overall width to that of a Chivers coach kit, which just suited the Dundas roof. When cutting the floor piece and all the other parts that would sit between the sides, I forgot to take into account that the Avalon Line sides are a good 0.5-0.75mm thicker, i.e. there should be a rebate in the floor... I was also starting to think a flatter roof profile would be bit more "tram like" and to cut a long story short, after rejecting an already-converted version as being too narrow, I pinched a new roof from a Dapol Railbus kit. It was cut to length, oddly the length between sets of ventilators was just right, and then narrowed. I miscalculated here taking 6mm out, then having to take a further 1mm from each side. Glued together with a strip of 40 x 156 thou Evergreen strip below the joint, it was set aside to dry.


Whilst that dried I fitted the bulkhead partitions into place on the floor unit, having carefully measured their location in relation to the sides. The lengths of 60 thou x 3.2mm strip were further cut down to fit in-between and add strength to the central section. In between the partitions and the seat fronts I added squares of 40 thou styrene that will eventually support the balcony seats, but also add extra support to the bulkheads.


Just visible in the shot above is the construction of the rear side of the bulkhead partitions, a 40 x 40 thou strip runs from the motor cut-out, through the window divide and right up to roof level, with panels of 40 thou sheet in either quarter above and below the windows. This was a neater way to get the strength required in these parts. As some of the lower pieces are visible through the side windows they have a planked effect scribed in to represent the seat backs.

More soon, this is progressing well... 

Colin

Saturday, 26 March 2022

Unfinished Business

Just over a year ago I posted about a new build loco project that had stalled in December 2020. It didn't restart until some point in 2021, where a set of channel frames eventually emerged and changes were made to the cab. Although I cannot pin down when the 2021 work took place, it may have co-incided with receipt of the Kato 11-109 chassis on which the loco sits, my first of the new generation chassis. However the loco then went back in the drawer until late February 2022

The 2021 work had given it channel frames rather than plate ones and also a revised cab. I think at that point I had realised that it actually looked too like it's inspiration (SMR No.3), so I made changes to overcome this. Drawing more inspiration from the RH&DR's 'Redgauntlet' I looked towards the original build of that loco, where it sported round spectacle windows on the cab front. My spares box revealed an A1 Models 009 etch that I had attempted (and failed) to convert to O9 but the cab front and roof were salvageable, and were incorporated into the rebuild. All the Feb 2022 onwards work has built on this theme.


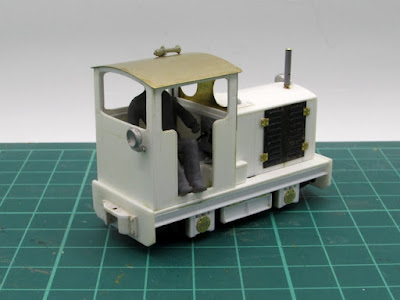
As well as the A1 etches I have used parts from the MG Models fret of grilles, louvres, hinges etc to make the hinged bonnet side doors and front grille. Other bonnet details include a RT Models headlight, and filler caps made from Dapol Drewery coupling rod pins. The exhaust was in the spares box, used in a previous test build. The air horn on the cab roof is No.3's original fitting, I think either a Crownline or early A1 Models casting.


A look from the other side reveals that I had to cut the etched grille down and this side of the surround is in fact styrene strip. Under the channel frame the suspension/axlebox units are cribbed from the Black Dog O&K design but with a few differences. I had hoped to use the original axlebox mouldings from No.3 on here but the started to disintegrate on clean up so instead I dug further back in my modelling career to find some etched ones last used on a model I made in my youth. I had to strip layers of Humbrol gloss paint off to clean them up!


Around the back of the cab can be seen the 2021 modifications made to open out the rear window to follow the roofline. Another RT Models headlight features here, the position still echoing No.3. The coupler blocks on the buffer beams are scratchbuilt, but retrieved from the scrap box having been recovered from a previous project.


With the cab and driver figure removed, we can see the rudimentary detailing. The control panel is from the Dapol Drewery kit with a Peco track pin as a control. The gearbox is represented using a Drewery sandbox with another pin. The original sand dispenser forms another lever, purpose unknown! A modified wagon handbrake forms a (brake?) lever at the rear of the cab, and the driver has a thin cushion to sit on. I'd offer more comfort but headroom is limited a little, commercial figures won't fit so he is a Chinese Prieser copy suitable cut about.

Next stop is the paint shop...

Colin

Sunday, 16 January 2022

Bumper Bungalow Update - Painting and Finishing

A patch of reasonable weather a week or so before Christmas allowed the workshop to be used for spraying without having to warm it up too much, giving an opportunity to give the bungalow a full coat of primer. As ever the primer brings all the different materials together as one and forms a good base for what follows. Throughout painting I have tried to use the principle of applying washes and near dry-brushes wherever possible, avoiding "solid" colour if I can. 


The roof tiles were given a wash of Vallejo 'Black Grey', then almost dry-brushed with a mix of Vallejo 'Hull Red' and a terracotta shade that I had bought especially for the job. A further wash was then followed by dry-brushing with the terracotta shade, actually Army Painter 'Tanned Flesh'. This was bought especially for the job after my home-brew mixes failed to get the right shade.

The concrete render started out as Railmatch 'Concrete' with a touch of grey added, then washes of brown, black-grey and dry brushing with light grey and sand shades. Generally the old Airfix render mouldings come out rather well! Window frames were painted away from the model in Vallejo 'Olive Green', dry brushed with the same manufacturers 'Green Grey'. The same treatment was given to the sills on the wall mouldings. Windows frames were fixed in place once most of the painting was complete.


The 'Tanned Flesh' paint formed the basis of brick and chimney pot colouring, and once painted the chimney stacks were flashed into the roof using pieces of foil harvested from an egg-shaped Cadbury's product available in the early part of the year. With painting completed before the Christmas break I waited on a relatively mild, dry day to matt varnish everything...


That mild, dry day turned out, rather unexpectedly, to be the afternoon of New Year's Eve. Humbrol acrylic matt varnish was applied from an aerosol giving a pleasing finish. The next step was to add some moss and bird deposit effects to the roof, both for realism and to try and hide some of the dodgy tiling that I can only blame on myself...

Vallejo matt medium was applied to areas that needed moss adding and a blend of fine foam scatters scattered on through a sieve. Once dry various green, yellow and grey acrylics were stippled on to add to the effect.

That shot really does show that the roof tiles are far from perfect...

After the New Year weekend the bungalow got placed to one side as I got involved in some wagon projects (more another time), but I have finally got around to adding the glazing to the windows. This uses 20 thou clear styrene, fixed behind the frames using Kleer.


The front door and two of the narrow windows (to represent the bathroom and toilet) were "frosted" by sanding both sides with wet wet and dry paper. I think some internal partitioning might eventually be required to stop the see-through effect, and of course some curtains on the windows to stop you seeing in too far, and depending on how it is eventually used even some grunge inside or out of the glazing.


Overall I am very pleased with how this had turned out. Although officially a project with no place, it has proved a useful refresher in building colouring and techniques that will be useful for future 7mm scale work...

Colin


Thursday, 23 December 2021

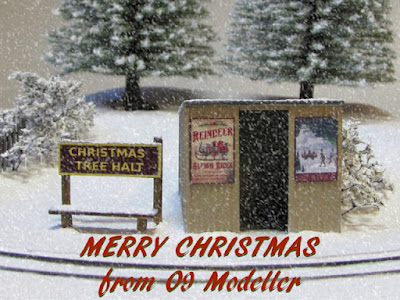
Merry Christmas from O9 Modeller

It's that time of year again, 'Christmas Tree Halt' sits on display in the living room as a little bit of entertainment and has also made an appearance in the third issue of the 'Micro Model Railway Dispatch' edited by Ian Holmes. You can download a copy here: MMMR Dispatch 3 

On the workbench the Dapol bungalow conversion has been receiving various paint effects, which have been transformational in how it appears. I will explain these in more detail at a later date, but at the moment it is awaiting a coat of matt varnish to seal everything in place. The Christmas period generally sees the workbench slow to a halt, so it will likely be the new year before this is applied.


Once back into the swing of things there will hopefully be some progress on a layout in one form or another. Until that time, I'll wish all O9 Modeller readers a Merry Christmas and a Happy New Year.

Colin


Thursday, 9 December 2021

Bungalow Bodgery

Years ago, back in primary school, our class topic was buildings. A friend of mine told a story of how he thought the Bungalow had got it's name, when housebuilders ran out of bricks and the foreman just told them to "bung a low roof on!" Whatever the truth, it came to mind when working on this project...

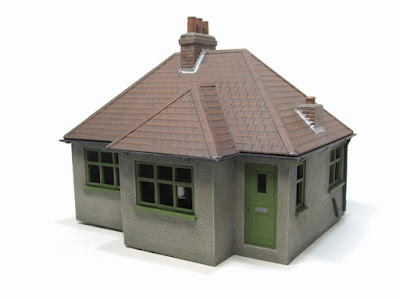
This is a project that doesn't really fit in anywhere in my longer-term plans but has acted as an effective time-occupier, having off and on for many months. It nearly got thrown in the bin earlier in the year and has only really come together properly in the last fortnight. The starting point is the Dapol C027 Detached House kit, this particular example having been acquired at a toy fair for a couple of quid.

Somewhere I had read that this kit could be converted to a bungalow and I was intrigued to have a go...


Aside from the obvious conversion to single storey, I have added a 3mm strip of material to the base of the sides, largely to give a footing that could be buried in the ground rather than to add any extra height. Elsewhere I have adopted a principle of refinement of the kit parts wherever possible. For example the chunky window frames were thinned by sanding them against a flat surface, then adding opening frames from strips of 5 thou styrene. The doors were given frames from Evergreen strip, and panel lines scribed in, door handles and letterbox etc added. Doors and windows are presently loose to aid painting (blu tac is holding them in place for the pictures).

One window on the right-hand end was made smaller as it conflicted with the chimney stack. This was nothing to do with cutting the kit down, even the original upper storey had this issue! The join can just be seen but I think paint will hide it.


The main chimney stack has a new top with Wills pots and a strip of Slaters bricks towards the top to add relief, the shorter stack is half size as I only had one half in the pack and had to double-up. This has a MicroTrains truck pin as a capped stack.

Working on the roof nearly ended the project, the moulding was poor with little lumps all over it, as does the one on the Dapol website so this may be a damaged tool. Sanding this smooth destroyed a lot of the detail and I ended up scribing it back in (not my greatest work). I also removed the half-row of tiles from the bottom edge as they looked ridiculous! This destroyed what there was of a gutter so guttering and downpipes were later added from the Wills building accessories pack. These are a massive improvement visually. The kit roof lacked any capping strips so these were added to all joints, scribed from 10 thou styrene.


Of course, in best DIY fashion, there are a few bits left over...


Some of these will go into the bits box, even those chunky window frames might come in useful somewhere as they are accurately moulded shapes. The more damaged bits of wall and failed modified windows are likely to go however, you cannot keep everything!

Colin

Wednesday, 9 September 2020

Summertime Blues (with lashings of Cream)

My semi-open coach conversion of the Roger Chivers O9 coach has finally reached the point of completion. I don't usually like to post pictures of models during the painting process, but I'll make an exception on this occasion. I had a few issues with adhesion that I put down to the age of the primer coat and over-handling of the model since, although it was cleaned several times. Paint is largely Vallejo acrylics applied by brush and overcoated with Humbrol aerosol matt varnish. 


Following varnishing I went off for a few days in Norfolk and on my return started to add the glazing to the (ex-Dapol railbus) side windows, using 20 thou clear styrene cut to side and flush fitted, secured in place with Kleer. This didn't go to plan on the first attempt and after a revision in practices, new glazing pieces and a fresh bottle of Kleer it went a lot better. The end windows are also glazed with 20 thou material, fitted into the recess provided on the kit parts. 


I then started focusing on a new project but this week I thought I ought to add a little weathering, wheels and couplings etc...The figures are a small selection I had to hand, temporarily held in place with BluTac. As with everything of late, until I decide on it's final duties they will stay temporary!


Weathering has only been lightly applied to the roof, underframe/bogies and a touch of dry brushing around the door openings to represent wear and tear. Overall I think this captures the look of a much-modified 15" gauge coach rather well, but I'm not in a hurry to build another in this form, maybe I'll reconsider in another 5 years... 


Colin 

Sunday, 8 March 2020

Gmeddling About in 009

Prior to exhibiting my 009 pizza layout 'Old Quarry Line' last July I quickly reworked a Minitrains Gmeinder as a spare loco. I had limited myself to replacing the bonnet side vents with a MG Models etch and altering the cab doorways a little to lose the door one side and add a canvas side sheet and wooden planking on the other. This was the result.


It was only meant to be a temporary work-around but I've grown a bit attached to it. However, the cab sides were still jarring a little, they just didn't look like they belonged on a Feldbahn locomotive...

This is where a recent O9 project came into play. I realised the etched cab sides from the 009 cab on the A1 Models test-build did have a slightly Feldbahn-esque look to them. This is the etch as seen on A1's eBay listing.


Offering them up they were a little too wide and a bit too tall, but setting to I managed to cut them down to size, re-drilling the bottom handrail hole as the original was lost in the cutting. Having added the handrails I then realised the real thing would most likely have shorter rails to allow for a removable cab top, so I removed them, re-drilled and re-soldered them in place. Then came the moment of truth, the cab was carefully removed from the Minitrains loco and bathed in 'Super Strip' to return it to bare plastic to make the required changes. With detail removed and sanded flat I was able to Araldite the new sides in place.


Milliput was used to fill the gaps between the etched sides and plastic parts, being careful to try and retain the rivet details on the ends. I opted not to add a split line horizontally on the cab sides/ends to represent the removable cab top. Even so, it now looked a lot more like a Feldbahn locomotive despite still being a very much a freelance interpretation

Painting then followed, I have managed to match the weathering (what little there was) to the original paintwork on the bonnet and I'm really happy with how the cab corners look, the time spent carefully filling and sanding the join has paid off with the rivet detail intact.


The original driver, already much modified from a Dapol example (largely flattened on the other side) has had further surgery to cope with the new door layout. Having infilled the old door opening to the right with styrene before adding the etched sides, he has had a chunk taken out of the back of his right arm and leg to accommodate this (and a chunk from his left arm too). He now sits in such away that it highlights the thinness of the cab sides at the door opening. He is also now an integral driver, securely polystyrene cemented into the cab side rather than relying on glue under his feet!

On the other side of the cab the original canvas cover have been resized to fit the new opening, with planking retained below


Before reassembling the cab onto the loco I was able to resolve the issue of less-than-perfect running I had encountered with the loco, eventually resorting to having the wheels out and tweaking the pick-ups a little. I was also careful to replace the glazing in the rear window with thinner material as there was evidence of the flywheel making contact with the old window.

Colin

Thursday, 7 March 2019

Progress without movement

Before Christmas I demonstrated progress with my 4-wheel coach conversion to a PW crew coach. After a few delays caused by the weather and illness, the end result is now this:


The yellow areas are sprayed using Halfords 'Broome Yellow' over a white primer, whilst everything else is brush painted in acrylics. Matt Humbrol varnish was sprayed over the completed modelling and weathering applied in the form of washes and dry-brushing.


Inside the figures are cheap Chinese ones sprayed with grey primer and then given a dark grey wash. Dry brushing highlighted the skin colour on hands and faces and orange on their jackets to look like hi-vis (but low-vis, if you catch my drift...). Windows are the Dapol originals and door handles are 7mm NGA ones chemically blackened and weathered.

A couple of other pre-primed items are now awaiting workshop attention, but don't get too excited...

In other news, despite some progress on the mk2 version of the 'Beck Bridge' scene I still wasn't overly happy. So officially the project is on hold for a while - unofficially I have a 'cunning plan'... 


In the mean time the bridge itself has been painted and weathered, which is a good encouragement to actually use it...

Colin

Thursday, 6 December 2018

PW Crew Comfort

Spurred on by reviving the semi-complete 'not DA1' I looked into the incomplete projects box to see what else might be revived. My eyes settled on the 4-wheel coach I had assembled from Dapol railbus left-overs and last seen on the blog in May 2015 (and that date rather surprised me too...)

I had never had a real plan for this coach and to that end it had been completed with running gear adapted (badly) from an old coach bogie and only passive provision for MicroTrains couplings. Realising it would make a rather nice crew coach for the permanent way department I have replaced the running gear with a modified Peco wagon chassis and made proper provision for MicroTrains couplers. I then stripped back the primer on the body and tidied it up a little, especially around the ends of the roof which were never my finest work.


At one end I blanked over the end window on each side and added a vent cut from an old A1 Models BR class 37 etch. In fact I think these had previously been used on the original version of my model of 'Jay' before I realised I had made it a little overscale.

On the end itself is another etched addition, I suspect that this is again A1 in origin, alongside an electrical connection from the railbus spares box.


Internally a cupboard has replace the seat at this end, complete with a kettle fashioned from Dapol and Knightwing leftovers.


Another recycled part is the window set into the other end, this was once in the same position on one of my very early coaches that had to be dismantled.


It has been fun making these changes, and yes, there is something of a nostalgic tone to working with leftover kit parts and odd bits of etch...

Colin

Monday, 2 January 2017

Adding a Touch of Rheidol?

It appears to be the time of year for raiding the 'grey' projects box - those almost complete models in primer awaiting the inspiration to complete the paintwork. Following on from the recent wagon exploits and due to join them in the queue for another blast of primer is my semi-enclosed conversion of the Chivers O9 coach kit. That I hadn't got around to painting it is in some ways is a bonus as I have now decided that it would benefit from a different roof.

Although I was making best use of the Dapol Railbus roof parts in the original build, I wasn't happy with the way I had treated the ends of the roof, it looked more like a GRP moulded roof plonked on an older coach, which whilst perfectly feasible in 15" gauge wasn't the look I wanted. It didn't help that the roof was under-reinforced and starting to banana upwards, further not helped by gentle pressure to relieve this... Snap!

I decided to cast about for alternatives and offered up a Parkside Vale of Rheidol roof (available as a spare ref. DP08) - the width is just right...


With the roof trimmed to length, rainstrips added and the ends reconstructed, I think that this is an improvement. As a bonus it now sits a little higher and matches my other enclosed stock a little better. What isn't apparent from the picture is that this roof was once split down the middle and widened in a failed attempt to re-roof one of my 'Exmoor' coaches, then reconstructed and filled at the original width! I won't tell anyone if you don't....

I managed to get the shed workshop warmed up sufficiently over the New Year weekend to put a coat of primer over the rebuilt coach and new roof. All seems well, when the time comes to add a top coat it will just need a light rub down with 1500 grit wet and dry. I am getting the urge for a two-tone scheme but I'm not sure what yet, that may depend on which project it is intended for.


 Colin

Sunday, 31 May 2015

A few bits and bobs left over... (in honour of Dave Lister)

"There's a few bits and bobs left over, but its always the same when you do a bit of do-it-yourself, isn't it?" Wise words from the guy who mended the Chicken Soup machine on the 'Red Dwarf'...

But it is indeed true.  Having completed three Dapol Railbus/Drewery Shunter loco bashes over the years I have rather a lot of left over parts, including spare window-wide panels and the sliding doors by the plenty. Some time ago I hatched a plan to use these, plus a complete new kit, to make an O9 railbus, as previewed here in 2012. Last November I did actually start to put together the parts for this project, however, despite making up sides (one side with doors, the other without), and front ends, something didn't quite gel.

Having put all the parts to one side, on re-examination I decided not to go ahead with the railbus and I took apart many of the parts and sought out how to recycle them. The door-less sides and ends, plus roof, were re-purposed as parts for a diesel loco with Evergreen 'siding' used to make grilles, and subsequently sold on as I couldn't see me completing it any time soon...


So what to do with all those window-wide panels...  well, would you believe that the width of a window frame from a Dapol railbus kit matches almost exactly the width of the Chivers seat moulding?  You may ask how I found that out, but kicking about for ideas I somehow offered the Dapol parts up to the Chivers kit... What you see here is actually the window panel with the bottom half of the side cut off and then turned upside down so that the top panel replaces the armrest of the Chivers kit side. The roof is made from further Dapol left-overs.


Inside I have created a footwell for the middle doorways to give a bit more legroom for passengers, this modification could be applied to other Chivers conversions.


After a lot of fettling and filling, sanding etc the coach was primed and I think the overall result justified the work involved, it is almost impossible to tell it is a kit-bash. The roof is currently loose-fitted to allow access to the interior for finishing off, hence the gap!


With a few panels and all the doors still left over, I looked for a further project to use up some parts. This coach started life as eight (much modified) doors and two side panels, plus a roof offcut.  The underframe is scratchbuilt in styrene, incorporating a much cut-up wagon bogie to hold the axles. 


It is based loosely on coaches built by the Parkinson's for the Southend Miniature Railway in the 1920s (to a similar style to the Great Yarmouth/Sutton bogie stock) - but my model is somewhat larger than scale, despite which you can't actually sit a figure in it... not to worry, my plans possibly see it as a static item, awaiting restoration. A comparison with the Chivers conversion shows they are about the same height but different window lines.


Both coaches now await painting but colours and finishes depend on future use...

Colin