Showing posts with label Roger Chivers. Show all posts

Sunday, 4 October 2020

A Tale of Hinge Envy

Earlier in the year, before the world of lockdown, my thoughts turned to rolling stock for a future O9 project. Whilst some existing wagons could be used, more would be required if I went down a light industrial or agricultural route. In my analysis, my usual way of wagon building had three points of time consumption:

  • Scribing plank lines on styrene sheet
  • Creating wood grain effects
  • Adding bolt detail individually

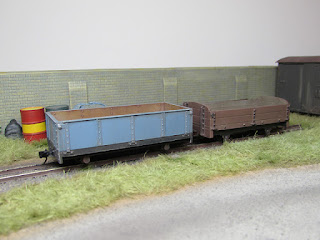
The chance purchase of a Slaters sheet of rivet details on 20 thou styrene sheet prompted some experimentation. Using this and Slaters planked sheet the wagon body on the left was built, eliminating all three points of contention... However, it looked more like a wagon built from shed timber than planks! So the Mk2 version on the right returned to scribed planks on the sides (but retaining the Slaters sheet on the floor). 

The rivet strips were cut slightly finer on the second attempt and the end result looked quite reasonable. On the ends Evergreen channel section added further relief for minimal effort. However, once painted 
I wasn't entirely happy with the result, and I eventually realised why when the Chivers Finelines O-16.5 wagons became available again... very little can match the finesse of Roger's tooling on the hinge straps etc. I realised I had hinge envy!


When ordering Evergreen rod for 'Wilton' last week I had a glance down the Grandt Line listing from 7mm NGA sales and found some 'Engine House Door Hinges' (ref 3524). A quick Google confirmed that they might fit the bill with a bit of adjustment so a pack was added to my order. A Mk3 wagon body was assembled, and I took the opportunity to put a new blade in my scriber for the first time in a while, which has improved the plank lines compared with the previous build.


As the photo shows, I've shortened the hinges, and then carefully recovered the top two bolt heads and fixed them in new positions. I've also added the redundant top sections at right-angles to create the point at which the sides will be secured in place. I opted for some simple extra hinge detail added from 10 thou styrene strip and some rod through the hole of the moulded hinge. Simple pieces of bent 0.5mm wire represent the locking devices for the doors, I had started making something much more complex but decided to keep it simple.


After a coat of primer I was impressed with how the hinges/straps looked. As and when wagon production is decided upon the Mk2 version will be upgraded to match, it is 0.5 mm narrower but that will add some variety, as will differing hinge details and end supports etc, with the aim that there are a group of similar, but not identical wagons.

Colin

Wednesday, 9 September 2020

Summertime Blues (with lashings of Cream)

My semi-open coach conversion of the Roger Chivers O9 coach has finally reached the point of completion. I don't usually like to post pictures of models during the painting process, but I'll make an exception on this occasion. I had a few issues with adhesion that I put down to the age of the primer coat and over-handling of the model since, although it was cleaned several times. Paint is largely Vallejo acrylics applied by brush and overcoated with Humbrol aerosol matt varnish. 


Following varnishing I went off for a few days in Norfolk and on my return started to add the glazing to the (ex-Dapol railbus) side windows, using 20 thou clear styrene cut to side and flush fitted, secured in place with Kleer. This didn't go to plan on the first attempt and after a revision in practices, new glazing pieces and a fresh bottle of Kleer it went a lot better. The end windows are also glazed with 20 thou material, fitted into the recess provided on the kit parts. 


I then started focusing on a new project but this week I thought I ought to add a little weathering, wheels and couplings etc...The figures are a small selection I had to hand, temporarily held in place with BluTac. As with everything of late, until I decide on it's final duties they will stay temporary!


Weathering has only been lightly applied to the roof, underframe/bogies and a touch of dry brushing around the door openings to represent wear and tear. Overall I think this captures the look of a much-modified 15" gauge coach rather well, but I'm not in a hurry to build another in this form, maybe I'll reconsider in another 5 years... 


Colin 

Friday, 14 August 2020

Summertime Blues

It's that time of year when I find that railway modelling slows down a little. With little to do other than a couple of tweaks to the ex-Ashover coach, the only other job currently in progress is the revival of  my semi-enclosed conversion of the Roger Chivers O9 coach. Records show it was started in May 2015 and last modified in January 2017, so this has been a long time coming.

Pleased with the result of painting the Ashover coach in LCLR blue and ivory livery I have dug the coach out from storage. This may seem to be an odd link to make but it must be all that vertical planking... Fellow O9 modeller Andrew Blackwell has always said this should be in a two-colour scheme, so here goes...
 

As with the Ashover coach I firstly masked off the areas that would be the darker colour and sprayed white primer on the areas that would be the lighter shade. The colours will be similar, most likely the same shade of ivory but maybe the Vallejo blue I bought as a comparison to the Citadel shade used on the 009 model. However, a lesson learnt from the previous job is to paint the interior first, especially as it is going to be much more visible on this model!

Colin

Monday, 2 January 2017

Adding a Touch of Rheidol?

It appears to be the time of year for raiding the 'grey' projects box - those almost complete models in primer awaiting the inspiration to complete the paintwork. Following on from the recent wagon exploits and due to join them in the queue for another blast of primer is my semi-enclosed conversion of the Chivers O9 coach kit. That I hadn't got around to painting it is in some ways is a bonus as I have now decided that it would benefit from a different roof.

Although I was making best use of the Dapol Railbus roof parts in the original build, I wasn't happy with the way I had treated the ends of the roof, it looked more like a GRP moulded roof plonked on an older coach, which whilst perfectly feasible in 15" gauge wasn't the look I wanted. It didn't help that the roof was under-reinforced and starting to banana upwards, further not helped by gentle pressure to relieve this... Snap!

I decided to cast about for alternatives and offered up a Parkside Vale of Rheidol roof (available as a spare ref. DP08) - the width is just right...


With the roof trimmed to length, rainstrips added and the ends reconstructed, I think that this is an improvement. As a bonus it now sits a little higher and matches my other enclosed stock a little better. What isn't apparent from the picture is that this roof was once split down the middle and widened in a failed attempt to re-roof one of my 'Exmoor' coaches, then reconstructed and filled at the original width! I won't tell anyone if you don't....

I managed to get the shed workshop warmed up sufficiently over the New Year weekend to put a coat of primer over the rebuilt coach and new roof. All seems well, when the time comes to add a top coat it will just need a light rub down with 1500 grit wet and dry. I am getting the urge for a two-tone scheme but I'm not sure what yet, that may depend on which project it is intended for.


 Colin

Saturday, 6 August 2016

Theakston - Rusty and Dusty

The last time we saw the Roger Chivers Theakston wagon it was still in bare plastic. I subsequently sprayed both the body and underframe in red oxide primer and put it to one side as other priorities took over.


At a local 009 Society (Gasp!) event I was able to pick up some 7mm diameter wheelsets of Bemo origin, which resulted in me altering the coupling mount height to suit and at the same time adding a coupler to the other end rather than use it as the end wagon of a rake. I then sprayed the body in grey primer over the red oxide, deliberately leaving a few rough spots and not really bothering too much in the interior at all (!). 

Once dry I washed over the grey with a dark grey wash, wiping this off the panels where necessary to allow colour to build in the strapping. The strapping and interior were then overcoated with a brown wash, and once dry some dry brushing added a rustier tone. Meanwhile, the underframe was painted in Humbrol red/brown, with the W-irons in grey/black. Again once dry the brown wash was used to tone the colours down. I then glued the underframe and body together, and once set added a coat of matt varnish. The final step has been dry-brushing to blend the two sections together and make it look suitably 'used'. 


Finishing-off jobs included MicroTrains couplers and adding about 63mm of lead window strip as weight underneath.

Certainly a recommended kit.

Colin

Sunday, 19 June 2016

Theakston - Fantastic in Pastic

At the recent 7mm NGA AGM at Burton-upon-Trent Roger Chivers had examples of his second O9 plastic kit on sale. It is for a Ravenglass & Eskdakle 'Theakston' stone wagon and simply requires wheels and couplings to complete.


A very pleasant 45 minutes of my time one evening put the parts together. I must admit I did struggle to get any wheels into it, I have resorted to a bit of drilling and splaying out of the axle boxes in order to fit Farish coach wheelsets (current production). Technically they are too small at 6mm diameter, but Roger has designed the kit to take the correct 8mm downwards.


The next job was to equip it with MicroTrains couplers. With Farish wheelsets fitted the base of the headstock is 6mm from rail level so only a 1mm deep section needs to be removed to put the coupler mounting height at 7mm.

You can just make out in this picture where the middle bar of the chassis frame is cut back to clear the coupler and to give it space to move backwards to function.


I then made a refinement to the top edge of the body in an attempt to reduce it's visual thickness. I have removed some material at a 45 degree angle, carefully stopping at the line of moulded rivets on the sides. This is a trick I've used in the past on items such as Airfix mineral wagon kits and once painted should trick the eye into believing the top edge is thinner.


Whilst at Burton Steve Lamb's 'Reclaim' caught my eye. A development of the Julian Andrews' 'United Brick' layout plan (now of course Howard Martin's 'Avalon Brickworks') this has provided much food for thought, and the possibility of an O9 version using materials stored in the workshop is quite apealing...


Colin

Sunday, 13 December 2015

The "Chivers Diet" - the Results are In!

After a lot of slicing, dicing and generally making it up as I have gone along, I can reveal the finished products of both of my Chivers Finelines O-16.5 to O9 conversions. These wagons were both rebuilt from assembled kits in a batch of five that I had acquired at a very reasonable price via the NGRM Forum.

The 2-plank wagon is seen complete, weathered and fitted with couplings. I have had the brown MicroTrains couplers in stock for a while, they suit this use better than a grey wagon or locomotive bufferbeam, in reality they do not look so obviously plastic.


The steel-bodied wagon is also now painted, when I said that it would have a splash of colour I meant it...


I've always liked this shade of grey-blue, I had an early O9 bogie wagon painted like this, plus a Gn15 loco at one stage - I also know that it is a popular choice with Steve Bennett of Black Dog Mining fame! Some subtle weathering in the form of colour washes and dry brushing have brought out the details in the Chivers mouldings very well. Using a 1/43rd scale drone I can show the interior weathering and plank effect on the floor.


Those who have followed my wagon ramblings over the years will realise that both of these wagons are in rather different colours to my usual choices, is there perhaps some scheme in the back of my mind that needs the wagons to all be different colours...?


Who knows ;-)

Colin

Monday, 7 December 2015

More Chivers go Slimmer

Whilst I haven't had a lot of time at the workbench of late, I have had a tinker with the parts from a Chivers steel-side open. This is another from the same batch of secondhand wagons as the two-plank and once stripped of old paint it was obvious that it was a little lop-sided. It was certainly well glued together (perhaps too well) and I had to be brutal to get it apart, I nearly regretted starting....

With the ends cut down and a new floor, this is the result:


I had envisaged this as a bogie wagon and opened out the headstock for a bogie mounted coupler. However as it reminded me of the drop-side wagons at the Kirklees Light Railway, the decision was made for it to be a 4-wheeler. Having completed basic assembly I filled the headstock back in to create a space suited to a MicroTrains coupler and then added some corner strapping to finish off the ends.


Underneath a previously split-in-two Peco chassis forms the basis of the running gear with Plastruct 3mm channel as the solebars. All of the N gauge spring and axlebox detail was removed from the chassis mouldings and as an experiment I used 51L Highland Railway axleboxes in their place.  A few strokes of a file removed the top section of each box to allow them to sit neatly in position. Visually this trick works very well. 


A coat of primer covers up many sins and allows all the filling and sanding to be hidden. The home-brewed sections of strapping are nowhere near as neat as the fine Chivers mouldings but hopefully once painted they won't look too bad.


This wagon is now in the paintshop getting a splash of colour.

Colin

Saturday, 21 November 2015

Playing with Post-its (wagon painting)

A quick progress report on the Chivers 2-plank wagon conversion/slimming to O9.  Having painted the bodywork with Humbrol red/brown I realised it would look better if I could pick out the ironwork in black. I realised that picking it out would be rather time consuming and fiddly, so I came up with* an alternative....


I cut two strips 8mm wide from the sticky end of a post-it note to use as masking, it is sticky enough to hold itself in place but not affect the paint below.  The strips were cut to fit between the hinge straps and end end uprights.


Using a mix of black and beige acrylic paint, I dry-brushed the hinges and uprights to get good colour coverage - it does not have to be perfect, as weathering will add to the effect in due course.

With the masking off, the result is quite effective...


Colin

*I say came up with, but I suspect it has been tried before!

Friday, 30 October 2015

A plan so cunning...

As previously alluded to, I have acquired several Chivers Finelines O-16.5 wagons requiring repair as a job lot, and the 2-plank wagon was next for a bath in 'Superstrip', revealing a few interesting quirks such as what appear to be holes drilled in the headstocks for buffers, and that the ends were not vertical. 


As the 2-plank did not feature in my future O-16.5 plans and fact that it would have to come apart anyway, I wondered what could be made from it. Some time ago I pondered if converting any of this series of kits to O9 was possible, so I compared the sides and ends with an Avalon Line O9 chassis adaptor and discovered that there was not really a lot of difference in length, but I would need to loose 10mm off the width!


After a bit of cutting, including a new floor and replacement of the centre section of the headstock, this was the result, although there is still a lot of fettling still to do:


After a little fettling and filling, I gave it a coat of primer and this is the result as it stands, temporarily on two halves of a Peco 10' chassis:


I'm pretty impressed with the result and I have been contemplating a similar conversion to the Chivers steel-bodied open wagon, but as a bogie wagon... watch this space...

Colin

Sunday, 25 October 2015

Confessions of a rubber gauger

Following on from the last 'Up-cycle' post I realised that I hadn't uploaded a photo of the completed test track board with track in place...

The varnish on the cork did not work out so one Sunday morning I took the power sander to it and removed the varnish and evened out the surface finish. Its still a little messy around the edges but that just adds to the charm, so I tell myself... 


Trackwork is Peco code 100 for the 16.5mm gauge section and Roco HOe for the 9mm. Both lengths are made up from oddments.  The selection switch to power one line at a time sits in one of the original point switch locations, it was a lot easier that way as there was already a hole in the plywood underneath. The 9mm gauge line features a Micro Trains magnet for coupler testing.

The 16.5mm gauge track may be needed at some point if I ever get around to building a O-16.5 loco to pull the latest occupant of the workbench. This is the first of the five secondhand Chivers open wagons purchased via the NGRM Online forum classifieds to be refurbished.  I felt that this 4-plank wagon was the most in need of attention as it had a solid mass of ballast in it and no wheels or brake gear.  Having soaked out the load and stripped the paint in Phoenix Paints 'Superstrip' I gave it some careful attention, including careful removal of one end and both sides, adding brake gear from a new Chivers kit in my stash and reconstructing the mounts for Kadee couplers. The plan was that this would be a prototype for my own future builds from new, plus refurbishment of others in this batch.


I have made two enhancements to the basic kit. The first, unseen here, was to texture the floor planking with wood grain, the second was to alter the shape of the brake lever where it goes past the guide, angling it inwards.  This can be seen in the underside view below, along with the strip connecting the guide to the W-iron:


The wheels have been pinched from a 2-plank wagon in the batch.  This isn't a design that really features in my plans and having now stripped the paint off a cunning plan is being developed that may be 'on topic' for this blog...

Colin


Sunday, 31 May 2015

A few bits and bobs left over... (in honour of Dave Lister)

"There's a few bits and bobs left over, but its always the same when you do a bit of do-it-yourself, isn't it?" Wise words from the guy who mended the Chicken Soup machine on the 'Red Dwarf'...

But it is indeed true.  Having completed three Dapol Railbus/Drewery Shunter loco bashes over the years I have rather a lot of left over parts, including spare window-wide panels and the sliding doors by the plenty. Some time ago I hatched a plan to use these, plus a complete new kit, to make an O9 railbus, as previewed here in 2012. Last November I did actually start to put together the parts for this project, however, despite making up sides (one side with doors, the other without), and front ends, something didn't quite gel.

Having put all the parts to one side, on re-examination I decided not to go ahead with the railbus and I took apart many of the parts and sought out how to recycle them. The door-less sides and ends, plus roof, were re-purposed as parts for a diesel loco with Evergreen 'siding' used to make grilles, and subsequently sold on as I couldn't see me completing it any time soon...


So what to do with all those window-wide panels...  well, would you believe that the width of a window frame from a Dapol railbus kit matches almost exactly the width of the Chivers seat moulding?  You may ask how I found that out, but kicking about for ideas I somehow offered the Dapol parts up to the Chivers kit... What you see here is actually the window panel with the bottom half of the side cut off and then turned upside down so that the top panel replaces the armrest of the Chivers kit side. The roof is made from further Dapol left-overs.


Inside I have created a footwell for the middle doorways to give a bit more legroom for passengers, this modification could be applied to other Chivers conversions.


After a lot of fettling and filling, sanding etc the coach was primed and I think the overall result justified the work involved, it is almost impossible to tell it is a kit-bash. The roof is currently loose-fitted to allow access to the interior for finishing off, hence the gap!


With a few panels and all the doors still left over, I looked for a further project to use up some parts. This coach started life as eight (much modified) doors and two side panels, plus a roof offcut.  The underframe is scratchbuilt in styrene, incorporating a much cut-up wagon bogie to hold the axles. 


It is based loosely on coaches built by the Parkinson's for the Southend Miniature Railway in the 1920s (to a similar style to the Great Yarmouth/Sutton bogie stock) - but my model is somewhat larger than scale, despite which you can't actually sit a figure in it... not to worry, my plans possibly see it as a static item, awaiting restoration. A comparison with the Chivers conversion shows they are about the same height but different window lines.


Both coaches now await painting but colours and finishes depend on future use...

Colin

Sunday, 26 January 2014

Fitting MicroTrains Couplers to the Chivers Finelines O9 Coach

I made my choice to use MicroTrains couplers (and trucks) at a very early stage in my O9 modelling and it isn't something that I have regretted. Admittedly, it has been fiddly at times, has caused some obstacles, but there has always been a solution (even if that was just to fit MicroTrains bogies in place of those supplied in Avalon kits).  The arrival of the Chivers Finelines O9 coach kit has provided the latest challenge - I was determined not to change the bogies over completely!

First things first, the bogies were built as per the instructions, ensuring they were squared up correctly and the wheels sat flat on a glass surface.  At this stage I did not add the coupler mounting strip provided.

Before constructing the body I made openings 3mm x 11mm in the headstocks on either end - this will allow the coupler to swing as the bogie turns, as seen here on the completed adaptation:


The modifications to the mounting strip were all made before it was fitted to the bogie and can be seen in the diagrams below....


Fig 1 - Cut the end of the mounting strip 11mm from the centreline of the hole that fits over the bogie (approx 14mm from the end of the part).

Fig 2 - Shape with a rat-tail file a semi-circular indent into the end of the part - this is to allow the MicroTrains 1015 coupler to work correctly (under pressure it pushed back out of the draft box).

Fig 3 - a) Add a 20 thou styrene shim 8.5 x 5mm under the mounting strip and level with the cut end - when set shape this with the rat-tail file to match.  b) Cut a 40 thou styrene piece 6.5 x 5mm, adding a taper at one end over about 1.5 mm.  Fix this in place and once set trial-fit both the mounting strip and wheelset, if need be use the rat-tail file to create extra clearance.

Once this has all set, drill a 0.9mm hole on the centre line in the exposed 40 thou platform, 2mm from the front edge (check using the draft box to locate exactly). Effectively 'tap' this using the MicroTrains coupler screw and clean up any excess styrene burr.  Optional at this stage is to shape the end of the 40 thou piece to make it less visible underneath the coupler when fitted.  The mounting strip can now be stuck to the bogie:


This view shows how the bogies look once fitted with the wheelsets, the clearances are rather tight but the bogies remain free rolling.  You will need to shorten the MicroTrains screws for the final fitting - I used a razor saw with the screw held in my desk vice:


An overall view of the completed (unpainted) coach with the bogies and MicroTrains couplers fitted:


Colin

Thursday, 23 January 2014

Progression...

I'm pleased to report that my recent projects are now just about complete, with some details added to the diorama and the Chivers coach kit painted, varnished and assembled.

Here's an overview of the diorama in it's "completed" state (I say that as there is scope to add a few more small details in due course):


In the front left hand corner I have added some spare lengths of rail and new sleepers awaiting installation, behind them can be seen the R C Link point lever:


At the other end of the scene the bench has been painted and installed, and a 'Skegness is so bracing' poster added to the wall as a further reference to a location that has inspired the development of this diorama in its various incarnations:


As can be seen, I've added strips of timber to the front and side edges to neaten up the final look of the scene, these are from basswood, and are treated with matt varnish.

Moving on to the Chivers coach, this has been completed as no. 8 in the SMR sequence (the number is in gold at the right hand end of each side) and painting/varnishing it has had it's awkward moments - fun with both the Halfords red and then the varnish spray cans, but it has got there in the end!  I have now fitted the seats and bogies, which were painted separately, and posed a figure seated within to give an idea of size:

Overall a very impressive kit and a venture that ought to make O9 modelling easily accessible. Oh, I haven't forgotten that I promised to write-up the fitting of the MicroTrains couplers.... honest...

Colin