Thursday, 23 December 2021

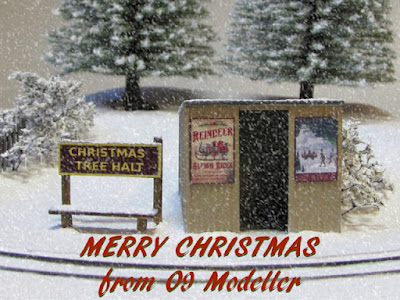
Merry Christmas from O9 Modeller

It's that time of year again, 'Christmas Tree Halt' sits on display in the living room as a little bit of entertainment and has also made an appearance in the third issue of the 'Micro Model Railway Dispatch' edited by Ian Holmes. You can download a copy here: MMMR Dispatch 3 

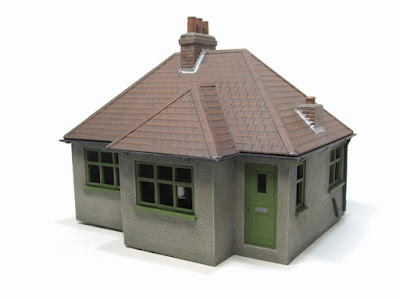
On the workbench the Dapol bungalow conversion has been receiving various paint effects, which have been transformational in how it appears. I will explain these in more detail at a later date, but at the moment it is awaiting a coat of matt varnish to seal everything in place. The Christmas period generally sees the workbench slow to a halt, so it will likely be the new year before this is applied.


Once back into the swing of things there will hopefully be some progress on a layout in one form or another. Until that time, I'll wish all O9 Modeller readers a Merry Christmas and a Happy New Year.

Colin


Thursday, 9 December 2021

Bungalow Bodgery

Years ago, back in primary school, our class topic was buildings. A friend of mine told a story of how he thought the Bungalow had got it's name, when housebuilders ran out of bricks and the foreman just told them to "bung a low roof on!" Whatever the truth, it came to mind when working on this project...

This is a project that doesn't really fit in anywhere in my longer-term plans but has acted as an effective time-occupier, having off and on for many months. It nearly got thrown in the bin earlier in the year and has only really come together properly in the last fortnight. The starting point is the Dapol C027 Detached House kit, this particular example having been acquired at a toy fair for a couple of quid.

Somewhere I had read that this kit could be converted to a bungalow and I was intrigued to have a go...


Aside from the obvious conversion to single storey, I have added a 3mm strip of material to the base of the sides, largely to give a footing that could be buried in the ground rather than to add any extra height. Elsewhere I have adopted a principle of refinement of the kit parts wherever possible. For example the chunky window frames were thinned by sanding them against a flat surface, then adding opening frames from strips of 5 thou styrene. The doors were given frames from Evergreen strip, and panel lines scribed in, door handles and letterbox etc added. Doors and windows are presently loose to aid painting (blu tac is holding them in place for the pictures).

One window on the right-hand end was made smaller as it conflicted with the chimney stack. This was nothing to do with cutting the kit down, even the original upper storey had this issue! The join can just be seen but I think paint will hide it.


The main chimney stack has a new top with Wills pots and a strip of Slaters bricks towards the top to add relief, the shorter stack is half size as I only had one half in the pack and had to double-up. This has a MicroTrains truck pin as a capped stack.

Working on the roof nearly ended the project, the moulding was poor with little lumps all over it, as does the one on the Dapol website so this may be a damaged tool. Sanding this smooth destroyed a lot of the detail and I ended up scribing it back in (not my greatest work). I also removed the half-row of tiles from the bottom edge as they looked ridiculous! This destroyed what there was of a gutter so guttering and downpipes were later added from the Wills building accessories pack. These are a massive improvement visually. The kit roof lacked any capping strips so these were added to all joints, scribed from 10 thou styrene.


Of course, in best DIY fashion, there are a few bits left over...


Some of these will go into the bits box, even those chunky window frames might come in useful somewhere as they are accurately moulded shapes. The more damaged bits of wall and failed modified windows are likely to go however, you cannot keep everything!

Colin

Friday, 3 December 2021

The best laid plans... can be changed

The appearance of 'Brooking Vale Brewery' in the latest 'Modeller has prompted some further thought about my stalled O9 micro layout project. Although the builder of that layout did not reference it, I was reminded of my source material, Julian Andrew's United Brick (Avalon Brickworks). I revisited this to see what it was that didn't quite gel for me, aside from issues about a credible scenario... I realised part of the issue might be that I had watered down one of the elements of the original (and many of it's imitators) by moving the inner siding towards the running line rather than it going towards, or even through a building in front of the backscene. Indeed I had physically moved it forward twice since the track was first laid.

I pondered what could be done if I swung the siding into a 6" radius curve and to move the Petite Properties structure to this location. So I drew out a 6" curve on good old cereal packet and also created a new mock-up of the structure as I realised it would look better reversed. By moving the bigger tree forward from the backscene it potentially hides the line running through the backscene a little better.


I have used part of the older mock-up to disguise the right-hand-side curve. I think I would actually go for a slightly taller, maybe wider, but definitely more bland structure here, possibly in corrugated material. The key to this structure appears to be that is should be seen but not to draw the eye to it, and the more I think about it the more the Petite Properties kit would not meet that criteria!


I still think I am some way off (re)starting this build. Whilst it remains an aspiration to complete it, having worked on the Christmas pizza and taking great delight in the simplicity of it, part of me yearns to do something quite simple and accessible for my next project, but I am not sure what...

Colin

Saturday, 20 November 2021

Santa's Gotta Brand New Sack

The presents in the open wagon on 'Christmas Tree Halt' were troubling my mind a few weeks ago. The reduction in size of the originals was the obvious solution at the time but part of me wondered if the eventual solution was to have a sack of presents represented in the wagon. I thought nothing more of it until I took a trip to a local model shop that is sadly closing at the end of the year (http://www.thegoodsyard.co.uk/). I was hoping to get some 009 flexi track but they were out of stock, however I did pick up a few bargains...


All were in the £1 box and being 7mm scale I was going to pop them in the "some day" box. I've no idea who NMB Models are/were, address on the back in is Immingham, but the more I looked at those sacks once I'd returned home the more it occurred to me they could be the answer to a present wagon load in 4mm scale. Even the smaller parcels might pass as presents if painted up in a suitable way...

In order to create the new load I started with a piece of 20 thou styrene scribed as a false floor, to hide the fact that inside the wagon it still has 7mm scale planking. I arranged the sacks to overlap, filling the area underneath the left-hand sack with Milliput, carefully shaped to match the casting. The parcel castings were cleaned up and used as larger presents (must be train sets and TVs!) to fill the gaps. I adjusted two of them in size to give a little more variety. All were placed carefully with the label hanging downwards.


After a coat of grey primer I gave everything a wash of watered-down Vallejo grey-black and once dry carefully picked out the floor planks in timber colour, and the sacks in a slightly darker red shade than the final shade. The presents were picked out in different base colours and then the actual red shade almost dry-brushed over the sacks giving a pleasing depth effect. the ribbon on the presents was picked out in Vallejo brass, as I had no gold to hand!


Once varnished the load was slipped into the wagon, it isn't glued in place but is a tight enough fit. I'm really happy with how this has come out, whilst the old present load worked to a degree I think this actually looks better and is more in keeping with tone and texture of the scene as it exists.


Colin

Wednesday, 10 November 2021

Christmas in a Box

Having spent the time to restore/rebuild 'Christmas Tree Halt' I decided that I would have to find a way of safely storing it for the eleven months that it might not be required. I was mindful of the fact that the damage to the original version may have occurred due to it being badly stored - I'll never know. 

Given that the trees are removable the easiest option would have been to locate a suitable 'Really Useful Box' but having looked at the options I would have needed an 11 litre box, and they were not available locally. It would also have involved a cost, and when you have a selection of materials to hand building your own box makes some sense...

There is a distinct recycling theme here, construction of the bottom half of the box used some 8mm ply from an old box that a friend passed on to me in January 2020, having held vintage car parts, in the days when things were packaged properly! The hardboard for the base came from the back of an old wardrobe disposed of when my daughter moved in January this year and the thinner ply diagonally in the corner and dividing the main box is some of the last bits of lovely veneered ply that came from a wardrobe disposed of many moons ago.

The lid is a further piece of ex-wardrobe hardboard with 25x12mm timber surrounding the edge, this was new material purchased specifically for layout-boxing, with the Avalon Brickworks layout in mind at the time. If I could have found some suitable material to recycle...

The pizza layout fits in neatly in the large compartment, and the two trees fit in the smaller compartment, retained by a system of trunk peg holes and special supports in the centre. The smaller compartment top-left is intended to hold the battery pack and any other bits and pieces that need to stay with the layout. I need to devise how the pizza can be padded into the space, it is deliberately not too tight a fit!

Along the back edge of the box can just be seen the two pieces of thin aero-ply that cover the encapsulated nuts that allow the lid to be secured in place. Holes were carefully drilled through with the lid clamped in place, then opened out from the inside to hold the nuts. The nuts were Araldited in place and the thin ply plates, with holes punched using a hole punch rather than drilled, were fixed in place as a belt-and-braces approach to stop the nuts falling through in the unlikely event the Araldite failed.

With the lid in place and secured the box ought to provide adequate protection for the layout, I just have to remember that unlike the covers for my other layouts that bolt to the baseboard, this one cannot be stood on end! All timber surfaces and hardboard edges have received a coat or two of yacht varnish to protect them from moisture and it has really lifted the appearance of the plywood sides.

Overkill, maybe... but I've actually quite enjoyed the build process.

Colin


Sunday, 31 October 2021

A White Christmas

I had unofficially set myself a target of getting the 'Christmas Tree Halt' rebuild completed by the end of October, lots of reasons but mostly to ensure it was completed for December! I think I might have made it...


Since last week's update the major change is that I have painted the snow. As daft as it sounds this is key to the effect that I am after, as I wanted a snow finish that was durable (i.e. not too much loose material glued down) and repairable (in case of sticky fingers). This is why I paid so much attention to texture at the filler stages... My method has been to use Vallejo 70919 'Cold white', thinned very slightly with water and with a drop of Vallejo retarder medium added, painted using a soft brush (to avoid brush marks) and as each area is painted a very sparing sprinkle of Deluxe Materials 'Icy sparkles' added. You cannot see the sparkles in the photos but they do glimmer if the light is right!


The Noch trees have been fixed to their barbeque skewer pegs and slot neatly into the tubes set into the scenery. In the foreground I have added the bare bushes around the fence and shelter, with a smaller patch to the right. These are largely recycled from last year's efforts, but broken into smaller sections and a effort made to make them look more like bushes than trees. These were painted with the Vallejo 'Cold white' for the snow effect and again some icy sparkles sparingly added.

Last year I had hoped to add some ribbon around the base of the scene to help emphasise the "decoration" element of the concept, but had nothing to hand and no time to go out looking. With more time on my hands this year I was able to obtain something suitable, I always knew I would probably end up in the craft section of Boyes for this but had not perhaps foreseen making the purchase in their Barnard Castle branch!*


The ribbon was attached using double-sided tape, it really adds to the effect of the whole scene "floating" as you cannot really see the black-painted supports underneath.

There is one more item to add in due course but all the work I wanted to do to bring the pizza back to life for 2021 is pretty much done. A few adjustments have been made to the wagon for this year, notably adding Peco couplers in place of the bent bits of wire it ran with last year, and adjusting the load to not look quite so over-powering (although they are still HUGE presents!).


Attention is now turning to safe storage, it isn't easy to create a box that slips over a pizza and bolts in place, so a box that accommodates the pizza and has storage space for the trees is now under construction.

Colin

*my eyesight is fine, thank you...

Saturday, 23 October 2021

Gimmie Shelter (and other snowbound detail)

I'm making progress with the rebuild of 'Christmas Tree Halt', with short bursts of work almost every day taking each step at a time.

The Wills halt building was primed and painted, ironically in pretty much the same colours it was moulded in, but the painted finish is much nicer in my eyes. The moulding dictates that there should be posters ether side of the doorway, so I searched online for suitable vintage looking Christmas themed designs. The chosen posters were reduced to size in Gimp and given the effect of a frame around them, then printed on glossy photo paper. Once fixed in place the whole structure was matt varnished to remove the sheen from the prints.


The shelter was glued in position and the snow (more filler) built up all around it whilst the glue set. As I had a weight on top holding it down I could not add snow to the roof at this stage.

I have also managed to plant a short length of fence, more Wills halt leftovers. I had to create a little trench in the scenery to get this to sit correctly, but once I was happy I glued it in place and added more snow all around. Just visible to the left in the shot below is the extra piled up snow I've added in front of the rock faces as these areas looked fat too flat before.


Once the shelter and fence were firmly in position I could add snow to the horizontals of the fence and the roof. The rooftop snow had a little PVA mixed into the initial layer to aid adhesion to the painted surface. The corrugations are still visible in places and I've achieved a snow dropping off the edge effect. On the right I've tried to give the impression some snow has recently dropped to the ground


The sign and bench from the Mk1 version of the scene are now in place and blended into the ground. There are still a few more areas to attend to before I start to paint the snow in it's final coating, such as to fill the areas of bare ground where the trees will sit. It is funny how the snow actually looks better and cleaner in the current photos than in reality! 


Oh, and I must clean up those rails...

Colin

Monday, 11 October 2021

It's starting to look all white...

A little progress on the Christmas pizza. I have been slowly applying filler around the edges of the board, then inside the track but not over the central area. The central area has had a coat of a mix of the same filler but mixed about 4:1 with PVA in the hope this can avoid any cracking over the softer base. Everything is largely thin layers in a bid to further avoid cracking issues. The two "eyes" in the centre of the scene are where the trees will sit, rather than plonked in the snow as per the mk1 version there will be a bit of exposed ground cover visible. In the centre of each patch is a tube fitted to accommodate the removable trees, these extend down through the polystyrene into the MDF base.

Whether applied at full thickness or the PVA mix, the filler was smoothed into place with a putty knife (or in the case of inside the circuit, butter knife...) and textured using a stiff paintbrush. A wet brush was then lightly run over the top to smooth the texture a little. I'm not sure the amount of texture is quite right in places and I may smooth any really high spots with fine wet or dry before adding the final colouring. 


Some of the left over filler/PVA mix was stippled into the previously smoothed area between the rails which has given a much better finish in this area. I now need to clean up the rail edges and have a test run to ensure it still works! Attention will now turn to painting the Wills halt building, some fencing and the rock faces before the next stage of snow work is attempted.

Colin

Sunday, 26 September 2021

An Unseasonal Chill

Earlier in the month I had spotted some ready-mixed filler at a reasonable price in the largest shop in the village and bought it to see how it faired, as snow...

It had been on my mind for a while to revisit the remains of 'Christmas Tree Halt', the 009 pizza I built very quickly last December, which had been stripped down after mould or some other irritant had appeared in the snow cover. In truth the board had actually been stripped back completely earlier in the year, the track relaid using Roco sleepers/secondhand rail and even painted and weathered with a non-winter scene in mind. After adding corrugated card around the outside and in the centre I had lost interest again...

With filler to hand I soon found myself carefully filling in around the track. Taking my time, rather than rushing as I had before. I actually filled outside and inside the rails in separate sessions, and split the work into small manageable chunks rather than trying to do it all at once, which I felt helped keep control of the filler. I also tried not to create the final finish on the first application! Between the rails an extra layer was added, a mix of the filler and PVA effectively skimmed on and cleared from rail sides. After a little cleaning up I was relieved that it still worked!

With the track embedded I added the bases of the roadway and platform from card, and created the raised central area from polystyrene, subtly different in shape to the original. New features on the Mk2 version are some rock faces made some time ago using Plaster of Paris in improvised foil moulds, and a Wills station halt shelter, left over from the 'Humberston' diorama. Don't panic about the black blobs, they mark where the trees go, marked in felt-tip pen and then wetted during scenic treatment. In the background of the picture above can be seen some early trials of snow mix using Vallejo Foundation white and the new filler.

The Wills shelter has had a few tweaks to make the parts sit a little more comfortably and give the impression of framework over the doorway. The original station sign and bench should sit to the left. Platform edging is very thin balsa, overkill maybe as it will be covered in snow, but the original build lacked relief in this area.


One of the plaster-cast rock faces. This has been blended into the polystyrene landscape using some white modelling clay that had originally been bought to bed in the track, but was not shall we say the market-leading brand and seems to shrink quite a bit, causing me to go back over the gaps a few days later. It will all get a covering of snow in due course! To hold everything together all exposed polystyrene and some of the clay was covered in strips of kitchen towel fixed in place with dilute PVA.

So far so good, the next job is going to be to create sound fixtures to plug the trees in, I'm thinking of cutting into the polystyrene to add pre-drilled wooden blocks that a dowel in the tree base can locate into.

Just in case anyone thinks this is madness in September, I'm enjoying doing it with time to spare and better conditions for things to dry out. I'm also fairly certain I can be finished in time!

Colin

Saturday, 4 September 2021

Neptune at Ninety

A week away in North Yorkshire gave the opportunity to visit Scarborough's North Bay Railway in it's 90th year. Journeying from our holiday park by a combination of buses and cliff lift, we found 1931 'Neptune' operating services as it had for all that time, with only a break during hostilities. The second train was operated by 1932 'Triton' as it had done for 89 years, apparently I had missed seeing relative youngster 1933 'Poseidon' in operation by a day!


As well as celebrating it's 90th anniversary, 2021 sees the North Bay Railway with a new operator, the operating company changing hands to common ownership with the Cleethorpes Coast Light Railway. One interesting development is commitment to the line's pioneering diesel-hydraulic motive power and the sale of the new-build steam loco 'Georgina'. Director John Kerr kindly let me take a quick peek in the shed area to view 'Robin Hood' and 'Poseidon', which now looks a closer match to the original locomotives after much hard work by the Scarborough team.


Services are running daily until the end of October and are "turn up and go", no need to book and trains can be joined and left at ether end of the line.

One interesting thing that came to light after my visit was that there is a model of the North Bay Railway being documented on YouTube. I am not sure of the scale but it uses 9mm gauge track and Dapol A3 Pacifics and is quite convincing, this is just one of several videos on the channel of Harold Thompson - one to watch...


The photos from my visit to Scarborough on 19th August can be found on Flickr - Scarborough NBR.

Colin


Thursday, 2 September 2021

Imposters - Spot the Difference

The two 'imposter' wagons seen in the last post are now completed and painted in grey primer. Since the last pictures I have added some simple hinge details, securing pins for the drop-doors and dummy link-and-pin coupler pockets.

Despite being to practically the same design, there are many differences in dimensions and details, in fact I'm not sure anything is actually the same!

When time permits and the mood takes me they will be painted up and finished off, but that really needs to wait until work on their potential home is underway...

Colin


Monday, 16 August 2021

Imposters on the Bench

Unfortunately I haven't done much modelling of late, lots of reasons, but the result was that I did find myself analysing my current project (the O9 micro roundy-roundy) and whether I had the time to continue with it, do something different or... who knows...?!

The last few weeks have seen a glimmer of hope and a couple of weekends ago I found I had time to sit at the workbench and actually build something. I opted to build another 3-plank wagon based on the one I had completed in January, a nominal 5ft (scale) long wagon with Grandt Line hinges on 3-plank sides. Of course I then decided one wasn't enough so started a second, and to give some variety this is a little bit longer. Detailing is still in progress with the end stanchions yet to be cut back and shaped.


One of the things that test running the new project had revealed was that trains formed of multiple Black Dog Mining based wagons tended to wobble a bit, especially if propelled. Some might say this is ultra realistic but to me it is a bit distracting (remembering that I abandoned using KB scale Hudson chassis for a similar reason). With that in mind for the first wagon I cut up a Peco N gauge 10ft chassis to a 14mm wheelbase and disguised it with Black Dog-style axleboxes, modifying the set I had made last year to try and add to a damaged Hudson frame. Hence this is the first imposter! The second wagon retains the 20mm wheelbase and has steel channel solebars, where there was space to add genuine Black Dog axlebox castings recovered from a broken chassis. An imposter in the sense they are not functioning... Both have weight added in the void between Peco chassis and floor.


The eagle-eyed might spot that there are no cut-outs for MicroTrains couplings on these builds. This is again in reaction to test running, as in order to avoid any accidental uncoupling events, I have opted to use MT couplers at the outer ends of rakes only, within rakes simple loop and pin couplers will suffice. Both new wagons will therefore be loop and pin only.

This leaves a few modifications to do to existing vehicles. I might have over-thought this, but in order to maintain consistency between vehicle ends I wanted couplers that bore a passing resemblance to the MicroTrains box at the other end, which luckily, if you squint, do look a bit like link and pin coupler blocks on real 15" gauge wagons. So out came the styrene and I had a play, having no 5mm x 3mm section wasn't as big an issue as I thought as I fudged up my own from 5mm x 5mm that had already been cut in half lengthwise... More imposters were born!


From left to right:
  • Initial experiments based on MicroTrains 1015 (L) and 1023 (R) coupler boxes. These were actually OK, but the 1015 style one then went on for a bit of further development.
  • Refined 1015 and 1023 boxes. The 1015 (L) now has some 3.2mm channel as the coupler face and whilst maybe not as close as the initial version, I concluded that this could be replicated on the new-build wagons easily. The 1023 (R) has some additional section down either side to reflect the additions I had already made to disguise the actual coupler boxes on some stock.
  • A stand-alone coupler for new-build stock fashioned from 3.2mm channel, one of 5 made for the new wagons. Externally this and the 1015 substitute will look consistent. 
After that burst of activity there will probably be a bit of a lull until I get any more work done, but we shall see... 

Colin


Sunday, 8 August 2021

Getting on the Right Track

I've spent some time over the last few weeks making little tweaks to the Julian Andrews inspired micro layout as and when I've had time. Inspired by a discussion on the NGRM Online forum about how track looked (as a reaction to a piece by Iain Rice in Model Railway Journal), I revisited the sleeper spacing on the 'main line' around the curve. In order to lose the regularity (if you can call it that) of the Peco track I removed about 5-6 sleepers and respaced the remainder. The sidings had already been through a similar process when laid but I chose to lose a couple more sleepers there, and also to realign the inner siding to make a bit more room for the trees behind.

On one of my lunchtime walks, where I'll freely admit I ruminate about model railway projects, I realised that although I wouldn't have time to do much to this project over the summer, there would be a distinct advantage to getting the track painted during "better" weather. So last weekend I made preparations and sprayed away...


My method was to use Halfords matt dark brown sprayed at the rail sides, then to stand the board on end and a (lighter) Humbrol matt bown sprayed over the sleepers, with a smattering of grey primer too, after the Humbrol can splattered, failed and made a bit of a mess.

It did all look a bit of an unhappy mess for a while, but it was only ever intended as a base. A couple of evenings tinkering with acrylics added some slightly rustier tones to rail sides and dry-brushing the sleepers with some woody tones. A recent article in the NGIRM Review on track is also worth reading with regard to how nature interacts with the permanent way so there will no doubt be further adjustments once ballasting and scenic treatments begin, whenever that might be... 

Colin

Saturday, 17 July 2021

A New 15" Gauge Seaside Locomotive

An interesting new prototype for an O9 model was revealed at the Cleethorpes Coast Light Railway today, on the 73rd anniversary of opening of the first miniature railway at the site.

This brand new 15" gauge diesel locomotive has been specially built by RVM Engineering of Hastings and has seemingly evaded the camera of visitors to the Hastings Miniature Railway for some time (yes, I've been searching...). I'm sure Hastings will be glad to get the shed space back! 

Photo: CCLR

At first glance it screams out to be modelled in O9 using a Farish '08' chassis, I aim to get confirmation of dimensions to see how feasible this would be. Even a version on a Kato chassis wouldn't be too much of a stretch of the imagination...

I have been aware of this build for a while, largely through a CCLR Director making a comment that my MG Models 'Classic' diesel looked rather like something else they knew of. You can see the resemblance in the lines of this new design around the bonnet and cab front windows.

Clearly like model locomotives the choice of coupling is to be determined by the purchaser and they have no doubt got an order in with a lifesize Narrow Planet for nameplates!

Colin


Sunday, 11 July 2021

Reet Petite

I've been playing again with mock-ups for the Julian Andrews-inspired O9 scheme. The building represents Petite Properties 'Harpers Yard' with a little extra depth added. I've liked the look of this range of structures for some time and in particular I was impressed with the effects that Michael Campbell had achieved with them in 4mm scale on Loctern Quay.


The manufacturers website says this structure is 17.5cm wide and 20.8cm tall but I could not help feel those dimensions were transposed as it scales out the other way from the photos, and the dimensions of the 4mm version are shown wider than it is tall. Through a request on the 7mm NGA Facebook group Ian Leese kindly confirmed the dimensions as 18.5 cm wide and 15 cm tall, so I could dimension the image of the front accordingly. I must also thank Simon Andrews as he confirmed the doorway height at 49mm so there may need to be an adjustment to get some items on O9 stock through.

I think the next adjustment might be to the inner siding, bringing it closer to the inside of the curve to give more space for the tree... we shall see!

Colin


Sunday, 27 June 2021

Moving on from Paper and Pencil?

It's four months (yes really) since I last posted my thoughts on the scenic treatment for my O9 interpretation of the Julian Andrews brickworks plan. Since then there has been little creative thought about the project until this week. In fact there has been more thought on alternative schemes but they have all drawn a blank...

There are a few items that I wish to use on the project and in some ways these are either driving or stopping my thoughts on how the scene should look. One of these is a photograpic backscene, and I was having a few thoughts that this could be overpowering to the scene, especially compared to my usual "restrained" style. To test how it would look I downloaded the images of it from the internet and resized them to full size and then printed in draft, temporarily mounting them on a spare piece of ply. With the addition of new dummy foreground trees, better representing the two Skale Scenics examples I wish to use on the project, this doesn't look too bad. 


My attention then turned to the grouping of buildings on the right hiding the return curve. As mocked up this is the building shown last time (based on one I built a few years ago) with a modified Airfix/Dapol water tank behind. This didn't look quite right, to me it looks too obvious that the line can curve through the structure. But what if the building moved back and the track entered a lean-to at the side? There would be enough of the main building wall visible to trick the eye, as in the first sketch.


Wishing to incorporate the water tank and break the roof line up a little I created the second sketch, turning the main building roof through 90 degrees. The lean-to would have a more varied roofline where it leant on the water tank supports (brick piers would replace the kit pillars). This would have to be one carefully planned, removable structure but I think it is a much better trick on the eye to hide the return curve.

I even have a potential prototype for part of the structure, this field shelter at Hall Farm Park in Lincolnshire. I would envisage it repurposed as a small workshop, perhaps with a Land Rover parked half in/out. 

There is something to be said for keeping the structures simple, I am yet again reminded of Neil Rushby's 'Isle of Avalon Tramway' (seen here with a later owner) - the simplicity of the structures hiding the sector plate on the left is very deceiving, there is little actual detail but interest is created by shape and colour. 


Thinking cap firmly on...

Colin


Monday, 17 May 2021

Big 'Keef at Beck Bridge

Salty Seagull looks on as the Keef K30 poses on a Kato 11-109 chassis giving an idea of how this loco could look if used in O9...


With a few tweaks and extras such as the front grille, bufferbeams etc it would make a quite passable O9 loco, certainly for a modern tourist line. In freelance form, not trying to claim it as a genuine Keef product you could perhaps try a different power source, such as a Bandai short bogie chassis or even the Farish outside framed 08.

Colin


Sunday, 9 May 2021

Big 'Keef

I received this new Alan Keef K30 print from A1 Models a week or so as John Flower felt that it might be suitable for O9 use. With a few provisos it isn't bad for a maximum-width O9 loco, 28+ mm wide and 43 mm tall when sat on a Kato 11-10. In fact I think my green Knightwing bash might have been a similar size a few years ago. 

It is difficult to see in the pictures in raw form that it is print with a rough finish (it is incredibly difficult to photograph in this form too!)

I thought I would show the stages of finishing the print to a ready-to-paint state. Firstly the raw print was bathed in white spirit to degrease, then washed, dried, and the surface sanded with 400 grit. Then washed and dried again.

(Note: All sanding used home made sanding sticks  made using wet and dry stuck to lolly sticks/coffee stirrers and was carried out wet.)

Red plastic primer was sprayed onto the model - this tends to highlight the surface and the print looks really rough and gritty.


More sanding followed, this time 800 grit sticks, then washed and dried.


A coat of yellow filler primer were applied, then another sand with 800 grit, revealing that a second coat would be beneficial. 


After the second yellow coat I sanded with 1200 grit to the state seen here. Washing and drying occurred again after each sanding session (of course!).


Finally, grey primer has been applied to my satisfaction, giving a smooth finish with only a few minor imperfections. I have managed to achieve this with no loss of detail on the print, luckily it is mostly flat surfaces and angles, with no fine detail.


In all I think about 3+ hours of work went into finishing this 3D print to this state, broken up over several evenings and waiting for paint to thoroughly dry before sanding. I ask myself if I could have built it in less time from scratch, and no, I couldn't.... at this stage I think that it may stay in grey primer, it isn't really the locomotive I need at the moment, but at least it is making me think about what is...

Colin