Showing posts with label The White Rose. Show all posts

Sunday, 5 February 2023

January Jumble

January has turned out to be a month of finishing off and tinkering. I've already shown the completed tramcar, and sneak preview of the A1 Models 'Albert' can be seen later in this post.

When I swapped it's place in the display case for the tramcar, I re-evaluated how I finished off the bufferbeams and couplers on 'The White Rose'. I was never quite satisfied with awkward L-sections either side of the couplers, so these areas have been carefully reworked with a deeper bufferbeam and sweep-downs at the ends of the side frames, taking cues from Trevor Guest's Dudley Zoo Bo-Bo, now at Windmill Farm. 

This work was carefully completed around the existing paintwork and the new paintwork varnished and blended into the existing finish and a touch of weathering to complete. Couplers were refitted and I am happy with the overall result, still very much a 1960s machine in the latter stages of life!


Having found myself struggling to find anything I wanted to "build" whilst the paintwork on other projects was being completed, I eventually found myself making some changes to a wagon last seen a year ago. At first glance not a lot has actually changed... but I'll give you a clue, the main noticeable difference is the longer wheelbase...

This model was originally built on a Black Dog Mining 6ft chassis frame, however I had noticed that it had a bit of a wobble, more so than usual for these chassis. Separately I had been coming to the conclusion that for layout use where shunting and uncoupling were required, especially with MicroTrains couplers, my wagons with Peco chassis were actually the better performers. So this wagon has received a Peco underframe disguised with a scratchbuilt styrene underframe 'surround' with Black Dog style axleboxes hiding the N-gauge ones. Built and painted away from the body, I was able to get a close-enough colour match of the timber shades. 

Although the official line is that I still don't "do" paintshop progress pictures, at this point it was only really short of a coat of varnish/lacquer so I thought I might as well share it...

The green (Citadel 'Moot Green', brush-applied) is of course based on 'Rachel' at Cleethorpes as pictured in an earlier post, although the shade is perhaps a little darker. The model is now varnished and finished and will be seen in more detail in a future post.

Colin


Sunday, 16 October 2022

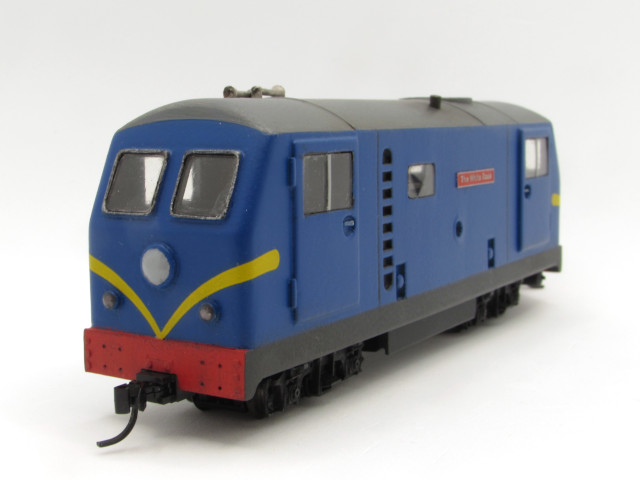
'The White Rose' is Revealed

A vintage photo of a 15" gauge Bo-Bo diesel 'The White Rose', mid to late 20th century, location unknown...


I can now reveal the completed A1 Models 3D printed diesel. Why the name? Well 'Royal Anchor' was named after the pub where the workshop it was built in was located, and this name sounds like of could be the name of a pub. Of course the loco isn't actually white, but neither is the Curwen diesel 'The White Heron' at the Stapleford Miniature Railway...

I last illustrated this prior to going onto the paintshop and it has been a slow process to get it through to the finishing point. The main body colour was sprayed using Halfords Rover Tahiti blue, which was left for a good week or so to dry in order to avoid any masking mishaps. The bufferbeams were masked off and painted with Vallejo red, similarly the roof in London grey and the solebar in black-grey. As can be seen I chose to paint in the curved join between the blue and grey on the cab front, achieved using masking tape cut against a template.


I painted the window recesses in matt black and picked out the frames on the front windows in silver, which looks a lot untidier in the pictures than reality. Headlights were picked out in light grey and the tail lights in a dark red. The yellow chevrons are Dapol railbus transfers, applied with plenty of Micro Sol and Set, then varnished with Johnson's Kleer to protect them prior to the final varnish coat of Testor's Dulcote. I say coat, it was several coats as the first (from an old can) went on a bit patchy, leading to me starting my final can... Again I left the model for a week after this to dry thoroughly. Once dry the lights had Araldite floated on as lenses and I started the tedious process of glazing the windows with individual panes.


Looking down from the roof the fan grille can be seen, this was added during painting, as the recess below had to be painted matt black prior to fitting the grille just before the roof was painted. Despite the many coats of Dulcote the roof had a slightly speckled appearance so it has had a slightly heavier dose of weathering than I might normally give a miniature outline locomotive. But miniature railway locomotives do get dirty! Air horns are old whitemetal castings from a very old A1 models packet and the nameplates are also A1 products.


Taking these photos did reveal a window that was not in position properly, which has now been corrected, and there are a few areas that really do look worse in close up than reality! But generally I am happy with the result although the jury is still out on using a chassis with a shorter bogie wheelbase than intended, that could be revisited in the future if required.

Colin


Wednesday, 31 August 2022

Pushing the Bo-Bo towards the paintshop

In my last post I left the MicroTrains coupler hanging below the bufferbeam of the A1 Models 'Royal Anchor' look-alike, looking for a way to make this look more realistic. My initial thought was to use an extension plate to the centre of the buffer beam, based on the arrangement of ex-Fairbourne 'Rachel' (left below). However in practice this did not look so good with the chunkiness of the MT coupler box. What was desirable was something more like ex-Fairbourne 'Katie' in Haigh Hall/Cleethorpes condition (right) where the angle-sections remained from former Fairbourne arrangement of "cow catcher" either side of the coupler.


One problem, I had no Plastruct 'L' section and slicing it up from channel did not look right. I was also concerned that plastic section here would be quite vulnerable during construction and painting and could snap or just become unstuck from the brass bufferbeam. Make that two problems, I had no brass 'L' section small enough either. After some rummaging I found some brass fence posts, etched with a join down the middle which would fold nicely to 'L section of about the right size. If only I could have soldered them to the bufferbeams before I glued them to the loco, that would be super-strong! Oh the benefit of hindsight... However, what I could do is solder them to a backing plate the of the same strip as the bufferbeam and glue that in place, giving the advantage of a greater glued area. It was a fiddly soldering job but I got there in the end (inset).


One of the completed coupler units was offered up to the loco and I was pleased with the result. This did however show up that it really could do with is some empty boltholes for the other bits of ironwork and where buffers may have once fitted.  I made up some templates to allow marking and drilling of the brass but this was proving very difficult to make it look how I saw it in my minds eye.

After some thought I cheated and made up 5 thou styrene pre-drilled overlays and superglued them in place. Job done! I also added tiny bits of Plastruct hex rod to the brass angles to emphasise what might have been bolted in the holes. By the time this photo was taken I had blackened some of the exposed brass areas ready for the painting stage


After a wash down I then applied a light coat of primer to the body. As I suspected it might this revealed a few areas that need attention before moving on. Also, a little nagging doubt started to form, was I really happy with those curved lines over the windscreens? I started to delve deeper into 'Royal Anchor', because whilst I wasn't actually modelling her, most of the inspiration was coming from that direction. It started with looking at liveries, from the original two-tone grey with red trim (very 50s!); R&ER dark blue; and the various schemes work at Carnforth, such as two-tone green. What was clear is that the line on the drawings that I had scribed into the body was just the paint line of the R&ER livery and was not there in reality other than perhaps being the point the curvature started.


As I was not really happy with the way the lines had turned out this prompted me to fill the "furrowed brow" and once smoothed out re-apply the primer. I now have the freedom of choice between a curved paint join or straight across as per the Carnforth repaints. I then masked up the bufferbeam areas and sprayed them with red primer to give a base to the bufferbeam red in due course. This is a bit rough around the edges but will be lost in the final paint job.

As per my usual rule I don't generally take photos of paintshop progress, so you may have to wait for the next update!

Colin
Saturday, 27 August 2022

A firmly 'Anchored' chassis frame

Although I have the Bachmann chassis that the A1 Models diesel is designed to fit (in my case a U36-B) I have opted to instead use an Atlas GP7 chassis to power the model. This is a slightly more sophisticated chassis and has a smaller die-cast section and allows for a figure (of sorts) to be represented in each cab, whereas the Bachmann chassis would only really allow something at one end. This particular chassis was previously used under my original Dapol railbus loco conversion and it was still in the chassis frame from this era. This proved useful as a blueprint for the new frame that would be required for the A1 body.


The new unit is largely 40 thou styrene, reinforced with Evergreen strip where required. Through careful measurement it and the original clip onto the Atlas chassis block using four dimples drilled into the inner sides of the upright sides. Between the bogies I have added a section that hides the fuel tank area of the chassis but also reflects the design of 'Royal Anchor'.

I found two suitable figures to sit in the loco, they had to get head and shoulders within the width of the chassis upright as this slots into the A1 Models body (there are substantial strengthening ribs along the bottom edge). The figures are actually glued in place as they will only get require minimal painting to give an impression of colour. The chap at this end looks rather bored, he must be awaiting the right-away!


Having been reminded by an observer of the absence of any Dapol kit parts so far in the build, I delved into the railbus and drewery shunter bits boxes in order to maintain this tradition. Space constraints ruled out my initial thought to use the part from the railbus kit that represent the side of the engine block, visible through the side window. I considered Drewery shunter vac pipes but in the end I resorted to a railbus air tank under the bufferbeam at the far end and a box of some sort at the the closest end. 

The next step was to make provision for MicroTrains couplers. As luck would have it the bottom of the bufferbeams is 7mm from rail level, and there is just enough material to drill a 1mm dia hole to screw the coupler into. There is just one problem... it looked tacked onto the bottom of the bufferbeam!


This would take some thought to resolve, we shall see how next time.

Colin

Sunday, 21 August 2022

A new spin on 'Royal Anchor'...

On return from a week in Scarborough I cast around for something to do model wise, and my eyes fell upon the A1 Models O9 3D printed Bo-Bo locomotive I had completed the initial preparation work on some time ago. Although clearly based on the former Ravenglass/Carnforth locomotive 'Royal Anchor' I wanted to put my own spin on the model. I had discussed this model with John Flower at the Mansfield 009 Society members day and now had a clearer idea of what I might like to do to it.

A reminder of how it looked...


The first job was to get a little drastic with the windows. This is not as drastic as I had initially envisaged as I had pondered creating a single windscreen with a slightly curved top edge, reminiscent of the former Dudley Zoo Bo-Bo machine prior to rebuilding at Cricket St Thomas. I think it would be do-able but I am never sure just what modifications a print will withstand so as it stands I have just opened out the cab front windows to loose the chunky surrounds. Each window is perhaps only 0.5mm bigger each way but it does change the look a little. The wobbly dividers in the door windows have gone and will be replaced when the glazing is installed. The body side windows have lost their frames completely with a resultant colour patch where sanding down has occurred. The circular opening (fuel filler?) has also been reduced in the same way.


The biggest change is the new bufferbeams. John admitted that he had totally forgotten to add these to the design. Brass etch waste 3.5mm deep was Araldited to the bottom of the cab fronts and once set I scored a line along the bodysides at a corresponding height to represent the rest of the underframe. This line was deepened and neatened using an Olfa-style cutter. Two vertical panel lines were also added to the bodysides, all corresponding with 'Royal Anchor' despite this not being a model of that machine. Milliput was used to fill the corners behind the new buffer beams, being brass these exposed corners are now very robust.


Using a template (actually an old A1 Models cab etch) a line was scored above the windscreens, which will eventually be the colour join between cab front and roof colours. Again this follows 'Royal Anchor', but helps break up the large area above the windscreens, which was in danger of looking like a slimline Metro-Cammell DMU! Above this line I have smoothed back the join between front and roof to a more rounded profile.

There are still a few details to add, such as door hinges and some roof detail, but at present I am concentrating on getting a chassis under there, which isn't going to be the Bachmann one the manufacturer envisaged...

Colin