Sunday, 23 April 2023

'The Headshunt' - Taking a Trick-Shot

As alluded to in my previous post I have been considering the design of a new diorama to fit in a small photographic lightbox. Although I like that design, over the weekend I had a little play to see if there is an alternative, involving the recently refreshed 'The Headshunt'. 

When taking the most recent pictures of 'The Headshunt' I had been working in the shed with a basic LED strip light, but for the background I had used a large matt white plastic photographic sheet that my wife had picked up very cheaply. In the past I had always photographed this diorama on my desk using my standard desk lamp and whatever was to hand as the background, so the thought occurred to me that the sheet might be useable in the same way. The experimentation began... this is the set-up used, with a bonus glimpse of the new storage box being used as a height booster.


A pretty standard 3/4 shot. This is very satisfactory but I must trim the longer grass strands!


The awkward reverse-shot. Pleasingly the new grey edging is almost invisible in this and the next shot compared to the old black strip. My thoughts were turning to ways to reduce the white space, wondering if standing a carriage there might be the answer. 


Looking down the line. An anecdote from the rebuilding process is that I managed to snap the point lever during the work, hearing it ping across the shed never to be seen again. A new lever was found and colour matched to the original base.


The next day I thought I would try out the carriage trick for a shot pointing to the left, I think this works rather well and I'm baffled why I have never thought of it before!


This led to a further thought (dangerous, I know...) of a 'prop' of a half-coach that could be placed at the far left, and in combination with a couple of figures posed in conversation could "fill the gap" in photographs without having to have the coach right up against the subject matter. 

Overall I am very happy with the outcome, although I may try using a bit of one of the free Railway Modeller backscene pieces as a further trial in due course.

Wednesday, 19 April 2023

Developing a Diorama

As I have mentioned when describing recent changes to my diorama The Headshunt I have been trying to create a new photographic diorama that can be used within a small (12" x 12") lightbox. There have been a couple of false starts to say the least, however the work carried out on the older diorama has created a renewed interest in getting the job done...

I had conducted a little experiment with one of my 70mm deep scenes, just to see how it would work on camera, and in all honesty with a bit more depth it could work. However what this shot does highlight is how any such scene needs to have a fairly solid back piece (wall/fence/hedge) to really work, and the problem of how to treat the area where the track goes off the edge of the scene.


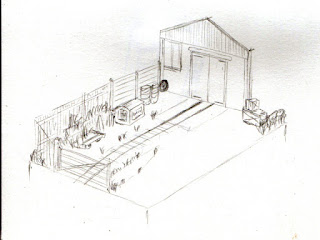
So the thought came to me that if there could be a building over the track at one end, and maybe a gate at the other, with wall or similar in between, an enclosed photo 'set' could be created. The idea in my mind was that it was some sort of workshop overhauling miniature railway stock, recalling photos of Fairbourne Railway locomotives outside Trevor Guest's workshop at Wollaston. 

Having located some of these in John Milner's 'Rails Through the Sands' I briefly fell into a rabbit hole of research, as I tried to find out a little more as there were two distinct buildings pictured. Luckily an article by John Tennant in 'The Narrow Gauge' no. 238 (Summer 2016) identified that there were two buildings in use, the 'bottom shed' and newer 'top shed'. They can both be seen in RAF aerial imagery from 1961 hosted by Historic England - Guest's yard is in the triangle of roads towards the top-left of the image. I adapted what I now know as the 'top shed' as the basis of this sketch.

The sketch reveals a host of background junk, and how by leaving the front third of each side clear, maximum camera angles are available in a small space of 8" x 6". In order to try out the idea I built a quick mock-up in the medium of cereal box and double-sided tape and placed it in the light box to try a few photo angles.

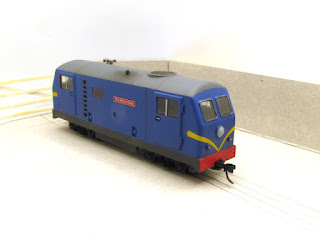
Generally speaking the concept worked, and a few trial shots resulted from different angles with a couple of locos used for the test shots. The grey and white makes balancing the images rather fun but that would not be an issue with a fully-developed scene. There is also the possibility of adding a temporary backscene piece behind the wall rather than relying on the lightbox.

There was a slight concern though, one that is not so apparent in the picture above... Although the lightbox kicks out an impressive amount of light, the further forward an item is the more the foreground starts to get into shadow. So when I used a slightly larger loco in the box, the front end isn't quite as well lit as the rear. I had encountered a similar issue on a couple of occasions that I had used 'The Headshunt' in the box end-on (not the greatest of ideas!).

So I had an idea, what if it cut the back two corners of a scene at 45 degrees? Prototype number two was therefore assembled from leftover cereal packet card.


This way the scene can be pushed further backwards into the light box and the front of a longer loco should be better lit. A Slaters gate makes a special guest (no pun intended) appearance here, as I only have the one of these it would have to be removeable to go at the end where it needed to be in the background.

The result is that there does appear to be an improvement in the lighting of long-loco shots. In this view the section of wall in the centre is up against the back of the light box.

The downside to this idea is that it does away with the workshop building, but it then occurred to me that there is actually a possibility of doing the 45 degree cut at just one end and having the best of both ideas...

Colin

Friday, 14 April 2023

A bit of work down 'The Headshunt'

Those with long memories may recall that last summer I had intended to give my larger O9 diorama 'The Headshunt' a scenic makeover, but in the end carried out a similar exercise on my 009 layout 'The Old Quarry Line'. Fast forward to March this year, and frustrated with my lack of success with a new photographic diorama to fit in a small lightbox, I decided to revisit my planned work on 'The Headshunt'. Firstly, a reminder of how it looked...
 

As well as needing some new scenic work, the other thing that was really troubling me was the heavy black surround in 5mm ply. This particularly looked awful at the left hand end where it crossed the track and platform. So I carefully (with a mallet and heavy-duty scraper!) removed it. Nothing fell apart so the front strip had similar treatment, leaving everything a little vulnerable until they were replaced. The replacements are from 3mm ply, gently rounded on the front upper edges to reduce their impact, and are also about 1mm lower. Painted grey rather than black they no longer dominate the diorama.


The two holes in the new front trim are an indication of another long-envisaged aspect of the rebuild project, as they are securing holes for a ply/hardboard cover to protect the scene in storage. 

Within the scene itself the new areas of foliage can be seen left and right. As with work on 'Beck Bridge' and 'The Old Quarry Line' these use teased-out coir hanging basket liner, sprayed in two shades of brown, and various foliage mats, stems and other items to create a varied effect. I have also added Martin Welberg tufts and some MiniNature flowers in moderation.


The pile junk behind the headshunt has grown a little, as all piles of junk do... The wagon is a KB Scale Hudson frame with Black Dog adaptor piece, with wooden deck. This was completed some time ago and saved for a use such as this. Adding this led to a rearrangement of the oil drums, which sounds easy but they were very well stuck down! The green one was moved elsewhere and the red/yellow one moved into it's place, it just looked better that way... The more subtle addition is a cab frontspiece on the right, part of an old A1 Models etch carefully painted and weathered.


Overall I am very happy with these long-awaited changes, one advantage of the delay has certainly been the use of the grey surround in place of black, in part inspired by seeing James Hilton's work recently. Working on 'The Headshunt' has certainly kept things going on the modelling front for the last few weeks too. Thoughts have now returned to the new photographic scene but nothing concrete has happened... yet.

Colin