Sunday, 1 January 2023

Highlights of 2022

On the face of it, 2022 seems to have been a quiet year modelling wise for me, at the end of the year it doesn't feel as if there is anything to really reflect on, but as I browse back through the photos I realise it hasn't all been that bad!

The Bungalow

Started in 2021, completed in January, an Airfix/Dapol conversion in 4mm scale built with no real purpose but to 'do'. Interestingly this inspired one of my modelling 'hero's to do a similar conversion, and I'm flatered! I still have it, one day it may feature in a layout or diorama...


The 'Big Tree'

Encouraged by my friend James Wells' work for the NRM's O gauge layout, I reworked my prototype wire-framed tree into a half-relief model with the hope that it would move forward a layout project. Completed in April, it hasn't achieved that but I still have it, awaiting it's moment...


Little Red Number

Restarted earlier in the year from a stalled project, again completed in April, this model of nothing in particular (sorry, The Smiths are playing on the radio...) is one that I am particularly proud of, capturing the spirit of a mid 20th century 15" gauge loco.


'Old Quarry Line' Scenic Re-work

Totally unexpected, as I was meant to be re-working something else instead! I wanted to reuse the scenic materials removed during reworking the big tree and another project, creating new layers of undergrowth and adding another reworked Hornby tree. 


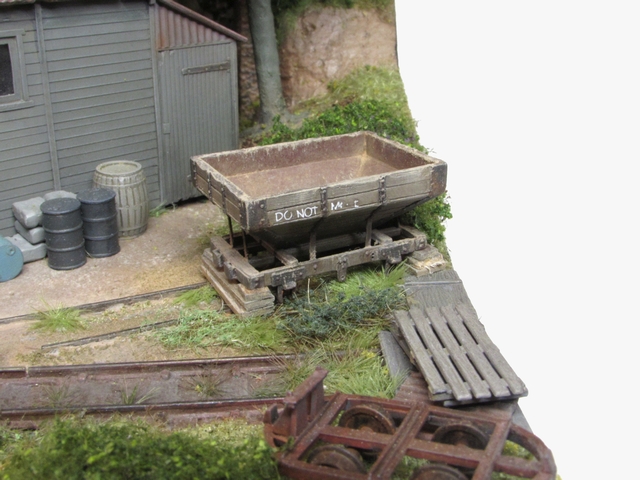
In addition a new dummy siding was added that became host to a much modified Dundas Snailbeach hopper. I completed a running example too, plus a Peco one was received at Christmas...

The White Rose

Having been received from A1 Models back in February, this 3D print finishing project was not completed until October, I have to admit I fell out with on more than one occasion, but perseverance paid off in the end to a satisfactory result, although a few further changes have not been ruled out...


The Tramcar

Another February generated project, but one that had a lot of thoughts and doodles behind it by the time it started. Very much a nonsense project it is currently in the latter stages of assembly post-paintshop, the full reveal will hopefully not be too far into 2023...


Almost 'Albert'

Another A1 Models build but with a lot of changes to better reflect it's inspiration (largely because I know the chaps that built it!). Livery and real name to be determined very soon, watch this space!


There were a few other projects in the course of the year that I haven't mentioned here, including numerous wagons and another tree. But all in all it doesn't really add up to a massive amount of creation. I look on at other modellers rates of production not with envy but awe at what they can output, but have to remember that we all have different circumstances, resources and amounts of time available. I cannot even pinpoint 3D printing as a reason people can produce more, despite those who claim it isn't 'real modelling' (whatever that is), designing the print takes skill and time, and even after printing cleaning up, preparing for paint, painting and finishing still takes time and real skill. I have to admit I prefer other mediums, one of the reasons 'The White Rose' took so long was the 3D print's limitations, but that is a personal choice rather than a prejudice.

In O9 ready-to-run isn't an option, one of the reasons I keep an hand in 009 is that it does allow the odd dabble in "instant satisfaction" and the ability to receive the odd gift of a wagon etc. I'm torn on the Bachmann Quarry Hunslet, I'd really like one, I can afford one but only as a one-off treat. But would it eclipse my Minitrains-based locos that I've put work into to make unique? Decisions, decisions...

Happy New Year to all readers of O9 Modeller.

Colin


Thursday, 22 December 2022

'Albert' in his Prime(r)

The A1 Models 'Albert' was given a good clean up with a fibreglass brush, a scrub with Cif and then dried thoroughly to avoid any tarnishing caused by water drying slowly. At this point the box it was sat in gained a post-it saying "gloves on" to remind me not to touch it with bare hands. 

I'd rather not have thing hanging around in that state too long, so after a couple of freezing weeks the "warmer" weather on Monday did allow me to successfully get the loco into primer, with the usual effect of making everything seem 'as one'.


I am really pleased that the joins around the bonnet front and the top of the sides are all smooth and belie the mix of materials. 

This will probably remain in this state for a week or two now, notwithstanding Christmas and the desire to move the tram along in the paintshop, I need to decide on what colour I would like to paint it!

As activity over the coming days is likely to be limited, this will be the last update before Christmas, so I will take this opportunity to wish all blog readers a Merry Christmas and Happy New Year.


Colin


Thursday, 8 December 2022

Developing the A1 'Albert'

When we last saw the A1 Models 'Albert' build I had assembled all of the provided parts and I subsequently started to consider what changes I wanted to make to the basic kit. 

The first addition was a curved bonnet top, using a piece of 20 thou styrene sheet recycled from an old ice cream carton lid (!) Cut to just oversize and sellotaped to the outside of a small saucepan (whilst no-one was looking), then dunked in a pyrex dish of just-boiled water for a few minutes and subsequently cooled. This way used less water than the more obvious route of the inside of the pan and filling it! A 30 x 60 thou strip of Evergreen styrene down the centre and two 20 x 40 strips at appropriate intervals hold the shape, the whole assembly being held in place with Araldite and subsequently trimmed to size.


On the underframe 40 thou styrene was used to make bufferbeams to fill the gap in the etched part. Openings for MicroTrains couplers were marked and cut out prior to fitting. An 80 x 156 thou strip of Evergreen styrene along the top on the inside both increased the gluing area and will provide substance to fix the MicroTrains couplers to in due course.

After looking at a few more photos of 'Albert' at Littlehampton I decided that I could not live with the front grille arrangement. Whilst searching for some other detail parts for the project I chanced upon an Avalon Line resin grille casting. This was about 0.5mm narrower than the etched grille and 0.5mm taller. With the etched overlay removed (it was only ever tacked in place) and the mesh cut away, I was able to clean up and carefully open up the aperture to take the casting. I backed the casting with strips of 20 thou styrene and Araldited it in place from behind.


Prior to fitting the grille in place I marked up, centre-punched and drilled a hole in the bonnet front to accept a turned headlight, with a similar hole on the cab back. The cab front was drilled centrally for a horn or whistle. 

The next job was to fill all the gaps with Milliput, concentrating on the bonnet front and top of the sides, the bufferbeams and cab corner join and roof edges (to smooth out the corrugations). Once set this was smoothed back and I made a trial fit of the headlights (A1 Models 4mm scale mainline diesel turnings). In the process of fitting the front one I realised the resin radiator wasn't straight or central, so out that came to be refitted and refilled. I then added an exhaust from brass tube and some bolt detail to the bufferbeams from styrene rod. I had intended to replicate the prototype's buffers but opted not to in the end.


Further work on the chassis has included adding a rudimentary bench seat at the back of the cab and a coupler pocket arrangement in each bufferbeam to secure MicroTrains 1015 couplers. This involved removing the section of bufferbeam under the opening and replacing with 40 x 100 thou styrene, as the screw hole is centred only 1mm from the bufferbeam face.


At either side of the underframe I had previously Araldited some chunks of styrene, onto which I have added air tanks from the usual sources of Dapol Railbus and Drewery shunter kits. Additional strips of styrene help centre the Kato chassis, although this will need to be secured with double-sided tape after painting.

Progress has reached the stage where it is agonisingly close to being ready to paint, but the weather is not favourable to getting out to the workshop to do so - and the prospect of having to turn the heater on! A further delay here may be caused by the tramcar and its accoutrements currently taking up the  paintshop 'bay' and paint stands...
 

Colin


Friday, 18 November 2022

Building an A1 'Albert'

Back in July John Flower from A1 Models handed me his latest etched O9 kit, based on the locomotive 'Albert' of the Littlehampton Miniature Railway. Although now 12 1/4" gauge this locomotive was originally 15" gauge, built at Windmill Farm in Lancashire, started by Craig Gluyas and completed by Dave Madden and Austin Moss. The kit certainly captures the style of the loco if not all the details and fits on the Kato 11-103 or 11-109 chassis.

This is the etches as supplied, John had only etched four doors instead of six on the main etch so two extra were supplied! An etched chassis frame is supplied, I think this is from an existing 009 Kit. The purpose of the four rectangular pieces top right was a bit of a mystery at first (I had no instructions), but I eventually fixed them to the chassis to locate the bonnet and cab units.


Having folded up the bonnet and cab parts I opted to remove some of the tabs intended to make assembly easier - although well intended and perhaps helpful to anyone using an adhesive for these joints, they made the fit of the bonnet front awkward and the cab roof did not sit correctly at the eaves. The bonnet front was soldered in place inside the sides/top and the cab joined in the corner, having added a length of scrap etch to pack out the join to keep the dimensions of front and sides equal. The cab roof was soldered in place, aligning it correctly took some time due to the etched ridges underneath just being in the wrong place!


The etched grille on the front had distorted in the heat of the soldering iron, but that was a minor issue really. At this point I took the photo above and shortly afterwards spotted my "deliberate" mistake... I had soldered the whole front panel in upside down!

This was promptly rectified before moving on to the next stage, adding the bonnet side grilles/doors and cab doors. These were fixed in place using a thin coating of Araldite in two sessions, one for each side, in order to avoid disrupting one side whilst working on the other.


I have temporarily added the other grille mesh in front of the chequered mesh, temporary as I have identified this as an area that I may wish to upgrade, not least as it seems to float in the space, and also because the real locomotive has a different style of front grille altogether.


I had to do a bit of cleaning up around the cab doors to remove excess Araldite, there is only about 1mm either side to fix to so a bit of spread under the edges was inevitable. I moved the door up as far as I dared so there wasn't a huge gap above it, overlapping by about 2mm at the top and less than 0.5mm at the bottom. The kit can be built with one or both of the doors propped open at 180 degrees and some cab interior detail, it would seem the real loco often runs in that fashion at Littlehampton.


As well as the grille upgrade I plan to add a shallow curved top to the bonnet using 20 thou styrene and some supporting strips. It cannot curve too much due to the cab front windows but should give a better impression of the prototype it is based on. I will also be adding bufferbeams and a few underframe details to finish the model off.

The kit can be purchased on A1 Models on eBay.

More soon...

Colin

Thursday, 10 November 2022

Tramcar Roof Refinements

Having added the nicely curved bulkhead top pieces to the body of the tram I realised that something similar but smaller was required under the roof, both to align with the end of the carriage sides and at the end of the overhang. More pieces of 40 thou styrene were marked out, using the template made from one of the old bulkheads for the top and an A1 Models etched cab front for the bottom. These pieces were then fixed in place, carefully measuring for the inner ones. I also added a strip of 30 x 60 thou styrene over the balcony openings to give some substance the imagined framework.


With the roof in place the effect looking upwards is that there is a frame under the roof holding it all up... However the ends of the roof needed some attention to give the impression that the roof is formed from a thinner material than the edge of the Dapol moulding.

With the roof ends filled with Milliput and smoothed back once set, a strip of 15 x 20 thou Evergreen styrene was carefully glued into place (along the 15 thou side) following the curve of the centre section of the roof. Left overnight to set, the following day this was softened with solvent and gently curved around the roof edge profile. Left to set again this was trimmed to size and more Milliput added to fill the join between roof and extension. Smoothing off followed once the filler was set and a little shaping of the bottom corners finished off the job. 


With the roof pieces in place the next job was to add the headlights to the front dash. These are Details West mouldings (LT 1015) designed for an HO scale EMD machine but work just as well in O9. Being clear plastic they don't photograph well... They have separate lenses that will be fitted after painting, one thing I had not realised is that there is no back to the headlight moulding hole so I have subsequently added Araldite as a filler so that the plank effect does not show through.

The holes for the door handles were drilled into the side using a 0.7mm bit and opened out a touch with a cutting broach, to suit 7mm NGA door handles, to be fixed after painting. With all parts in place we might be ready for a good scrub down and a trip the paint shop

Colin


Monday, 7 November 2022

For England, Fourdees...

Some years ago now I looked at a drawing of a Ffestiniog Railway 'England' saddle tank and wondered if a 15" gauge version was feasible, along the lines of the Fairbourne Railway's Darjeeling style 'Sherpa' and Ruslip Lido's 'Mad Bess', itself based on the Ffestiniog ex-Penrhyn Hunslets (let's not get any ideas about that new Bachmann model!).

Thanks to a new entrant in the O9 market I can wonder no more...

Photo: Fourdees

Fourdees have become an established name in the 009 market offering a range of finished 3D printed locomotives and more recently kit versions based on their older models and also taking opportunity of new chassis such as the Bachmann USA 'Peter Sam' and Kato/Peco FR England. This new O9 model uses the latter chassis, which has a saddle-tank filling weight that sadly reduces the opportunity to build much else on it (although Fourdees do have some interesting 009 variations for it).

The coaches in the background are also new kits from Fourdees and despite being freelance have a real feel of 15" gauge stock, and come complete with Peco coach bogies/wheels and couplings. I can see these being very popular and those brake pipes look superb! 

This is all very encouraging for those wanting to model 15" gauge railways in 7mm scale. Sadly my current stance is that I have enough stock to be going on with (especially with 'Shifting Sands' in storage) and like many 15" gauge railways limited investment funds... I have however ordered an another nifty Fourdees product - a static 0-4-0 chassis designed for their England models, but equally useful as a basis for a scratchbuilt loco for display or diorama use.

Fourdees products can be purchased via their eBay store.

Colin

Thursday, 3 November 2022

Tramcar Tribulations

Time to catch up with the O9 Tramcar project. The Milliput around the joins has now been smoothed back, most noticeably on the fake clerestory on the roof. I was then able to add the resin sides to the plastic superstructure, fixing one side at a time using Araldite, clamping along the bottom of the sides to get a firm bond and to straighten out any warping in the resin parts. 

Whilst the Araldite was out I created an impression of handles on the controllers and brakes by creating a blob using the end of a cocktail stick, they are not perfect but should look OK once painted.


Sadly the more I looked at the tram after taking this photo the more something did not look right - Trying to tie in the bulkheads with the window dividing bars was showing up a discrepancy between the two bulkheads and the more I looked some of the bulkhead window openings appeared wonky and I had doubts about the squareness of the whole thing in places. 

So I took the sides off, and re-fitted them, but the issue still wasn't fixed and more drastic action followed with the sides coming off again... After trying to work with the existing seats and supports I opted in the end to clear the decks between the front seat supports and start again. New supports and seat bases were created from 40 thou styrene and new side supports cut from 60 thou x 3.2mm Evergreen strip.


I started work on two new bulkheads, 10 thou styrene backed with 30 thou strip and sheet sections. The intention was that they would be thinner than the originals and align directly with the window dividing bars. I had made the window openings taller than the originals - too tall in fact as I had to reduce them along the top edge. However on offering them up into position I found that the outer supports, combined with the thickness of the sides, just looked too bulky.


So I had a bit of a rethink and the decision was made not to have a bulkhead but instead just a seat back. In a lazy mood I decided to use more Chivers seat back mouldings, "borrowing" these from a kit in the stash (you get one spare in each kit so I'll have to owe this kit one!), setting these in place with careful measurement against the sides and the window dividing bar location.

In front of the chassis can be seen the parts that will replace the top part of the bulkheads, cut from 40 thou styrene using the better of the old bulkheads as a template. The triangular pieces will re-enforce the joint with the sides and provide a greater gluing area.


The resin sides were then Araldited back in place and unlike the earlier attempts both were fixed in place at the same time and less clamping pressure applied - I realised that this may have contributed to the warp apparent in the original attempts. 

With the sides in place I them added the upper divider parts into place, again using Araldite, having carefully marked their position directly above the seat backs. The roof was used as a guide to get the height correct. With these parts set I then added new 60 x 40 thou dividers in the side windows, directly in line with the edges of the seat backs and looking a lot neater than their predecessors. Despite saying there would be no bulkhead I then added an upright of 40 x 40 thou styrene from the centre of the seat back up to the roof support to tie the two parts together.


I do not intend to glaze the new openings, I feel that the new arrangement here is a lot better than the original and certainly gives the central compartment a more airy feel than it had previously (in fact it had looked rather claustrophobic).

Work has now moved on to the roof - adding false roof supports on the underside. More soon...

Colin