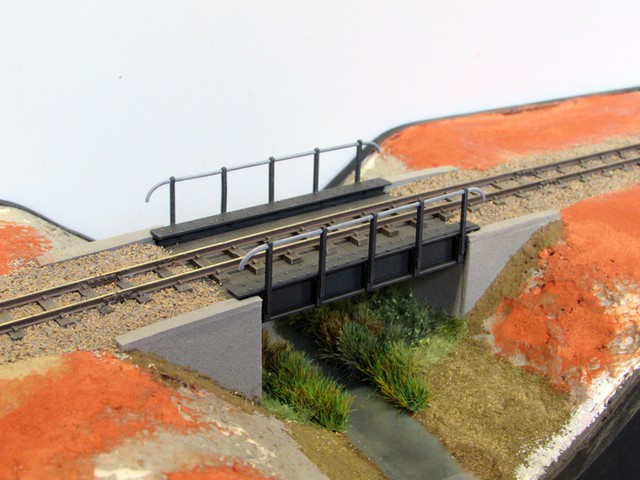
A few hours on Saturday morning saw the Beck Bridge diorama really come to life, with the fixing in place of the concrete fence and scenic treatment around it, plus various extra bits of plant life added to the scene. I am now at a point where I can consider it completed, but in no way finished as there are a few items to add that are still in the works.
The yellow flowers are MiniNature products whilst the red and purple ones are Noch/Gaugemaster laser cut examples, some of which were interesting to extract from the packaging in one piece and one particular plant end up being used in smaller pieces in several places, which has actually been quite effective. I've also experimented with the Peco brown grass tufts, cutting small sections off to add into the grass areas, then cutting them about a bit with nail scissors.
The static grass tufts have had a dry-brush with a grey-green colour to remove the shininess and tone the colour down a little and I've also used weathering powders to add some more tones to the ground cover, notably the track and ballast.
The eagle eyed will see that the fence hides another seaside attraction, the Model Village. The sign was manipulated from a photo found online, printed on photo paper and then sprayed with matt varnish. I then distressed the edges and corners to make it look like it was painted on plywood and de-laminating. The pile of junk in front is not secured in place and is just a test to see what works there, the area looks too empty without anything but I don't want to overcrowd it. Maybe a stack of new sleepers might do the trick?
Thoughts then turned to how to store the diorama and as I have tentatively said it will accompany 'The Old Quarry Line' for an appearance in July, it needs some form of box. Not wanting to go to the extent of a hardboard/timber cover I have opted for a cardboard box modified to suit, the idea being that it will then sit in a stacking crate. Having appropriated a cardboard box that a computer monitor was delivered in, I cut it down considerably in height and also cunningly reduced the length to that required to fit the diorama. Bubble wrap both protects the diorama and also makes a convenient way to actually remove it from the box!
There will now most likely be a short intermission in progress as I need to get a certain layout ready for the 7mm NGA show in Burton....
Colin
Railway modelling in 7mm scale on 9mm gauge track, representing 15" gauge miniature railways and 18" gauge industrial railways. (Plus anything else that I choose to include!)
Tuesday, 14 May 2019
Thursday, 9 May 2019
The Beck Bridge - Demanding Shrubbery
Bank holiday Monday saw me take a little time to devote to creating bushes. These use rubberised horsehair as the basis, teased out and shaped, then sprayed firstly with hairspray to make sure it was sticking together, then matt brown aerosols (Halfords and Humbrol) to give it a natural colouring. Foliage mats from both Woodland Scenics and Skale Scenics were then used as the initial covering, followed by a blend of finer scatter materials, using some of the same colours as used in the grass to maintain a degree of tonality.
The bushes have been positioned and stuck in place with plenty of PVA, aided by some strategic upright pieces of cocktail stick spray painted brown to blend in. At the far end space has been left for some fencing along the back edge. This will be the three panel length of concrete fencing initially put together for the micro-diorama created a month or so ago.
Studying the image above something was troubling me about the bushes and I realised that it was their neatness, as if they had just been neatly trimmed. I therefore opted to add some extra material sticking out from the basic shape of the bushes to add some extra texture. The extra material was created from sea foam (actually recycled from the winter diorama), sprayed with the same two shades of brown used on the horsehair and when dry sprayed with hairspray and the same scatter mix used on the the main parts of the bushes. Fixed in place with PVA they really make a difference.
In the back left corner of the scene I have added in a raspberry bush from the Tasma Products pack that I used on the Old Quarry Line. Although sold for HO/OO it has worked well in 7mm scale.
Of course, in the long run, this will all be in the background!
Colin
Saturday, 4 May 2019
The Beck Bridge - Grass Growing Everywhere!
Having worked steadily on this over the week the diorama now has a full covering of basic grassland created using hanging basket liner material. In the process of doing so I have created a step-by-step guide to using the material - 15 Years of Hanging Basket Liner Grass.
There's plenty more to add, I'm planning bushes and fencing along the rear edge plus there will be some laser cut and MiniNature flowers added as on the smaller diorama completed last month. It is certainly coming together well and a far cry from the cat food box!
In several areas I have used hairspray sprayed through simple newspaper masks to add extra texture using fine scatter material/ground foam scattered though a sieve. I have been careful to choose colours that blend well with the tone of the grass material. What is interesting is that I'm finding as I go through my ground foams etc I find more and more in shades of green that I do wonder why I bought them in the first place, is it dodgy exhibition lighting, or a change in my taste maybe?
Colin
Tuesday, 30 April 2019
The Beck Bridge - Covering Ground
I managed to sneak out to the workshop one evening during last week and get the basic ground cover in place over the whole diorama, as with the ballast this has a major effect on the visual aspect.
This ground cover uses my technique of a mix of emulsion paint/PVA/filler in a fetching shade of brown, painted on and whilst still wet a mix of very fine sand (as used on 'Shifting Sands') and Woodlands Scenics 'fine turf' scattered over from a fine sieve. This is tamped down in place, some sticks, some doesn't, which I feel adds greatly to the realism of the finish. You might spot that there are a few obvious joins with the material put down whilst treating the waterside areas, but they will be lost under the next layer of treatment.
In the front right corner I added some ballast into the ground cover, this area will be developed as a footpath which has seen occasional vehicle use.
A couple of hours over the weekend saw the edges of the Beck spring into life, I do sometimes feel that my lawn grows this fast...
As with the stretch under the bridge, Peco 10mm tuft strips in two colours have been mixed together, with the odd interception from the brown tufts. There are basically two strips of the tufts on either side but with a bit of variation so they don't look too straight and orderly! With the glue still drying on the tufts I added areas of hanging basket liner grass behind them and then left those areas to dry before pulling back the backing and gave them a trim. Some Woodland Scenics foliage was added directly behind the tall grass and then some MiniNature leaves on top of this. Some areas also benefited from some hairspray and scatter treatment, notably alongside the abutments. Most of the hanging basket liner grass here needs a little more attention, but that can wait until areas alongside are treated.
Having focused attention in the beck itself, you will be forgiven if you haven't noticed that I have added some of the Javis Autumn rough terrain matt alongside the edges of the ballast as on the recent smaller diorama.
Colin
Saturday, 27 April 2019
The Beck Bridge - Difference in a Day
Easter Sunday morning saw a major step forward in the Beck Bridge project. I'd like to say it was a carefully planned and choreographed event, but in the end I'm just glad that I manged to get everything in place in the right order! The aim was to get the track in place, but obviously that needs the bridge to be glued in place, which in turn needed the scenery underneath to be infilled, which needed the water to be satisfactory. You get the idea...
The evening before I had glued some sections of hanging basket liner grass in place along the abutments under the bridge and pulled this back to give some basic ground coverage. First job on Easter morning was to give this a trim, after that I could start to use the Peco Scene 10mm tufts and strips I had purchased for the purpose of creating long grass by the water. Using short lengths of two strips ('water meadow' and 'marshland') mixed with 'patch' tufts, I was able to get a good mix of colours along the waters edge. I also added in some Silfor tufts within the hanging basket liner area to get more colour variation.
The photo also highlights the modifications made to the Peco track prior to laying, adding in KB scale dummy rail joiners around fake joints in the rail, and painting and weathering. I sprayed everything with Halfords matt brown aerosol, then cleaned the rail heads, then sprayed towards the tops of the sleepers with Humbrol 29 spray (called dark brown but not that dark). Rail heads were cleaned again before the paint dried. Once glued in place with PVA I weathered the sleepers to represent worn timber and added a wash of Humbrol 160 red/brown over the rail sides.
Easter weekend being something of a warm one it was then too hot in the workshop to do any more, but the next morning I was able to add ballast to the track, a blend of Woodland Scenics fine buff and grey material. This was laid on dry, wetted with water and then fixed with Johnson's 'Kleer'. It is amazing how doing this suddenly brought the two halves of the scene together as one, I suppose it has hidden the last obvious join?
The bridge deck is un-ballasted, based on the treatment of the bridges on the now closed Markeaton Park railway in Derby. Getting the ballast to taper down took some care but I made sure there were a few stray lumps to make it look realistic!
Colin
Monday, 22 April 2019
The Beck Bridge - Terraform
After assembling the new diorama structure I filled a few gaps with filler and gave everything a coat of oil-based gloss varnish as a sealer. Once this was dry the side pieces were flatted back and then given two coats of matt black paint (this time water based). A third coat will be added right at the end of the build to make sure everything looks fresh.
Once the paint was dry the cat food box section was permanently glued in place and some flexible filler added around some of the edges where there was a bigger than expected gap. At the 'flat' end I then made every effort for it to be far from flat, infilling with a layer of 5,5mm foam core board, then balsa wood for the trackbed and more cat food box cardboard as the basis of the landscaping, carefully overlapping into the polystyrene of the original area..
Once the glue was dry on the cardboard I added DAS modelling clay to blend together the pieces and smooth the changes in levels. This included reworking over the polystyrene at the left hand end to ensure that there was an edge to ballast up against at a later stage.
Colin
Friday, 19 April 2019
The Beck Bridge - Supersize Me
With the cat food box sliced horizontally in Tectonic Shift, measurements were taken to allow the construction of a sturdy base for a larger diorama. As outlined in The Saga Continues, this takes the form of a plywood and timber structure very similar to that on 'The Headshunt'.
And underneath:
The length of the diorama is 14 inches, the same as 'The Headshunt', as that has proved to be a workable size for photography and storage. All materials are recycled, the plywood used as the edging coming from an old wardrobe, I've hidden the veneer on the inside as it is the only downside to using the material as it splinters when cut. the other side, used outwards, cleans up very nicely for painting. With the existing diorama and bridge in place an impression of how it will develop can be gained.
The remains of the cat food box are a very tight fit, having foreseen this two pencil-sized holes have been provided to allow it to be pushed out!
In due course the cat food box will be glued in place, but not before the outer frame has been painted.
Colin
And underneath:
The length of the diorama is 14 inches, the same as 'The Headshunt', as that has proved to be a workable size for photography and storage. All materials are recycled, the plywood used as the edging coming from an old wardrobe, I've hidden the veneer on the inside as it is the only downside to using the material as it splinters when cut. the other side, used outwards, cleans up very nicely for painting. With the existing diorama and bridge in place an impression of how it will develop can be gained.
The remains of the cat food box are a very tight fit, having foreseen this two pencil-sized holes have been provided to allow it to be pushed out!
In due course the cat food box will be glued in place, but not before the outer frame has been painted.
Colin
Subscribe to:
Posts (Atom)